Panasonic DMREZ485V Dvd Recorder - English/spanish - Page 40
Linked Operations with the TV(VIERA Link “HDAVI Control
 |
View all Panasonic DMREZ485V manuals
Add to My Manuals
Save this manual to your list of manuals |
Page 40 highlights
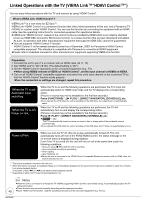
Linked Operations with the TV (VIERA Link TM "HDAVI Control TM") You can enjoy linked operations with the TV and receiver by using "HDAVI Control". What is VIERA Link "HDAVI Control"? VIERA LinkTM is a new name for EZ SyncTM. VIERA Link "HDAVI Control" is a convenient function that offers linked operations of this unit, and a Panasonic TV (VIERA) or receiver under "HDAVI Control". You can use this function by connecting the equipment with an HDMI cable. See the operating instructions for connected equipment for operational details. VIERA Link "HDAVI Control", based on the control functions provided by HDMI which is an industry standard known as HDMI CEC (Consumer Electronics Control), is a unique function that we have developed and added. As such, its operation with other manufacturers' equipment that supports HDMI CEC cannot be guaranteed. This unit supports "HDAVI Control 3" function. "HDAVI Control 3" is the newest standard (current as of December, 2007) for Panasonic's HDAVI Control compatible equipment. This standard is compatible with Panasonic's conventional HDAVI equipment. Please refer to individual manuals for other manufacturers' equipment supporting VIERA Link function. Preparation 1. Connect this unit to your TV or receiver with an HDMI cable ( 11, 72). 2. Set "VIERA Link" to "On" ( 66). (The default setting is "On".) 3. Set the "HDAVI Control" operations on the connected equipment (e.g., TV). When using HDMI2 terminal of VIERA as "HDAVI Control", set the input channel to HDMI2 on VIERA. 4. Turn on all "HDAVI Control" compatible equipment and select this unit's input channel on the connected TV so that the "HDAVI Control" function works properly. When the connection or settings are changed, repeat this procedure. (When the TV is on) Automatic input switching (When the TV is off) Power on link When the TV is on and the following operations are performed, the TV's input will automatically switch to HDMI input mode and the TV displays the corresponding action. (Picture or sound may not be available for the first few seconds.) Press [FUNCTIONS]1, [PLAY]2, [DIRECT NAVIGATOR], [SCHEDULE], etc. If you operate the VHS when the unit is recording on the DVD drive, the output does not automatically switch. When the TV is off and the following operations are performed, the TV will automatically turn on and display the corresponding action. (Picture or sound may not be available for the first few seconds.) Press [PLAY]2, [DIRECT NAVIGATOR], [SCHEDULE], etc. [DVD-V]3, etc. The TV is automatically turned on when you insert a disc or a tape without the accidental erasure prevention tab. If you operate the VHS when the unit is recording on the DVD drive, the TV does not automatically turn on. Power off link When you turn the TV off, this unit is also automatically turned off. This unit automatically turns off even if the FUNCTIONS screen, the status message or the on-screen menu is displayed during playback. Even if the TV is turned off, this unit will not turn off at the same time under the following conditions: - when you press [ REC] and this unit is recording - when scheduled recording is proceeding - when copying - when finalizing, etc. When this unit is connected to an "HDAVI Control" compatible Panasonic receiver with an HDMI cable, the receiver will also turn off. 1 This button is available only when this unit is on. 2 When this button is pressed, the playback image is not immediately displayed on the screen and it may not be possible to watch the contents from where playback started. In this case, press [] or [] to go back to where playback started. 3 Depending on discs, the TV may not automatically turn on. Notes When this unit is connected to a Panasonic TV (VIERA) supporting HDAVI Control 3 and initially set up, it automatically acquires the TV setting information. These functions may not work normally depending on the equipment condition. 40 About "HDAVI Control" function, read the operating instructions of the connected equipment (e.g., TV) too. RQT9056
-
 1
1 -
2
-
3
-
4
-
5
-
6
-
7
-
8
-
9
-
10
-
11
-
12
-
13
-
14
-
15
-
16
-
17
-
18
-
19
-
20
-
21
-
22
-
23
-
24
-
25
-
26
-
27
-
28
-
29
-
30
-
31
-
32
-
33
-
34
-
 35
35 -
 36
36 -
 37
37 -
 38
38 -
 39
39 -
 40
40 -
 41
41 -
 42
42 -
 43
43 -
 44
44 -
 45
45 -
46
-
47
-
48
-
49
-
50
-
51
-
52
-
53
-
54
-
55
-
56
-
57
-
58
-
59
-
60
-
61
-
62
-
63
-
64
-
65
-
66
-
67
-
68
-
69
-
70
-
71
-
72
-
73
-
74
-
75
-
76
-
77
-
78
-
79
-
80
-
81
-
82
-
83
-
84
-
85
-
86
-
87
-
88
-
89
-
90
-
91
-
92
-
93
-
94
-
95
-
96
-
97
-
98
-
99
-
100
 |
 |