Panasonic DMREZ485V Dvd Recorder - English/spanish - Page 72
Using an Audio Cable for Better Sound, Using an Optical Digital Audio Cable - dvd recorder dmr ez485v
 |
View all Panasonic DMREZ485V manuals
Add to My Manuals
Save this manual to your list of manuals |
Page 72 highlights
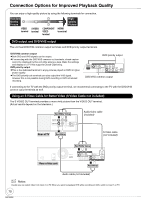
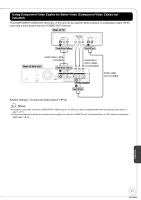
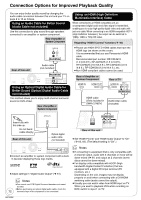
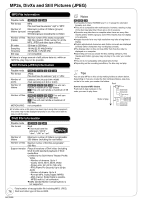
Connection Options for Improved Playback Quality You can enjoy better quality sound by changing the audio cable connection between this unit and your TV on page 8 to 10 as follows. Using an Audio Cable for Better Sound (Audio Cable not included) Use this connection to play sound through speakers connected to an amplifier or system component. Rear of Amplifier or System Component Using an HDMI (High Definition Multimedia Interface) Cable When connected to an HDMI compatible unit, an uncompressed digital audio and video signal is transmitted, enabling you to enjoy high quality digital video and audio with just one cable. When connecting to an HDMI-compatible HDTV (High Definition Television), the output can be switched to 1080p, 1080i or 720p HD video. Regarding "HDAVI Control" function ( 40) AUDIO IN RL Red White Rear of this unit Audio cable (not included) Red White RF IN RF OUT AC IN DVD/VHS COMMON OUT R-AUDIO-L VIDEO S COMPONENT VIDEO OUT Y PB PR S VIDEO R-AUDIO -L VIDEO IN1 R-AUDIO-L VIDEO R-AUDIO-L VIDEO DVD PDRVDIOPRRIORITITYYOUOTUT DIGITAL AUDIO OUT (PCM/BITSTREAM) Using an Optical Digital Audio Cable for Better Sound (Optical Digital Audio Cable not included) This method allows you to enjoy multi-channel surround sound on DVD-Video. Rear of Amplifier or System Component Please use HIGH SPEED HDMI cables that have the HDMI logo (as shown on the cover). It is recommended that you use Panasonic's HDMI cable. Recommended part number: RP-CDHG10 (1.0 m/3.3 ft.), RP-CDHG15 (1.5 m/4.9 ft.), RP-CDHG20 (2.0 m/6.6 ft.), RP-CDHG30 (3.0 m /9.8 ft.), RP-CDHG50 (5.0 m/16.4 ft.), etc. Non-HDMI-compliant cables cannot be used. Rear of Amplifier or System Component HDMI IN HDMI OUT Rear of TV HDMI IN INPUT 1 AUDIO IN VIDEO Red White Yellow HDMI cable (Only included in DMR-EZ485V) Audio/video cable (included) Insert fully with this side up. Do not bend cable sharply. Rear of this unit OPTICAL IN Optical digital audio cable (not included) Red White Yellow AV OUT Rear of this unit DVD/VHS COMMON OUT R-AUDIO-L VIDEO COMPONENT VIDEO OUT Y PB PR S VIDEO S VIDEO R-AUDIO -L VIDEO IN1 R-AUDIO-L VIDEO DVD PRIORITY OUT OPTICAL DIGITAL AUDIO O (PCM/BITSTREA Set "HDMI Priority" and "HDMI Audio Output" to "On" ( 65, 66). (The default setting is "On".) RF IN RF OUT AC IN DVD/VHS COMMON OUT R-AUDIO-L VIDEO S VIDEO COMPONENT VIDEO OUT Y PB PR S OVIDPETOICAL R-AUDIO -L VIDEO IN1 R-AUDIO-L VIDEO DVD PRIORITY OUT DIGIOTPATLICAALUDIO OUT (PCMD/IGBITIATL SAUTDIRO OEUAT M) (PCM/BITSTREAM) Connect an amplifier or system component with a builtin decoder displaying these logo marks. Adjust settings in "Digital Audio Output" ( 61). Notes You cannot use DTS Digital Surround decoders not meant for DVD. Before purchasing an optical digital audio cable, check the 72 terminal shape of the equipment to be connected. Notes If connecting to equipment that is only compatible with 2 channel output, audio with 3 channels or more will be down-mixed ( 91) and output as 2 channels (some discs cannot be down-mixed). For display units compatible with HDCP (High bandwidth Digital Content Protection) that are equipped with a digital DVI input terminal (PC monitors, etc.): Depending on the unit, images may not display properly or at all when connecting with a DVI/HDMI switching cable (audio cannot be output). Usually you can watch video from HDMI input on TV. When you want to playback VHS while recording on DVD, switch to input 1 on TV. RQT9056
-
 1
1 -
2
-
3
-
4
-
5
-
6
-
7
-
8
-
9
-
10
-
11
-
12
-
13
-
14
-
15
-
16
-
17
-
18
-
19
-
20
-
21
-
22
-
23
-
24
-
25
-
26
-
27
-
28
-
29
-
30
-
31
-
32
-
33
-
34
-
35
-
36
-
37
-
38
-
39
-
40
-
41
-
42
-
43
-
44
-
45
-
46
-
47
-
48
-
49
-
50
-
51
-
52
-
53
-
54
-
55
-
56
-
57
-
58
-
59
-
60
-
61
-
62
-
63
-
64
-
65
-
66
-
 67
67 -
 68
68 -
 69
69 -
 70
70 -
 71
71 -
 72
72 -
 73
73 -
 74
74 -
 75
75 -
 76
76 -
 77
77 -
78
-
79
-
80
-
81
-
82
-
83
-
84
-
85
-
86
-
87
-
88
-
89
-
90
-
91
-
92
-
93
-
94
-
95
-
96
-
97
-
98
-
99
-
100
 |
 |
