Pioneer AVIC-X920BT Owner's Manual - Page 28
Scrolling the map to the, position you want to see, Setting
 |
UPC - 884938104241
View all Pioneer AVIC-X920BT manuals
Add to My Manuals
Save this manual to your list of manuals |
Page 28 highlights
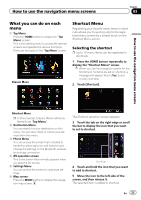
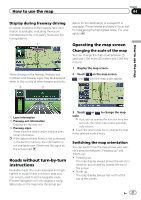
Chapter 04 How to use the map p The map orientation is fixed at "North up" when the map scale is 25 miles (50 kilometers) or more. p The map orientation is fixed at "Heading up" when the 3D map screen is displayed. 1 Display the map screen. 2 Touch on the map screen. or appears. screen, with street name and other information for this location being shown. (The information shown varies depending on the position.) p The scrolling increment depends on your dragging length. # Touch . The map returns to the current position. p Pressing MODE button returns the map to the current position. 3 Touch or to switch the vehicle's direction. Each time you touch the key changes that setting. p If you do not operate the function for a few seconds, the initial map screen automatically returns. Scrolling the map to the position you want to see 1 Display the map screen. 2 Touch and drag the map in the desired direction to scroll. Setting the "Quick Access" menu "Quick Access" menu allows you to perform various tasks, such as route calculation for the location indicated by the cursor or registering a location in [Favorites], faster than using the navigation menu. You can customize "Quick Access" displayed on screen. The "Quick Access" described here are prepared as the default setting. = For details, refer to Selecting the "Quick Ac- cess" menu on page 160. p Items marked with an asterisk (*) cannot be removed from the Quick Access menu. % When the map is displayed, touch . 1 2 1 Cursor 2 Distance from the current position Positioning the cursor to the desired location results in a brief informational overview about the location being displayed at the bottom of Quick Access menu : Route Options* Displayed when the map is not scrolled. This item can be selected only during route guidance. You can modify the conditions for route calculation and recalculate the current route. = For details, refer to Modifying the route calculation conditions on page 42. : Destination* 28 En
-
 1
1 -
2
-
3
-
4
-
5
-
6
-
7
-
8
-
9
-
10
-
11
-
12
-
13
-
14
-
15
-
16
-
17
-
18
-
19
-
20
-
21
-
22
-
 23
23 -
 24
24 -
 25
25 -
 26
26 -
 27
27 -
 28
28 -
 29
29 -
 30
30 -
 31
31 -
 32
32 -
 33
33 -
34
-
35
-
36
-
37
-
38
-
39
-
40
-
41
-
42
-
43
-
44
-
45
-
46
-
47
-
48
-
49
-
50
-
51
-
52
-
53
-
54
-
55
-
56
-
57
-
58
-
59
-
60
-
61
-
62
-
63
-
64
-
65
-
66
-
67
-
68
-
69
-
70
-
71
-
72
-
73
-
74
-
75
-
76
-
77
-
78
-
79
-
80
-
81
-
82
-
83
-
84
-
85
-
86
-
87
-
88
-
89
-
90
-
91
-
92
-
93
-
94
-
95
-
96
-
97
-
98
-
99
-
100
-
101
-
102
-
103
-
104
-
105
-
106
-
107
-
108
-
109
-
110
-
111
-
112
-
113
-
114
-
115
-
116
-
117
-
118
-
119
-
120
-
121
-
122
-
123
-
124
-
125
-
126
-
127
-
128
-
129
-
130
-
131
-
132
-
133
-
134
-
135
-
136
-
137
-
138
-
139
-
140
-
141
-
142
-
143
-
144
-
145
-
146
-
147
-
148
-
149
-
150
-
151
-
152
-
153
-
154
-
155
-
156
-
157
-
158
-
159
-
160
-
161
-
162
-
163
-
164
-
165
-
166
-
167
-
168
-
169
-
170
-
171
-
172
-
173
-
174
-
175
-
176
-
177
-
178
-
179
-
180
-
181
-
182
-
183
-
184
-
185
-
186
-
187
-
188
-
189
-
190
-
191
-
192
-
193
-
194
-
195
-
196
-
197
-
198
-
199
-
200
-
201
-
202
-
203
-
204
-
205
-
206
-
207
-
208
-
209
-
210
-
211
-
212
-
213
-
214
-
215
-
216
-
217
-
218
-
219
-
220
-
221
-
222
-
223
-
224
-
225
-
226
-
227
-
228
 |
 |
