Pioneer AVIC-X920BT Owner's Manual - Page 29
Switching the view mode, How to use the map
 |
UPC - 884938104241
View all Pioneer AVIC-X920BT manuals
Add to My Manuals
Save this manual to your list of manuals |
Page 29 highlights
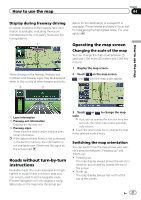
How to use the map Chapter 04 How to use the map Displayed when the map is scrolled. Set the route to the place specified with the cursor. : Registration Register information on the location indicated by the cursor to "Favorites". = For details, refer to Registering a location by scroll mode on page 46. : Vicinity Search Find POIs (Points Of Interest) in the vicinity of the cursor. = For details, refer to Searching for a nearby POI on page 37. : Overlay POI Displays icons for surrounding facilities (POI) on the map. = For details, refer to Displaying POI on the map on page 157. : Volume Displays the "Volume Settings" screen. = For details, refer to Setting the Volume for Guidance and Phone on page 163. : Contacts Displays the "Contacts List" screen. = For details, refer to Calling a number in the "Contacts List" on page 69. Close Hides the Quick Access menu. ! 3D View: Displays a map with an antenna view (3D map). ! Street View: Information on the next four guidance points closest to the current location appear in order from top to bottom on the left side of the screen. The following information is displayed. Switching the view mode Various types of screen displays can be selected for navigation guidance. 1 Display the "Map Settings" screen. = For details, refer to Displaying the "Map Settings" screen on page 154. 2 Touch [View Mode]. The "View Mode" screen appears. 3 Touch the type that you want to set. You can select the following types: ! 2D View (default): Displays a normal map (2D map). - Name of the next route to be taken by the vehicle - Arrow indicating the direction of the vehicle - Distance to the guidance points p This mode is available when the route is set. ! Rear View: Displays the rear view image on the left side of the screen and the map on the right side of the screen. En 29
-
 1
1 -
2
-
3
-
4
-
5
-
6
-
7
-
8
-
9
-
10
-
11
-
12
-
13
-
14
-
15
-
16
-
17
-
18
-
19
-
20
-
21
-
22
-
23
-
 24
24 -
 25
25 -
 26
26 -
 27
27 -
 28
28 -
 29
29 -
 30
30 -
 31
31 -
 32
32 -
 33
33 -
 34
34 -
35
-
36
-
37
-
38
-
39
-
40
-
41
-
42
-
43
-
44
-
45
-
46
-
47
-
48
-
49
-
50
-
51
-
52
-
53
-
54
-
55
-
56
-
57
-
58
-
59
-
60
-
61
-
62
-
63
-
64
-
65
-
66
-
67
-
68
-
69
-
70
-
71
-
72
-
73
-
74
-
75
-
76
-
77
-
78
-
79
-
80
-
81
-
82
-
83
-
84
-
85
-
86
-
87
-
88
-
89
-
90
-
91
-
92
-
93
-
94
-
95
-
96
-
97
-
98
-
99
-
100
-
101
-
102
-
103
-
104
-
105
-
106
-
107
-
108
-
109
-
110
-
111
-
112
-
113
-
114
-
115
-
116
-
117
-
118
-
119
-
120
-
121
-
122
-
123
-
124
-
125
-
126
-
127
-
128
-
129
-
130
-
131
-
132
-
133
-
134
-
135
-
136
-
137
-
138
-
139
-
140
-
141
-
142
-
143
-
144
-
145
-
146
-
147
-
148
-
149
-
150
-
151
-
152
-
153
-
154
-
155
-
156
-
157
-
158
-
159
-
160
-
161
-
162
-
163
-
164
-
165
-
166
-
167
-
168
-
169
-
170
-
171
-
172
-
173
-
174
-
175
-
176
-
177
-
178
-
179
-
180
-
181
-
182
-
183
-
184
-
185
-
186
-
187
-
188
-
189
-
190
-
191
-
192
-
193
-
194
-
195
-
196
-
197
-
198
-
199
-
200
-
201
-
202
-
203
-
204
-
205
-
206
-
207
-
208
-
209
-
210
-
211
-
212
-
213
-
214
-
215
-
216
-
217
-
218
-
219
-
220
-
221
-
222
-
223
-
224
-
225
-
226
-
227
-
228
 |
 |
