Ricoh GR Digital User Guide - Page 125
Using the SETUP Menu
 |
UPC - 026649732430
View all Ricoh GR Digital manuals
Add to My Manuals
Save this manual to your list of manuals |
Page 125 highlights
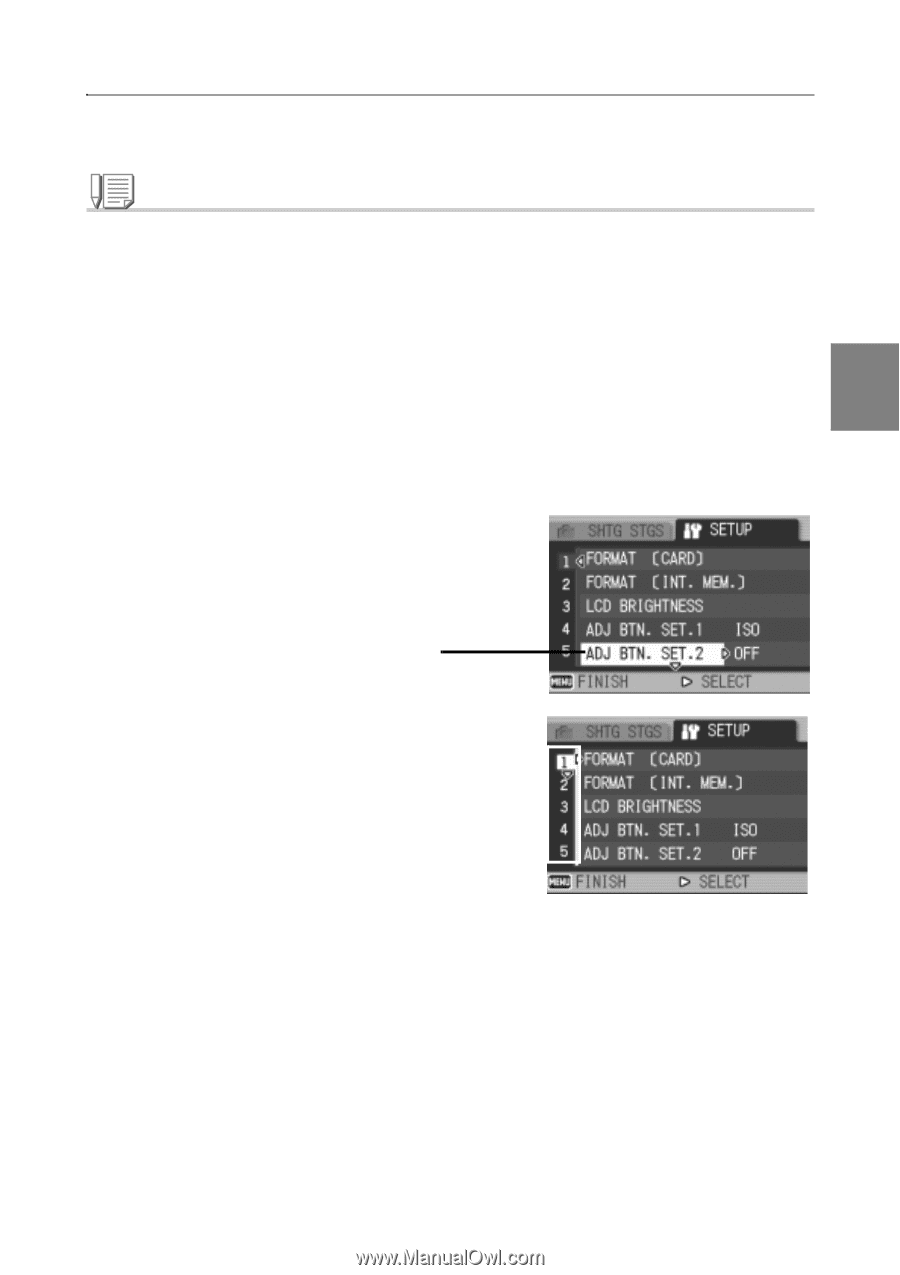
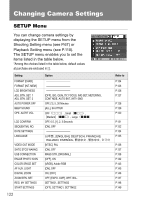
Using the SETUP Menu To display and use the Setup menu, follow the steps below. Note For some functions, the choice selection method may not be as explained here. For detailed operation, see the explanation of each function. 1. Press the M/O button. The Shooting Setting menu (or the Playback menu) appears. 2. Press the $ button. 3 The setup menu appears. 3. Press the !" buttons to select the desired setting. The setting items are provided on 5 screens. Changing Camera Settings When the " button is pressed at the bottom item, the next screen appears. To select a screen by screen number: 1. Press the # button to select a screen number on the left of the screen. 2. With the screen number selectable, press the !" buttons to switch between screens. 3. After selecting the screen, press the $ button to return to the setting item selection step. 4. After selecting a setting item, press the $ button. Choices for the setting item are displayed. 5. Press the !" buttons to select a choice. 6. Press the M/O or # button. 7. If you pressed the # button in step 6, press also the M/ O button. The menu disappears and the camera becomes ready for shooting and playing back. 123
-
 1
1 -
2
-
3
-
4
-
5
-
6
-
7
-
8
-
9
-
10
-
11
-
12
-
13
-
14
-
15
-
16
-
17
-
18
-
19
-
20
-
21
-
22
-
23
-
24
-
25
-
26
-
27
-
28
-
29
-
30
-
31
-
32
-
33
-
34
-
35
-
36
-
37
-
38
-
39
-
40
-
41
-
42
-
43
-
44
-
45
-
46
-
47
-
48
-
49
-
50
-
51
-
52
-
53
-
54
-
55
-
56
-
57
-
58
-
59
-
60
-
61
-
62
-
63
-
64
-
65
-
66
-
67
-
68
-
69
-
70
-
71
-
72
-
73
-
74
-
75
-
76
-
77
-
78
-
79
-
80
-
81
-
82
-
83
-
84
-
85
-
86
-
87
-
88
-
89
-
90
-
91
-
92
-
93
-
94
-
95
-
96
-
97
-
98
-
99
-
100
-
101
-
102
-
103
-
104
-
105
-
106
-
107
-
108
-
109
-
110
-
111
-
112
-
113
-
114
-
115
-
116
-
117
-
118
-
119
-
 120
120 -
 121
121 -
 122
122 -
 123
123 -
 124
124 -
 125
125 -
 126
126 -
 127
127 -
 128
128 -
 129
129 -
 130
130 -
131
-
132
-
133
-
134
-
135
-
136
-
137
-
138
-
139
-
140
-
141
-
142
-
143
-
144
-
145
-
146
-
147
-
148
-
149
-
150
-
151
-
152
-
153
-
154
-
155
-
156
-
157
-
158
-
159
-
160
-
161
-
162
-
163
-
164
-
165
-
166
-
167
-
168
-
169
-
170
-
171
-
172
-
173
-
174
-
175
-
176
-
177
-
178
-
179
-
180
-
181
-
182
-
183
-
184
-
185
-
186
-
187
-
188
-
189
-
190
-
191
-
192
-
193
-
194
-
195
-
196
-
197
-
198
-
199
-
200
-
201
-
202
-
203
-
204
 |
 |