Ricoh GR Digital User Guide - Page 91
Setting the White Balance Manually Manual Setting
 |
UPC - 026649732430
View all Ricoh GR Digital manuals
Add to My Manuals
Save this manual to your list of manuals |
Page 91 highlights
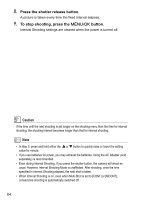
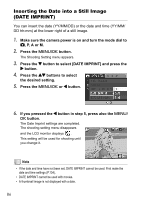
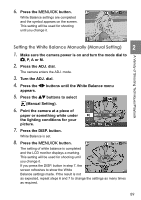
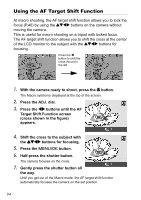
6. Press the M/O button. White Balance settings are completed and the symbol appears on the screen. This setting will be used for shooting until you change it. A Variety of Shooting Techniques/Playback Setting the White Balance Manually (Manual Setting) 2 1. Make sure the camera power is on and turn the mode dial to 5, P, A or M. 2. Press the ADJ. dial. The camera enters the ADJ. mode. 3. Turn the ADJ. dial. 4. Press the #$ buttons until the White Balance menu appears. 5. Press the !" buttons to select (Manual Setting). 6. Point the camera at a piece of paper or something white under the lighting conditions for your picture. 7. Press the DISP. button. White Balance is set. 8. Press the M/O button. The setting of white balance is completed and the LCD monitor displays a marking. This setting will be used for shooting until you change it. If you press the DISP. button in step 7, the screen refreshes to show the White Balance settings made. If the result is not as expected, repeat steps 6 and 7 to change the settings as many times as required. 89
-
 1
1 -
2
-
3
-
4
-
5
-
6
-
7
-
8
-
9
-
10
-
11
-
12
-
13
-
14
-
15
-
16
-
17
-
18
-
19
-
20
-
21
-
22
-
23
-
24
-
25
-
26
-
27
-
28
-
29
-
30
-
31
-
32
-
33
-
34
-
35
-
36
-
37
-
38
-
39
-
40
-
41
-
42
-
43
-
44
-
45
-
46
-
47
-
48
-
49
-
50
-
51
-
52
-
53
-
54
-
55
-
56
-
57
-
58
-
59
-
60
-
61
-
62
-
63
-
64
-
65
-
66
-
67
-
68
-
69
-
70
-
71
-
72
-
73
-
74
-
75
-
76
-
77
-
78
-
79
-
80
-
81
-
82
-
83
-
84
-
85
-
 86
86 -
 87
87 -
 88
88 -
 89
89 -
 90
90 -
 91
91 -
 92
92 -
 93
93 -
 94
94 -
 95
95 -
 96
96 -
97
-
98
-
99
-
100
-
101
-
102
-
103
-
104
-
105
-
106
-
107
-
108
-
109
-
110
-
111
-
112
-
113
-
114
-
115
-
116
-
117
-
118
-
119
-
120
-
121
-
122
-
123
-
124
-
125
-
126
-
127
-
128
-
129
-
130
-
131
-
132
-
133
-
134
-
135
-
136
-
137
-
138
-
139
-
140
-
141
-
142
-
143
-
144
-
145
-
146
-
147
-
148
-
149
-
150
-
151
-
152
-
153
-
154
-
155
-
156
-
157
-
158
-
159
-
160
-
161
-
162
-
163
-
164
-
165
-
166
-
167
-
168
-
169
-
170
-
171
-
172
-
173
-
174
-
175
-
176
-
177
-
178
-
179
-
180
-
181
-
182
-
183
-
184
-
185
-
186
-
187
-
188
-
189
-
190
-
191
-
192
-
193
-
194
-
195
-
196
-
197
-
198
-
199
-
200
-
201
-
202
-
203
-
204
 |
 |
