Ricoh GR Digital User Guide - Page 98
Shooting with the Aperture Set, Aperture Priority Mode
 |
UPC - 026649732430
View all Ricoh GR Digital manuals
Add to My Manuals
Save this manual to your list of manuals |
Page 98 highlights
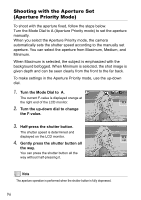
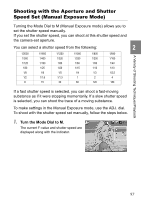
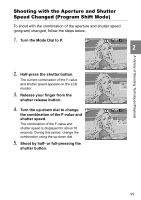
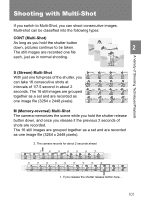
Shooting with the Aperture Set (Aperture Priority Mode) To shoot with the aperture fixed, follow the steps below. Turn the Mode Dial to A (Aperture Priority mode) to set the aperture manually. When you select the Aperture Priority mode, the camera automatically sets the shutter speed according to the manually set aperture. You can select the aperture from Maximum, Medium, and Minimum. When Maximum is selected, the subject is emphasized with the background befogged. When Minimum is selected, the shot image is given depth and can be seen clearly from the front to the far back. To make settings in the Aperture Priority mode, use the up-down dial. 1. Turn the Mode Dial to A. The current F-value is displayed orange at the right end of the LCD monitor. 2. Turn the up-down dial to change the F-value. 3. Half-press the shutter button. The shutter speed is determined and displayed on the LCD monitor. 4. Gently press the shutter button all the way. You can press the shutter button all the way without half-pressing it. Note The aperture operation is performed when the shutter button is fully depressed. 96
-
 1
1 -
2
-
3
-
4
-
5
-
6
-
7
-
8
-
9
-
10
-
11
-
12
-
13
-
14
-
15
-
16
-
17
-
18
-
19
-
20
-
21
-
22
-
23
-
24
-
25
-
26
-
27
-
28
-
29
-
30
-
31
-
32
-
33
-
34
-
35
-
36
-
37
-
38
-
39
-
40
-
41
-
42
-
43
-
44
-
45
-
46
-
47
-
48
-
49
-
50
-
51
-
52
-
53
-
54
-
55
-
56
-
57
-
58
-
59
-
60
-
61
-
62
-
63
-
64
-
65
-
66
-
67
-
68
-
69
-
70
-
71
-
72
-
73
-
74
-
75
-
76
-
77
-
78
-
79
-
80
-
81
-
82
-
83
-
84
-
85
-
86
-
87
-
88
-
89
-
90
-
91
-
92
-
 93
93 -
 94
94 -
 95
95 -
 96
96 -
 97
97 -
 98
98 -
 99
99 -
 100
100 -
 101
101 -
 102
102 -
 103
103 -
104
-
105
-
106
-
107
-
108
-
109
-
110
-
111
-
112
-
113
-
114
-
115
-
116
-
117
-
118
-
119
-
120
-
121
-
122
-
123
-
124
-
125
-
126
-
127
-
128
-
129
-
130
-
131
-
132
-
133
-
134
-
135
-
136
-
137
-
138
-
139
-
140
-
141
-
142
-
143
-
144
-
145
-
146
-
147
-
148
-
149
-
150
-
151
-
152
-
153
-
154
-
155
-
156
-
157
-
158
-
159
-
160
-
161
-
162
-
163
-
164
-
165
-
166
-
167
-
168
-
169
-
170
-
171
-
172
-
173
-
174
-
175
-
176
-
177
-
178
-
179
-
180
-
181
-
182
-
183
-
184
-
185
-
186
-
187
-
188
-
189
-
190
-
191
-
192
-
193
-
194
-
195
-
196
-
197
-
198
-
199
-
200
-
201
-
202
-
203
-
204
 |
 |