Ricoh GR Digital User Guide - Page 50
Playing Back - 4 review
 |
UPC - 026649732430
View all Ricoh GR Digital manuals
Add to My Manuals
Save this manual to your list of manuals |
Page 50 highlights
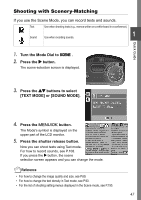
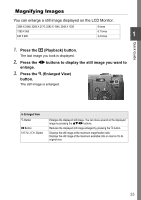
Playing Back Checking the image you just took (Quick Review) You can view the image you just took on the LCD monitor. If you are not pleased with the way the photo came out, you can erase it then and there. 1. While still in the Still Image Mode, press the Q (Quick Review) button. The last image you took is displayed on the LCD monitor. In Quick Review Q Button Returns to Shooting Mode. 8 Button Enlarges the displayed still image. You can move around on the displayed image by pressing the !"#$ buttons. 9 Button Reduces the displayed still image enlarged by pressing the 8 button. M/O Button Displays the still image at the maximum available ratio by pressing the 8 button. When displayed for the maximum size, it returns to a whole display. D Button Deletes the currently displayed file. When the D button is pressed, a warning message about deleting the file appears. Select [DELETE] and press the M/O button. Note • Once the power is turned off, the image you took cannot be displayed in the still image mode even if you press the Q button. • If you use Quick Review to view the image taken in Text mode (see P.47), the displayed image may have slightly lower quality than the recorded one. 48
-
 1
1 -
2
-
3
-
4
-
5
-
6
-
7
-
8
-
9
-
10
-
11
-
12
-
13
-
14
-
15
-
16
-
17
-
18
-
19
-
20
-
21
-
22
-
23
-
24
-
25
-
26
-
27
-
28
-
29
-
30
-
31
-
32
-
33
-
34
-
35
-
36
-
37
-
38
-
39
-
40
-
41
-
42
-
43
-
44
-
 45
45 -
 46
46 -
 47
47 -
 48
48 -
 49
49 -
 50
50 -
 51
51 -
 52
52 -
 53
53 -
 54
54 -
 55
55 -
56
-
57
-
58
-
59
-
60
-
61
-
62
-
63
-
64
-
65
-
66
-
67
-
68
-
69
-
70
-
71
-
72
-
73
-
74
-
75
-
76
-
77
-
78
-
79
-
80
-
81
-
82
-
83
-
84
-
85
-
86
-
87
-
88
-
89
-
90
-
91
-
92
-
93
-
94
-
95
-
96
-
97
-
98
-
99
-
100
-
101
-
102
-
103
-
104
-
105
-
106
-
107
-
108
-
109
-
110
-
111
-
112
-
113
-
114
-
115
-
116
-
117
-
118
-
119
-
120
-
121
-
122
-
123
-
124
-
125
-
126
-
127
-
128
-
129
-
130
-
131
-
132
-
133
-
134
-
135
-
136
-
137
-
138
-
139
-
140
-
141
-
142
-
143
-
144
-
145
-
146
-
147
-
148
-
149
-
150
-
151
-
152
-
153
-
154
-
155
-
156
-
157
-
158
-
159
-
160
-
161
-
162
-
163
-
164
-
165
-
166
-
167
-
168
-
169
-
170
-
171
-
172
-
173
-
174
-
175
-
176
-
177
-
178
-
179
-
180
-
181
-
182
-
183
-
184
-
185
-
186
-
187
-
188
-
189
-
190
-
191
-
192
-
193
-
194
-
195
-
196
-
197
-
198
-
199
-
200
-
201
-
202
-
203
-
204
 |
 |
