Ricoh GR Digital User Guide - Page 129
Setting a Function to the ADJ. dial, ADJ BTN.SET. 1/2
 |
UPC - 026649732430
View all Ricoh GR Digital manuals
Add to My Manuals
Save this manual to your list of manuals |
Page 129 highlights
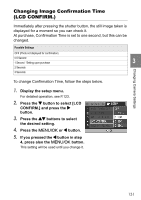
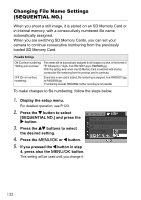
Changing Camera Settings Setting a Function to the ADJ. dial (ADJ BTN.SET. 1/2) The ADJ. dial allows you to display the exposure correction screen and whitebalance setting screen with fewer button operations. Functions that can be displayed by pressing the ADJ. dial can be assigned to [ADJ. BTN. SET. 1] and [ADJ. BTN. SET. 2]. Possible Settings OFF *Setting 2 upon purchase ISO *Setting 1 upon purchase QUALITY (PIC/QUALITY) FOCUS IMG SET METERING AUTO BKT CONT MDE WITH SND (Refer to) - P.91 P.69 3 P.74 P.78 P.77 P.80 P.101 P.85 To assign a function to either [ADJ. BTN. SET. 1] or [ADJ. BTN. SET. 2], follow the steps below. 1. Display the setup menu. For detailed operation, see P.123. 2. Press the " button to select [ADJ. BTN. SET. 1] or [ADJ. BTN. SET. 2], and press the $ button then. 3. Press the !" buttons to select the desired setting. 4. Press the M/O or # button. 5. If you pressed the # button in step 4, press also the M/O button. This setting will be used until you change it. Reference For how to use the ADJ. dial, see P.65. 127
-
 1
1 -
2
-
3
-
4
-
5
-
6
-
7
-
8
-
9
-
10
-
11
-
12
-
13
-
14
-
15
-
16
-
17
-
18
-
19
-
20
-
21
-
22
-
23
-
24
-
25
-
26
-
27
-
28
-
29
-
30
-
31
-
32
-
33
-
34
-
35
-
36
-
37
-
38
-
39
-
40
-
41
-
42
-
43
-
44
-
45
-
46
-
47
-
48
-
49
-
50
-
51
-
52
-
53
-
54
-
55
-
56
-
57
-
58
-
59
-
60
-
61
-
62
-
63
-
64
-
65
-
66
-
67
-
68
-
69
-
70
-
71
-
72
-
73
-
74
-
75
-
76
-
77
-
78
-
79
-
80
-
81
-
82
-
83
-
84
-
85
-
86
-
87
-
88
-
89
-
90
-
91
-
92
-
93
-
94
-
95
-
96
-
97
-
98
-
99
-
100
-
101
-
102
-
103
-
104
-
105
-
106
-
107
-
108
-
109
-
110
-
111
-
112
-
113
-
114
-
115
-
116
-
117
-
118
-
119
-
120
-
121
-
122
-
123
-
 124
124 -
 125
125 -
 126
126 -
 127
127 -
 128
128 -
 129
129 -
 130
130 -
 131
131 -
 132
132 -
 133
133 -
 134
134 -
135
-
136
-
137
-
138
-
139
-
140
-
141
-
142
-
143
-
144
-
145
-
146
-
147
-
148
-
149
-
150
-
151
-
152
-
153
-
154
-
155
-
156
-
157
-
158
-
159
-
160
-
161
-
162
-
163
-
164
-
165
-
166
-
167
-
168
-
169
-
170
-
171
-
172
-
173
-
174
-
175
-
176
-
177
-
178
-
179
-
180
-
181
-
182
-
183
-
184
-
185
-
186
-
187
-
188
-
189
-
190
-
191
-
192
-
193
-
194
-
195
-
196
-
197
-
198
-
199
-
200
-
201
-
202
-
203
-
204
 |
 |
