Samsung HMX-S10BN User Manual (user Manual) (ver.1.0) (English, Spanish) - Page 67
Ajuste de la exposición - Compensación de exposición, Adjusting the Exposure - Exposure Compensation
 |
UPC - 036725303263
View all Samsung HMX-S10BN manuals
Add to My Manuals
Save this manual to your list of manuals |
Page 67 highlights
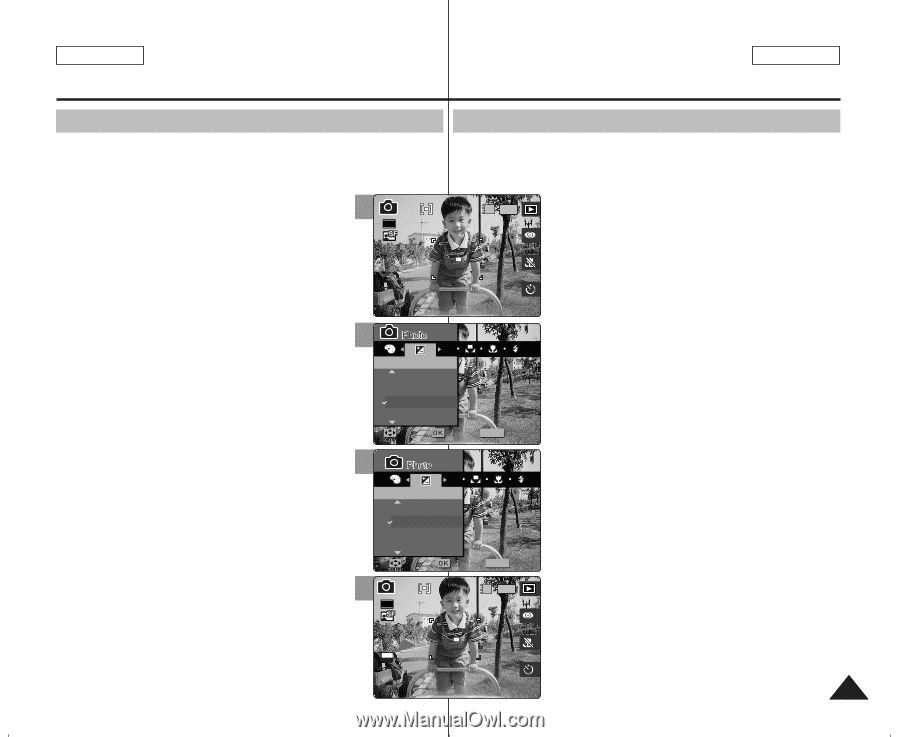
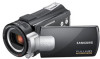
ENGLISH Photo Mode : Setting the Capturing Options Modo Photo (Foto) : ESPAÑOL Ajuste de las opciones de captura Adjusting the Exposure - Exposure Compensation Ajuste de la exposición - Compensación de exposición 23 You can manually make exposure adjustments using EV Exposure Puede manualmente realizar ajustes de exposición utilizando la Compensation which allows users to control the amount of light manually when the shutter-release button is released. 1. Turn the Mode Dial to Photo mode. 3 2592 compensación de exposición EV lo que permite a los usuarios 2c3ontrolar manualmente la cantidad de luz cuando se suelta el botón de liberación del obturador. 23 23 IN 1. Gire el Dial de modo a Photo (Foto). 2. Press the [POWER] button to turn on the Miniket Photo. 2. Pulse el botón [POWER] (ENC.) para encender la Miniket Photo. 3. Press the [MENU] button. N Menu screen appears. EV 4. Move the joystick left / right to select . 4 5. Select an option by moving the joystick up / down, and then press the joystick (OK). N -2.0 / -1.6 / -1.3 / -1.0 / -0.6 / -0.3 / 0 / +0.3 / +0.6 / +1.0 / +1.3 / +1.6 / +2.0 N The screen brightness gets darker when the EV settings goes to a negative setting and gets brighter when it goes to a positive setting. 5 6. Press the [MENU] button to exit the menu. N An icon indicating the selected mode appears on the screen. N No icon will be displayed when it is set to . EV EV ++00..63MovEeV 0 -0.3Move ISO Select Select Exit Exit Move Select MENU Exit Move EV EV +0.6 EV +0.3 0 -0.M3ovEeV Select ISO Select Exit Exit [ Warning ] ✤ Do not let the CCD be exposed to a strong light source for a long time. It may damage the CCD. 6 [ Notes ] ✤ Regarding EV setting in Scene modes, refer to page 72. ✤ While the menu screen is displayed, pressing the [Record / Stop] button will exit the menu. Move Move 2592 Move EV +0.3 Select MENU Exit 2S3elect IN 23 23 Select Exit Exit 23 3. Pulse el botón [MENU]. N Aparece la pantalla del menú. 4. Mueva el joystick a la izquierda / derecha hasta seleccionar . 5. Seleccione la opción moviendo el joystick hacia arriba / abajo y pulse el botón (OK) del joystick. N -2,0 / -1,6 / -1,3 / -1,0 / -0,6 / -0,3 / 0 / +0,3 / +0,6 / +1,0 / +1,3 / +1,6 / +2,0 N El brillo de la pantalla se oscurece cuando el ajuste del valor de exposición se coloca en un ajuste negativo y es más brillante cuando el ajuste es positivo. 6. Pulse el botón [MENU] para salir del menú. N Aparece en pantalla un icono que indica el modo del valor de exposición seleccionado. N No aparecerá ningún icono cuando se defina en . [ Advertencia ] ✤ No exponga la CCD a una luz intensa durante tiempo prolongado. Podría dañar la CCD. [ Notas ] ✤ Para el ajuste EV en los modos Scene (Escena), consulte la página 72. ✤ Mientras aparece el menú en pantalla, si se pulsa el botón [Record / Stop] (Grabar / Detener) se saldrá del menú. 67
-
 1
1 -
2
-
3
-
4
-
5
-
6
-
7
-
8
-
9
-
10
-
11
-
12
-
13
-
14
-
15
-
16
-
17
-
18
-
19
-
20
-
21
-
22
-
23
-
24
-
25
-
26
-
27
-
28
-
29
-
30
-
31
-
32
-
33
-
34
-
35
-
36
-
37
-
38
-
39
-
40
-
41
-
42
-
43
-
44
-
45
-
46
-
47
-
48
-
49
-
50
-
51
-
52
-
53
-
54
-
55
-
56
-
57
-
58
-
59
-
60
-
61
-
 62
62 -
 63
63 -
 64
64 -
 65
65 -
 66
66 -
 67
67 -
 68
68 -
 69
69 -
 70
70 -
 71
71 -
 72
72 -
73
-
74
-
75
-
76
-
77
-
78
-
79
-
80
-
81
-
82
-
83
-
84
-
85
-
86
-
87
-
88
-
89
-
90
-
91
-
92
-
93
-
94
-
95
-
96
-
97
-
98
-
99
-
100
-
101
-
102
-
103
-
104
-
105
-
106
-
107
-
108
-
109
-
110
-
111
-
112
-
113
-
114
-
115
-
116
-
117
-
118
-
119
-
120
-
121
-
122
-
123
-
124
-
125
-
126
-
127
-
128
-
129
-
130
-
131
-
132
-
133
-
134
-
135
-
136
-
137
-
138
-
139
-
140
-
141
-
142
-
143
-
144
-
145
-
146
-
147
-
148
-
149
-
150
-
151
-
152
-
153
-
154
-
155
-
156
 |
 |