Samsung HMX-S10BN User Manual (user Manual) (ver.1.0) (English, Spanish) - Page 88
Copia de archivos de fotos, Copying Photo Files
 |
UPC - 036725303263
View all Samsung HMX-S10BN manuals
Add to My Manuals
Save this manual to your list of manuals |
Page 88 highlights
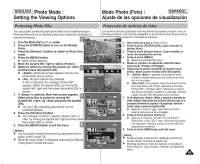
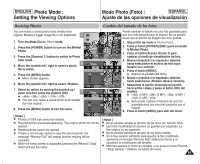
ENGLISH Photo Mode : Setting the Viewing Options Modo Photo (Foto) : ESPAÑOL Ajuste de las opciones de visualización Copying Photo Files Copia de archivos de fotos You can copy saved photo files from the internal memory on to an mini Puede copiar archivos de fotos guardados desde la memoria incorporada SD card and vice-versa. interna a una tarjeta mini SD y viceversa. 1. Turn the Mode Dial to Photo mode. 5 2. Press the [POWER] button to turn on the Miniket Photo. 2592 3. Press the [Shortcut 1] button to switch to Photo 100-0006 View mode. 100-0006 4. Press the [MENU] button. N Menu screen appears. 100-0006 5. Move the joystick left / right to select . 100-00P0h6oto 6. Select an option by moving the joystick up / Photo down and then press the joystick (OK). 6 PChooptyo(to) N : Multi-view screen appears and you Copy (to) TYPE can select photo files to copy. PChooptyo (to) N : All photo files will be copied. If is selected, the message "Copy All?" appears. Select or by moving the Select AllCopy (to) Move Select Exit joystick left / right and then press the joystick (OK) Move Select Exit to confirm. Move OK Select MENU Exit 7. If is selected, Multi-view screen appears. Select photo files to copy by moving 7 the joystick left / right / up / down and press Move Select Exit the joystick (OK). N An icon ( ) indicating the selected file to be copied appears. 8. Press the [Shortcut 4] button. N The message "Copy?" appears. Select or Move Select Exit by moving the joystick left / right and then Move OK Select MENU Exit press the joystick (OK) to confirm. 9. Press the [MENU] button to exit the menu. 8 Move Select Exit 1. Gire el Dial de modo a Photo (Foto). 2. Pulse el botón [POWER] (ENC.) para encender la Miniket Photo. 3. Pulse el botón [Acceso directo 1] para cambiar al modo de visualización de foto. 4. Pulse el botón [MENU]. N Aparece la pantalla del menú. 5. Mueva el joystick a la izquierda / derecha hasta seleccionar (Copiar (a)). 6. Seleccione la opción moviendo el joystick hacia arriba / abajo y pulse el botón (OK) del joystick. N (Selec.): aparece la pantalla de vista múltiple y puede seleccionar los archivos de fotos que va a copiar. N (Todo): se copiarán todos los archivos de fotos. Si se selecciona (Todo), aparecerá el mensaje "Copy All?" (¿Copiar todo?). Seleccione (Sí) o moviendo el joystick a la izquierda / derecha y pulse el botón (OK) para confirmar. 7. Si se selecciona (Selec.), aparece la pantalla de vista múltiple. Seleccione los archivos de fotos que va a copiar moviendo el joystick a la izquierda / derecha / arriba / abajo y pulse el joystick (OK). N Aparece un icono ( ) que indica el archivo seleccionado que se va a copiar. 8. Pulse el botón [Acceso directo 4]. N Aparece el mensaje "Copy?"(¿Copiar?). Seleccione (Sí) o moviendo el joystick a la izquierda / derecha y pulse el botón (OK) del joystick para confirmar. 9. Pulse el botón [MENU] para salir del menú. [ Notes ] ✤ It copies from the currently-used memory to another. If the internal memory was used, it copies to an mini SD card. ✤ When is set, file numbering will start from the next to the last file. ✤ While the menu screen is displayed, pressing the 88 [Record / Stop] button will exit the menu. MovCeopy? Select (External -> Internal) Yes No Move Move Move OK Select Select Select [ Notas ] ✤ Copia desde la memoria actualmente utilizada a Exit otra. Si se utilizó la memoria interna, copia en una tarjeta mini SD. ✤ Cuando se defina (Nº archivo), la numeración de archivos comenzará desde el archivo siguiente hasta el último. ✤ Mientras aparece el menú en pantalla, si se pulsa el botón [Record / Stop] (Grabar / Detener) se saldrá del menú.
-
 1
1 -
2
-
3
-
4
-
5
-
6
-
7
-
8
-
9
-
10
-
11
-
12
-
13
-
14
-
15
-
16
-
17
-
18
-
19
-
20
-
21
-
22
-
23
-
24
-
25
-
26
-
27
-
28
-
29
-
30
-
31
-
32
-
33
-
34
-
35
-
36
-
37
-
38
-
39
-
40
-
41
-
42
-
43
-
44
-
45
-
46
-
47
-
48
-
49
-
50
-
51
-
52
-
53
-
54
-
55
-
56
-
57
-
58
-
59
-
60
-
61
-
62
-
63
-
64
-
65
-
66
-
67
-
68
-
69
-
70
-
71
-
72
-
73
-
74
-
75
-
76
-
77
-
78
-
79
-
80
-
81
-
82
-
 83
83 -
 84
84 -
 85
85 -
 86
86 -
 87
87 -
 88
88 -
 89
89 -
 90
90 -
 91
91 -
 92
92 -
 93
93 -
94
-
95
-
96
-
97
-
98
-
99
-
100
-
101
-
102
-
103
-
104
-
105
-
106
-
107
-
108
-
109
-
110
-
111
-
112
-
113
-
114
-
115
-
116
-
117
-
118
-
119
-
120
-
121
-
122
-
123
-
124
-
125
-
126
-
127
-
128
-
129
-
130
-
131
-
132
-
133
-
134
-
135
-
136
-
137
-
138
-
139
-
140
-
141
-
142
-
143
-
144
-
145
-
146
-
147
-
148
-
149
-
150
-
151
-
152
-
153
-
154
-
155
-
156
 |
 |
