Samsung HMX-S10BN User Manual (user Manual) (ver.1.0) (English, Spanish) - Page 96
Balance>.
 |
UPC - 036725303263
View all Samsung HMX-S10BN manuals
Add to My Manuals
Save this manual to your list of manuals |
Page 96 highlights
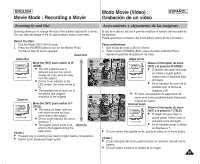
ENGLISH Movie Mode : Modo Movie (Video) : ESPAÑOL Setting the Recording Options STBY 4 MinAjuste de las opciones de grabación F Setting the White Balance Ajuste del balance de blancos STBY The White Balance is used to preserve natural colors under different4 Min Balance de blanco se utiliza para conservar los colores naturales bajo lighting conditions. It is recommended to set the white balanFce prior to diferentes coOnFFdiciones de luz. Se recomienda fijar el balance de blancos any recording. STBY antes de realizar cualquier grabación. 3 STBY 4 Min IN 1. Gire el Dial de modo a Movie (Video). 1. Turn the Mode Dial to Movie mode. 6F40 2. Press the [POWER] button to turn on the Miniket F REM 4 Min OFF AE 2. Pulse el botón [POWER] (ENC.) para encender la AUTO Miniket Photo. Photo. N The Movie Record screen appears. 3. Press the [MENU] button. N Menu screen appears. 4. Move the joystick left / right to select . 5. Move the joystick up / down to select an 4 option, and then press the joystick (OK). Auto Automatically sets according to the shooting environment. Daylight Adjusts the color according to daylight/indoor, outdoor light You can select this when you cannot have Cloudy daylight as a direct light, such as when it is partly-cloudy or cloudy. 5 Fluorescent H Suitable in a halogen or 3-wavelength light environment. Fluorescent L Suitable for a fluorescent light environment. Tungsten Suitable for an incandescent light environment. Movie White Balance Movie A OFF OFF White Balance Movie AE WhMiMteoovBevaileance Select Auto A DaWMyolhivgiethetBalanSceelect Cloudy Fluorescent H Exit Exit MoMveovieOK Select MENU Exit WMMhooitvveeieBalanceSelect Exit AE White Balance AuMtoovie Daylight N Aparece la pantalla de grabación de vídeo. 3. Pulse el botón [MENU]. N Aparece la pantalla del menú. 4. Mueva el joystick a la izquierda / derecha hasta seleccionar (Bal. blancos). 5. Mueva el joystick hacia arriba / abajo para seleccionar una opción y pulse el botón (OK) del joystick. Auto (Automático) Se ajusta automáticamente de acuerdo con el entorno de disparo. Daylight Ajusta el color de acuerdo con la luz del (Luz de día) día, sí es interior o si es exterior. Puede seleccionarlo cuando no pueda Cloudy (Nublado) tener la luz del día como luz directa, como cuando está parcial o totalmente nublado. Fluorescent H Ideal en entornos de luz halógena o de (Fluorecente D) longitud de onda 3. Fluorescent L (Fluorecente N) Ideal para entornos con luz fluorescente. Tungsten (Tungsteno) Ideal para entornos con luz incandescente. 6. Press the [MENU] button to exit the menu. [ Notes ] ✤ You can easily access this function by using the shortcut button (refer to page 94). 6 ✤ In general outdoors recording, setting will allow users to achieve the best results. ✤ As the lighting conditions change, set the appropriate white balance before recording. ✤ Regarding use with , refer to page 102. ✤ While the menu screen is displayed, pressing the 96 [Record / Stop] button will exit the menu. CWlohuitedyBalance FluoMMroeovsecveient H Select Exit Move OK Select MENU Exit White Balance STBY IN 640 SMTovBeY REM 4SMelienct F 4 Min F STMBoYve Select 4 Min F Exit AE AUTO Exit OFF OFF STBY 4 Min OFF F 6. Pulse el botón [MENU] para salir del menú. [ Notas ] ✤ Puede acceder a esta función utilizando el botón de acceso directo (consulte la página 94). ✤ En grabaciones en exteriores en general, el ajuste permitirá a los usuarios obtener los mejores resultados. ✤ Según cambien las condiciones de luz, ajuste el balance de blancos apropiado antes de grabar. ✤ Para ver información sobre (Bal. blancos) con (Programa AE), consulte la página 102. ✤ Mientras aparece el menú en pantalla, si se pulsa el botón [Record / Stop] (Grabar / Detener) se saldrá del menú.
-
 1
1 -
2
-
3
-
4
-
5
-
6
-
7
-
8
-
9
-
10
-
11
-
12
-
13
-
14
-
15
-
16
-
17
-
18
-
19
-
20
-
21
-
22
-
23
-
24
-
25
-
26
-
27
-
28
-
29
-
30
-
31
-
32
-
33
-
34
-
35
-
36
-
37
-
38
-
39
-
40
-
41
-
42
-
43
-
44
-
45
-
46
-
47
-
48
-
49
-
50
-
51
-
52
-
53
-
54
-
55
-
56
-
57
-
58
-
59
-
60
-
61
-
62
-
63
-
64
-
65
-
66
-
67
-
68
-
69
-
70
-
71
-
72
-
73
-
74
-
75
-
76
-
77
-
78
-
79
-
80
-
81
-
82
-
83
-
84
-
85
-
86
-
87
-
88
-
89
-
90
-
 91
91 -
 92
92 -
 93
93 -
 94
94 -
 95
95 -
 96
96 -
 97
97 -
 98
98 -
 99
99 -
 100
100 -
 101
101 -
102
-
103
-
104
-
105
-
106
-
107
-
108
-
109
-
110
-
111
-
112
-
113
-
114
-
115
-
116
-
117
-
118
-
119
-
120
-
121
-
122
-
123
-
124
-
125
-
126
-
127
-
128
-
129
-
130
-
131
-
132
-
133
-
134
-
135
-
136
-
137
-
138
-
139
-
140
-
141
-
142
-
143
-
144
-
145
-
146
-
147
-
148
-
149
-
150
-
151
-
152
-
153
-
154
-
155
-
156
 |
 |
