Samsung HMX-S10BN User Manual (user Manual) (ver.1.0) (English, Spanish) - Page 87
Ajuste de la función DPOF Formato de orden de impresión digital, Setting the DPOF Digital Print
 |
UPC - 036725303263
View all Samsung HMX-S10BN manuals
Add to My Manuals
Save this manual to your list of manuals |
Page 87 highlights
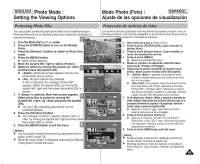
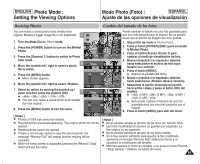
ENGLISH Photo Mode : Setting the Viewing Options Modo Photo (Foto) : ESPAÑOL Ajuste de las opciones de visualización Setting the DPOF (Digital Print Order Format) Function A66j/u6/6ste de la función DPOF (Formato de orden de impresión digital) You can automatically print a photo file recorded with a printer that supports Puede imprimir automáticamente un archivo de foto grabado con una impresora que admita DPOF. DPOF. 1. Turn the Mode Dial to Photo mode. 3 6/6 6/6 2. Press the [POWER] button to turn on the Miniket Photo. 2592 1. Gire el Dial de modo a Photo (Foto). 2. Pulse el botón [POWER] (ENC.) para encender la Miniket Photo. 3. Pulse el botón [Acceso directo 1] para cambiar al modo de 3. Press the [Shortcut 1] button to switch to Photo View visualización de foto. mode. 4. Press the [MENU] button. 110000-0-0000066 N Menu screen appears. 5. Move the joystick left / right to select . 6. Select an option by moving the joystick up / down and 100-0006 100-0P0P0h6hoototo then press the joystick (OK). N : Multi-view screen appears and you can 5 Photo select photo files to set DPOF printing. Photo TYPE N : All photo files will be marked with DPOF printing. If is selected, the message "DPOF All?" appears. Select the desired option by moving the joystick left / right and then press the joystick (OK) to confirm. Select All 4. Pulse el botón [MENU]. N Aparece la pantalla del menú. 5. Mueva el joystick a la izquierda / derecha hasta seleccionar . 6. Seleccione la opción moviendo el joystick hacia arriba / abajo y pulse el botón (OK) del joystick. N (Selec.): aparece la pantalla de vista múltiple y puede seleccionar los archivos de fotos en los que va a definir la impresión DPOF. N (Todo): todos los archivos de fotos se marcarán con impresión DPOF. Si se selecciona (Todo), aparecerá el mensaje "DPOF All?" (¿DPOF todo?). Seleccione la opción que desea moviendo el joystick a la izquierda / derecha y pulse el botón 7. If is selected, Multi-view screen appears. Select the photo files to set by moving the joystick left / right / up / down. 8. Set the number of prints by using the [Shortcut 3] and [Shortcut 4] buttons. 8 N Move to another photo by moving the joystick left / Move Move Select Select Exit (OK) del joystick para confirmar. Exit 7. Si se selecciona (Selec.), aparece la pantalla de vista Move OK Select MENU Exit múltiple. Seleccione los archivos de fotos que va a definir Move Select Exit moviendo el joystick a la izquierda / derecha / arriba / abajo. 11/6/6 8. Fije el número de impresiones utilizando los botones [Acceso directo 3] y [Acceso directo 4]. 1/6 N Vaya a otra foto moviendo el joystick a la izquierda / derecha y right and repeat the steps to set DPOF. 1/6 repita los pasos para definir DPOF. 9. The message "Confirm?" appears when you press the joystick (OK). N Select or by moving the joystick left / right and then press the joystick (OK) to confirm. 10. Press the [MENU] button to exit the menu. N < > icon is displayed on the photos with DPOF Move Move Move Confirm Exit OK Confirm MENU Exit Confirm Exit 9. Aparece el mensaje "Confirm?" (¿Confirmar?) cuando pulse el botón [OK] del joystick. N Seleccione (Sí) o moviendo el joystick a la izquierda / derecha y pulse el botón [OK] del joystick para confirmar. 10. Pulse el botón [MENU] para salir del menú. N El icono < > aparece en las fotos con configuración DPOF. setup. 9 [ Notes ] ✤ Please refer to the product instructions for further details on Move Confirm Exit [ Notas ] ✤ Consulte las instrucciones del producto para obtener instrucciones detalladas sobre el uso de la impresora DPOF. ✤ La utilización de una impresora que admita DPOF permite a los DPOF printer use. Confirm? usuarios imprimir directamente las fotos almacenadas en la tarjeta ✤ Using a printer that supports DPOF allows users to directly print photos stored in a mini SD card without a PC. ✤ While the menu screen is displayed, pressing the [Record / Yes No mini SD sin necesidad de un PC. ✤ Mientras aparece el menú en pantalla, si se pulsa el botón [Record / Stop] (Grabar / Detener) se saldrá del menú. Stop] button will exit the menu. MMMooovvveee OKSSeSeleeleclectct t Move Select 87
-
 1
1 -
2
-
3
-
4
-
5
-
6
-
7
-
8
-
9
-
10
-
11
-
12
-
13
-
14
-
15
-
16
-
17
-
18
-
19
-
20
-
21
-
22
-
23
-
24
-
25
-
26
-
27
-
28
-
29
-
30
-
31
-
32
-
33
-
34
-
35
-
36
-
37
-
38
-
39
-
40
-
41
-
42
-
43
-
44
-
45
-
46
-
47
-
48
-
49
-
50
-
51
-
52
-
53
-
54
-
55
-
56
-
57
-
58
-
59
-
60
-
61
-
62
-
63
-
64
-
65
-
66
-
67
-
68
-
69
-
70
-
71
-
72
-
73
-
74
-
75
-
76
-
77
-
78
-
79
-
80
-
81
-
 82
82 -
 83
83 -
 84
84 -
 85
85 -
 86
86 -
 87
87 -
 88
88 -
 89
89 -
 90
90 -
 91
91 -
 92
92 -
93
-
94
-
95
-
96
-
97
-
98
-
99
-
100
-
101
-
102
-
103
-
104
-
105
-
106
-
107
-
108
-
109
-
110
-
111
-
112
-
113
-
114
-
115
-
116
-
117
-
118
-
119
-
120
-
121
-
122
-
123
-
124
-
125
-
126
-
127
-
128
-
129
-
130
-
131
-
132
-
133
-
134
-
135
-
136
-
137
-
138
-
139
-
140
-
141
-
142
-
143
-
144
-
145
-
146
-
147
-
148
-
149
-
150
-
151
-
152
-
153
-
154
-
155
-
156
 |
 |
