Samsung SCH-R680 User Manual (user Manual) (ver.ei22) (English(north America)) - Page 100
Manage accounts, Adding an account, Managing a Google account, Managing a Corporate Exchange, account
 |
View all Samsung SCH-R680 manuals
Add to My Manuals
Save this manual to your list of manuals |
Page 100 highlights
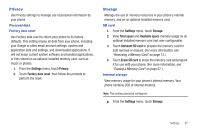
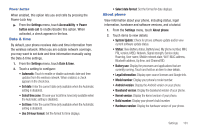
Auto-sync When enabled, all accounts sync data at any time, automatically. 1. From the Settings menu, touch Accounts & sync. 2. Touch Auto-sync to enable or disable the setting. When enabled, a check mark appears in the check box. Manage accounts Use Manage accounts to set up and configure your accounts. Note: Available settings depend on the type of account. Not all settings are available for all accounts. 1. From the Settings menu, touch Accounts & sync. 2. Under Manage accounts, touch the account to modify its settings. For more information about managing Google account, see "Managing a Google account" on page 31. For more information about managing a Corporate Exchange account, see "Managing a Corporate Exchange account" on page 32. Adding an account 1. From the Settings menu, touch Accounts & sync. 2. Under Manage accounts, touch Add account and follow the prompts to enter your credentials and set up the account. Tip: For more information about adding accounts, see "Setting Up Your Accounts" on page 31. Removing an account Important!: Removing an account also deletes all of its messages, contacts and other data from the phone. 1. From the Settings menu, touch Accounts & sync. 2. Touch an account to display its settings. 3. Touch Remove account, then touch Remove account at the prompt to remove the account and delete all its messages, contacts and other data. 96
-
 1
1 -
2
-
3
-
4
-
5
-
6
-
7
-
8
-
9
-
10
-
11
-
12
-
13
-
14
-
15
-
16
-
17
-
18
-
19
-
20
-
21
-
22
-
23
-
24
-
25
-
26
-
27
-
28
-
29
-
30
-
31
-
32
-
33
-
34
-
35
-
36
-
37
-
38
-
39
-
40
-
41
-
42
-
43
-
44
-
45
-
46
-
47
-
48
-
49
-
50
-
51
-
52
-
53
-
54
-
55
-
56
-
57
-
58
-
59
-
60
-
61
-
62
-
63
-
64
-
65
-
66
-
67
-
68
-
69
-
70
-
71
-
72
-
73
-
74
-
75
-
76
-
77
-
78
-
79
-
80
-
81
-
82
-
83
-
84
-
85
-
86
-
87
-
88
-
89
-
90
-
91
-
92
-
93
-
94
-
 95
95 -
 96
96 -
 97
97 -
 98
98 -
 99
99 -
 100
100 -
 101
101 -
 102
102 -
 103
103 -
 104
104 -
 105
105 -
106
-
107
-
108
-
109
-
110
-
111
-
112
-
113
-
114
-
115
-
116
-
117
-
118
-
119
-
120
-
121
-
122
-
123
-
124
-
125
-
126
-
127
-
128
-
129
-
130
-
131
-
132
-
133
-
134
-
135
-
136
-
137
-
138
-
139
-
140
-
141
 |
 |