Xerox 6015/NI User Guide - Page 116
Scanning Images into an Application on a USB Connected Computer, Scanning an Image into an - scanner driver
 |
View all Xerox 6015/NI manuals
Add to My Manuals
Save this manual to your list of manuals |
Page 116 highlights
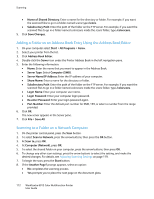
Scanning Scanning Images into an Application on a USB Connected Computer This section includes: Scanning an Image into an Application ...116 Scanning an Image Using Windows XP ...117 Scanning an Image Using Widows Vista or Windows 7 118 You can import images directly from the scanner into a folder on your computer. With a Macintosh computer, and some Windows applications, you can import the images directly into an application. Scanning an Image into an Application Notes: To use this feature, the printer must be connected to the computer with a USB cable. Some Windows applications, including Office 2007, do not support this feature. To import images into an application: 1. Open the file in which you want to place the image. 2. In the application, select the menu item to acquire the image. 3. From the Paper Source menu in Windows, or from the Scan From menu on a Macintosh computer, select: Document Glass Document Feeder 4. Specify the other scan driver settings as desired. Note: For more information, click the Help button to view the online help. 5. To begin the scan, press the Start button. The printer scans the document and places the image in your application. 116 WorkCentre 6015 Color Multifunction Printer User Guide
-
 1
1 -
2
-
3
-
4
-
5
-
6
-
7
-
8
-
9
-
10
-
11
-
12
-
13
-
14
-
15
-
16
-
17
-
18
-
19
-
20
-
21
-
22
-
23
-
24
-
25
-
26
-
27
-
28
-
29
-
30
-
31
-
32
-
33
-
34
-
35
-
36
-
37
-
38
-
39
-
40
-
41
-
42
-
43
-
44
-
45
-
46
-
47
-
48
-
49
-
50
-
51
-
52
-
53
-
54
-
55
-
56
-
57
-
58
-
59
-
60
-
61
-
62
-
63
-
64
-
65
-
66
-
67
-
68
-
69
-
70
-
71
-
72
-
73
-
74
-
75
-
76
-
77
-
78
-
79
-
80
-
81
-
82
-
83
-
84
-
85
-
86
-
87
-
88
-
89
-
90
-
91
-
92
-
93
-
94
-
95
-
96
-
97
-
98
-
99
-
100
-
101
-
102
-
103
-
104
-
105
-
106
-
107
-
108
-
109
-
110
-
 111
111 -
 112
112 -
 113
113 -
 114
114 -
 115
115 -
 116
116 -
 117
117 -
 118
118 -
 119
119 -
 120
120 -
 121
121 -
122
-
123
-
124
-
125
-
126
-
127
-
128
-
129
-
130
-
131
-
132
-
133
-
134
-
135
-
136
-
137
-
138
-
139
-
140
-
141
-
142
-
143
-
144
-
145
-
146
-
147
-
148
-
149
-
150
-
151
-
152
-
153
-
154
-
155
-
156
-
157
-
158
-
159
-
160
-
161
-
162
-
163
-
164
-
165
-
166
-
167
-
168
-
169
-
170
-
171
-
172
-
173
-
174
-
175
-
176
-
177
-
178
-
179
-
180
-
181
-
182
-
183
-
184
-
185
-
186
-
187
-
188
-
189
-
190
-
191
-
192
-
193
-
194
-
195
-
196
-
197
-
198
-
199
-
200
-
201
-
202
-
203
-
204
-
205
-
206
-
207
-
208
-
209
-
210
-
211
-
212
-
213
-
214
 |
 |
