Xerox 6015/NI User Guide - Page 134
Faxing to a Group, Creating a Fax Group
 |
View all Xerox 6015/NI manuals
Add to My Manuals
Save this manual to your list of manuals |
Page 134 highlights
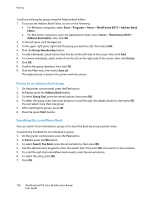
Faxing Faxing to a Group This section includes: Creating a Fax Group ...134 Editing Address Book Fax Groups ...135 Faxing to an Address Book Group ...136 Searching the Local Phone Book ...136 To send a fax to multiple individuals, create a group speed dial entry. Groups can include both previously stored individual and group entries. Note: Individual entries must be set up before groups can be defined. For details, see Adding an Individual Fax Address Book Entry on page 132. Creating a Fax Group You can create group address book entries using CentreWare Internet Services or the Address Book Editor. To create a fax group using CentreWare Internet Services: 1. At your computer, open a Web browser, type the IP address of the printer in the address field, then press Enter or Return. Note: If you do not know the IP address of your printer, see Finding the IP Address of Your Printer on page 55. 2. In CentreWare Internet Services, click Address Book. 3. Under Address Book in the left navigation pane, click FAX Groups. 4. In Directory Listing, click the Add link of any group that is not in use. 5. Type a group name, then click the Save Changes button. 6. When you see a Request Acknowledged message, click the Return button. 7. Click the Edit link for the group you created. 8. Select the check boxes of individuals you want to include in the group. 9. Click the Additional Entries links at the bottom of the Group Members column to see additional Fax Address Book entries. You can also add existing groups to this group. 10. When you have finished selecting group members, click Save Changes. The address book is saved in the printer with the entries. 134 WorkCentre 6015 Color Multifunction Printer User Guide
-
 1
1 -
2
-
3
-
4
-
5
-
6
-
7
-
8
-
9
-
10
-
11
-
12
-
13
-
14
-
15
-
16
-
17
-
18
-
19
-
20
-
21
-
22
-
23
-
24
-
25
-
26
-
27
-
28
-
29
-
30
-
31
-
32
-
33
-
34
-
35
-
36
-
37
-
38
-
39
-
40
-
41
-
42
-
43
-
44
-
45
-
46
-
47
-
48
-
49
-
50
-
51
-
52
-
53
-
54
-
55
-
56
-
57
-
58
-
59
-
60
-
61
-
62
-
63
-
64
-
65
-
66
-
67
-
68
-
69
-
70
-
71
-
72
-
73
-
74
-
75
-
76
-
77
-
78
-
79
-
80
-
81
-
82
-
83
-
84
-
85
-
86
-
87
-
88
-
89
-
90
-
91
-
92
-
93
-
94
-
95
-
96
-
97
-
98
-
99
-
100
-
101
-
102
-
103
-
104
-
105
-
106
-
107
-
108
-
109
-
110
-
111
-
112
-
113
-
114
-
115
-
116
-
117
-
118
-
119
-
120
-
121
-
122
-
123
-
124
-
125
-
126
-
127
-
128
-
 129
129 -
 130
130 -
 131
131 -
 132
132 -
 133
133 -
 134
134 -
 135
135 -
 136
136 -
 137
137 -
 138
138 -
 139
139 -
140
-
141
-
142
-
143
-
144
-
145
-
146
-
147
-
148
-
149
-
150
-
151
-
152
-
153
-
154
-
155
-
156
-
157
-
158
-
159
-
160
-
161
-
162
-
163
-
164
-
165
-
166
-
167
-
168
-
169
-
170
-
171
-
172
-
173
-
174
-
175
-
176
-
177
-
178
-
179
-
180
-
181
-
182
-
183
-
184
-
185
-
186
-
187
-
188
-
189
-
190
-
191
-
192
-
193
-
194
-
195
-
196
-
197
-
198
-
199
-
200
-
201
-
202
-
203
-
204
-
205
-
206
-
207
-
208
-
209
-
210
-
211
-
212
-
213
-
214
 |
 |
