Yamaha 01C Owner's Manual - Page 103
button is used here to record only the parts that have been selected for recording
 |
View all Yamaha 01C manuals
Add to My Manuals
Save this manual to your list of manuals |
Page 103 highlights
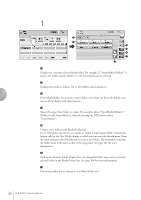
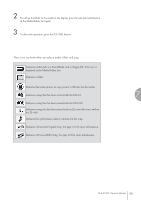
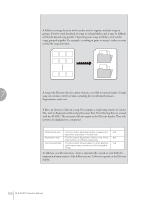
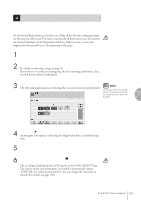
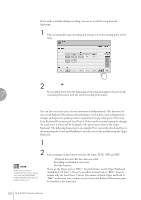
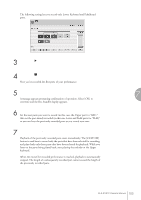
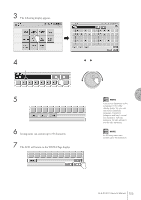
The following setting lets you record only Lower Keyboard and Pedalboard parts. 3 Press the [F] (Play) button, and start playing after the hourglass icon disappears. 4 Press the [J] (Stop) button when you are finished with your performance to stop recording. Now you've recorded the first parts of your performance. 5 Press the [RECORD] button to set up recording of the next part - Upper part in this case. 7 A message appears prompting confirmation of operation. Select [OK] to overwrite and the Rec Standby display appears. Music Data Recorder (MDR) 6 Select the parts for recording. Set the next parts you want to record (in this case, the Upper part) to "REC." Also set the part already recorded (in this case Lower and Pedal parts) to "PLAY," so you can hear the previously recorded parts as you record new ones. 7 Press the [CUSTOM] button to start recording of the new part or parts (Upper part). Playback of the previously recorded parts starts immediately. The [CUSTOM] button is used here to record only the parts that have been selected for recording, and plays back only those parts that have been selected for playback. While you listen to the parts being played back, start playing the melody on the Upper keyboard. When the end of the recorded performance is reached, playback is automatically stopped. The length of a subsequently recorded part cannot exceed the length of the previously recorded parts. ELS-01/01C Owner's Manual 103
-
 1
1 -
2
-
3
-
4
-
5
-
6
-
7
-
8
-
9
-
10
-
11
-
12
-
13
-
14
-
15
-
16
-
17
-
18
-
19
-
20
-
21
-
22
-
23
-
24
-
25
-
26
-
27
-
28
-
29
-
30
-
31
-
32
-
33
-
34
-
35
-
36
-
37
-
38
-
39
-
40
-
41
-
42
-
43
-
44
-
45
-
46
-
47
-
48
-
49
-
50
-
51
-
52
-
53
-
54
-
55
-
56
-
57
-
58
-
59
-
60
-
61
-
62
-
63
-
64
-
65
-
66
-
67
-
68
-
69
-
70
-
71
-
72
-
73
-
74
-
75
-
76
-
77
-
78
-
79
-
80
-
81
-
82
-
83
-
84
-
85
-
86
-
87
-
88
-
89
-
90
-
91
-
92
-
93
-
94
-
95
-
96
-
97
-
 98
98 -
 99
99 -
 100
100 -
 101
101 -
 102
102 -
 103
103 -
 104
104 -
 105
105 -
 106
106 -
 107
107 -
 108
108 -
109
-
110
-
111
-
112
-
113
-
114
-
115
-
116
-
117
-
118
-
119
-
120
-
121
-
122
-
123
-
124
-
125
-
126
-
127
-
128
-
129
-
130
-
131
-
132
-
133
-
134
-
135
-
136
-
137
-
138
-
139
-
140
-
141
-
142
-
143
-
144
-
145
-
146
-
147
-
148
-
149
-
150
-
151
-
152
-
153
-
154
-
155
-
156
-
157
-
158
-
159
-
160
-
161
-
162
-
163
-
164
-
165
-
166
-
167
-
168
-
169
-
170
-
171
-
172
-
173
-
174
-
175
-
176
-
177
-
178
-
179
-
180
-
181
-
182
-
183
-
184
-
185
-
186
-
187
-
188
-
189
-
190
-
191
-
192
-
193
-
194
-
195
-
196
-
197
-
198
-
199
-
200
-
201
-
202
-
203
-
204
-
205
-
206
-
207
-
208
-
209
-
210
-
211
-
212
-
213
-
214
-
215
-
216
-
217
-
218
-
219
-
220
-
221
-
222
-
223
-
224
-
225
-
226
-
227
-
228
-
229
-
230
-
231
-
232
-
233
-
234
-
235
-
236
-
237
-
238
-
239
-
240
 |
 |
