Yamaha 01C Owner's Manual - Page 155
To create your own backing patterns with the Rhythmic Chord, function, Write and/or Real Time Write.
 |
View all Yamaha 01C manuals
Add to My Manuals
Save this manual to your list of manuals |
Page 155 highlights
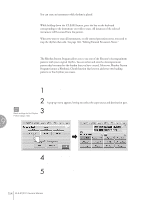
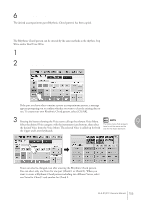
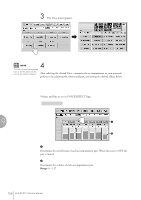
6 Press the [EXECUTE] button to execute the copy. The desired accompaniment part (Rhythmic Chord pattern) has been copied. To create your own backing patterns with the Rhythmic Chord function: The Rhythmic Chord pattern can be entered by the same methods as the rhythm: Step Write and/or Real Time Write. 1 Press the [INPUT] button at the top of the display to call up the INPUT Page. 2 Select the part, CHORD 1 or CHORD 2, which you want to create for the Rhythmic Chord pattern. If the part you have select contains a preset accompaniment pattern, a message appears prompting you to confirm whether you want to clear the existing data or not. To create your own Rhythmic Chord pattern, select [CLEAR]. 3 Select the desired Voice. Pressing the button showing the Voice name calls up the relevant Voice Menu. Select the desired Voice category with the instrument icon buttons, then select NOTE The Voice menu that appears 9 the desired Voice from the Voice Menu. The selected Voice is called up for both here is not the same as the one for the Voice Sections. the Upper and Lower keyboards. Rhythm Program Voices can also be changed even after entering the Rhythmic Chord pattern. You can select only one Voice for one part (Chord 1 or Chord 2). When you want to create a Rhythmic Chord pattern including two different Voices, select one Voice for Chord 1 and another for Chord 2. ELS-01/01C Owner's Manual 155
-
 1
1 -
2
-
3
-
4
-
5
-
6
-
7
-
8
-
9
-
10
-
11
-
12
-
13
-
14
-
15
-
16
-
17
-
18
-
19
-
20
-
21
-
22
-
23
-
24
-
25
-
26
-
27
-
28
-
29
-
30
-
31
-
32
-
33
-
34
-
35
-
36
-
37
-
38
-
39
-
40
-
41
-
42
-
43
-
44
-
45
-
46
-
47
-
48
-
49
-
50
-
51
-
52
-
53
-
54
-
55
-
56
-
57
-
58
-
59
-
60
-
61
-
62
-
63
-
64
-
65
-
66
-
67
-
68
-
69
-
70
-
71
-
72
-
73
-
74
-
75
-
76
-
77
-
78
-
79
-
80
-
81
-
82
-
83
-
84
-
85
-
86
-
87
-
88
-
89
-
90
-
91
-
92
-
93
-
94
-
95
-
96
-
97
-
98
-
99
-
100
-
101
-
102
-
103
-
104
-
105
-
106
-
107
-
108
-
109
-
110
-
111
-
112
-
113
-
114
-
115
-
116
-
117
-
118
-
119
-
120
-
121
-
122
-
123
-
124
-
125
-
126
-
127
-
128
-
129
-
130
-
131
-
132
-
133
-
134
-
135
-
136
-
137
-
138
-
139
-
140
-
141
-
142
-
143
-
144
-
145
-
146
-
147
-
148
-
149
-
 150
150 -
 151
151 -
 152
152 -
 153
153 -
 154
154 -
 155
155 -
 156
156 -
 157
157 -
 158
158 -
 159
159 -
 160
160 -
161
-
162
-
163
-
164
-
165
-
166
-
167
-
168
-
169
-
170
-
171
-
172
-
173
-
174
-
175
-
176
-
177
-
178
-
179
-
180
-
181
-
182
-
183
-
184
-
185
-
186
-
187
-
188
-
189
-
190
-
191
-
192
-
193
-
194
-
195
-
196
-
197
-
198
-
199
-
200
-
201
-
202
-
203
-
204
-
205
-
206
-
207
-
208
-
209
-
210
-
211
-
212
-
213
-
214
-
215
-
216
-
217
-
218
-
219
-
220
-
221
-
222
-
223
-
224
-
225
-
226
-
227
-
228
-
229
-
230
-
231
-
232
-
233
-
234
-
235
-
236
-
237
-
238
-
239
-
240
 |
 |
