Yamaha Tyros4 Owner's Manual - Page 79
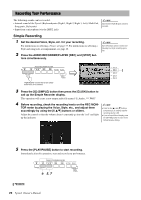
Press the [PLAY/PAUSE] button to start Bounce recording.
 |
UPC - 086792947280
View all Yamaha Tyros4 manuals
Add to My Manuals
Save this manual to your list of manuals |
Page 79 highlights
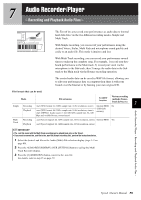
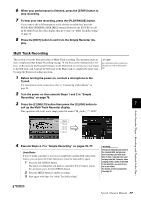
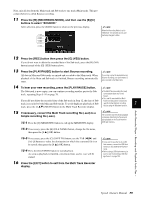
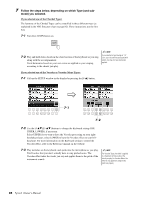
Next, mix all data from the Main track and Sub track to one track (Main track). This procedure (below) is called Bounce recording. 11 Press the [B] (RECORDING MODE), and then use the [B]/[C] buttons to select "BOUNCE." After selection, press the [EXIT] button to return to the previous display. NOTE When the Recording Mode is set to "BOUNCE," the selected track is automatically changed to Main. 12 Press the [REC] button then press the [G] (YES) button. If you do not want to delete the recorded data of the Sub track, press the [H] (NO) button instead of the [G] (YES) button above. 13 Press the [PLAY/PAUSE] button to start Bounce recording. All data in Main and Sub tracks are mixed and recorded to the Main track. When playback of the Main and Sub tracks is finished, Bounce recording automatically stops. NOTE If you sing or play the keyboard during Bounce recording, your performance is also recorded to the Main track. 14 To hear your new recording, press the [PLAY/PAUSE] button. NOTE The Sub track is now empty, you can continue recording another part to the Sub •The Multi Track recording file (.aud) track, repeating Steps 5-10 on page 78. can be played back only on the Tyros4. • The .aud file saved with the Multi If you did not delete the recorded data of the Sub track in Step 12, the data of Sub Track recording can be converted to track is recorded to both Main and Sub tracks. To avoid duplicate playback of Sub .wav file format (Simple recording 7 track, press the [4 ] (MUTE) button in the Multi Track Recorder display. file) by using the Mixdown function. 15 If necessary, convert the Multi Track recording file (.aud) to a Simple recording file (.wav). 15-1 Press the [J] (MIXDOWN) button to call up the MIXDOWN display. NOTE The converted .wav file allows playback on devices other than the Tyros4, and also playback on the Tyros4 from the USB flash memory. 15-2 If necessary, press the [B] (FILE NAME) button, change the file name, then press the [8 ] (OK) button. 15-3 If necessary, press the [C] (SAVE TO) button, use the TAB [][] and [A]-[J] buttons to select the destination (to which the converted file is to be saved), then press the [8 ] (OK) button. 15-4 Press the [G] (START) button to start playback. As soon as playback is finished, conversion from .aud to .wav will be started. 16 Press the [EXIT] button to exit from the Multi Track Recorder display. NOTE • If you want to save the file to a USB flash memory, connect the USB flash memory to the [USB TO DEVICE] terminal. • Before using a USB flash memory, be sure to read "Connecting a USB Storage Device" on page 100. Audio Recorder/Player - Recording and Playback Audio Files - Tyros4 Owner's Manual 79
-
 1
1 -
2
-
3
-
4
-
5
-
6
-
7
-
8
-
9
-
10
-
11
-
12
-
13
-
14
-
15
-
16
-
17
-
18
-
19
-
20
-
21
-
22
-
23
-
24
-
25
-
26
-
27
-
28
-
29
-
30
-
31
-
32
-
33
-
34
-
35
-
36
-
37
-
38
-
39
-
40
-
41
-
42
-
43
-
44
-
45
-
46
-
47
-
48
-
49
-
50
-
51
-
52
-
53
-
54
-
55
-
56
-
57
-
58
-
59
-
60
-
61
-
62
-
63
-
64
-
65
-
66
-
67
-
68
-
69
-
70
-
71
-
72
-
73
-
 74
74 -
 75
75 -
 76
76 -
 77
77 -
 78
78 -
 79
79 -
 80
80 -
 81
81 -
 82
82 -
 83
83 -
 84
84 -
85
-
86
-
87
-
88
-
89
-
90
-
91
-
92
-
93
-
94
-
95
-
96
-
97
-
98
-
99
-
100
-
101
-
102
-
103
-
104
-
105
-
106
-
107
-
108
-
109
-
110
-
111
-
112
-
113
-
114
-
115
-
116
-
117
-
118
-
119
-
120
-
121
-
122
-
123
-
124
-
125
-
126
 |
 |