Adobe 65011817 User Guide - Page 83
Use additional Auto Shapes, Add new Auto Shapes to Fireworks, Free-form shapes
 |
UPC - 883919157368
View all Adobe 65011817 manuals
Add to My Manuals
Save this manual to your list of manuals |
Page 83 highlights
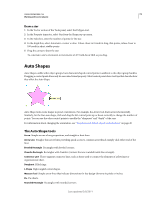
USING FIREWORKS CS4 77 Working with vector objects Use additional Auto Shapes The Auto Shapes panel contains additional Auto Shapes that are more complex than those in the Tools panel. Place these Auto Shapes into your drawing by dragging them from the Auto Shapes panel to the canvas. 1 Select Window > Auto Shapes to display the Auto Shapes panel. 2 Drag an Auto Shape preview from the Auto Shapes panel to the canvas. 3 (Optional) Edit the Auto Shape by dragging any of its control points. Add new Auto Shapes to Fireworks Add new Auto Shapes from the Adobe® Fireworks® Exchange website. New Auto Shapes appear either in the Auto Shapes panel or the Tools menu. You can also add new Auto Shapes to Fireworks by writing JavaScript code. For more information, see Extending Fireworks. 1 Select Window > Auto Shapes to display the Auto Shapes panel. 2 From the Options menu, select Get More Auto Shapes. 3 In the Exchange website, follow the onscreen instructions for adding new shapes. Free-form shapes You can draw and edit vector paths to create almost any shape of vector object. Draw free-form paths with the Vector Path tool The Vector Path tool, located in the Pen tool pop-up menu, is like using a felt-tip marker or crayon. The tool has a wide variety of brush stroke categories, including Air Brush, Calligraphy, Charcoal, Crayon, and Unnatural. Each category typically has a choice of strokes, such as Light Marker and Dark Marker, Splattered Oil, Bamboo, Ribbon, Confetti, 3D, Toothpaste, and Viscous Alien Paint. Although the strokes look like paint or ink, each has the points and paths of a vector object. This means that you can change the shape of the stroke using any of several vector-editing techniques. After you reshape the path, the stroke is redrawn. You can also modify existing brush strokes and add fills to selected objects you have drawn with the Vector Path tool. See "Applying color, strokes, and fills" on page 102. 1 From the Pen tool pop-up menu, select the Vector Path tool . 2 (Optional) Set stroke attributes and Vector Path tool options in the Property inspector. (Optional) For more precise path smoothing, select a number from the Precision pop-up menu in the Property inspector for the Vector Path tool. The higher the number you select, the greater the number of points that appear on the path you draw. 3 Drag to draw. To constrain the path to a horizontal or vertical line, hold down Shift while dragging. 4 Release the mouse button to end the path. To close the path, release the mouse button when you return the pointer to the point at the beginning of the path. Last updated 3/8/2011
-
 1
1 -
2
-
3
-
4
-
5
-
6
-
7
-
8
-
9
-
10
-
11
-
12
-
13
-
14
-
15
-
16
-
17
-
18
-
19
-
20
-
21
-
22
-
23
-
24
-
25
-
26
-
27
-
28
-
29
-
30
-
31
-
32
-
33
-
34
-
35
-
36
-
37
-
38
-
39
-
40
-
41
-
42
-
43
-
44
-
45
-
46
-
47
-
48
-
49
-
50
-
51
-
52
-
53
-
54
-
55
-
56
-
57
-
58
-
59
-
60
-
61
-
62
-
63
-
64
-
65
-
66
-
67
-
68
-
69
-
70
-
71
-
72
-
73
-
74
-
75
-
76
-
77
-
 78
78 -
 79
79 -
 80
80 -
 81
81 -
 82
82 -
 83
83 -
 84
84 -
 85
85 -
 86
86 -
 87
87 -
 88
88 -
89
-
90
-
91
-
92
-
93
-
94
-
95
-
96
-
97
-
98
-
99
-
100
-
101
-
102
-
103
-
104
-
105
-
106
-
107
-
108
-
109
-
110
-
111
-
112
-
113
-
114
-
115
-
116
-
117
-
118
-
119
-
120
-
121
-
122
-
123
-
124
-
125
-
126
-
127
-
128
-
129
-
130
-
131
-
132
-
133
-
134
-
135
-
136
-
137
-
138
-
139
-
140
-
141
-
142
-
143
-
144
-
145
-
146
-
147
-
148
-
149
-
150
-
151
-
152
-
153
-
154
-
155
-
156
-
157
-
158
-
159
-
160
-
161
-
162
-
163
-
164
-
165
-
166
-
167
-
168
-
169
-
170
-
171
-
172
-
173
-
174
-
175
-
176
-
177
-
178
-
179
-
180
-
181
-
182
-
183
-
184
-
185
-
186
-
187
-
188
-
189
-
190
-
191
-
192
-
193
-
194
-
195
-
196
-
197
-
198
-
199
-
200
-
201
-
202
-
203
-
204
-
205
-
206
-
207
-
208
-
209
-
210
-
211
-
212
-
213
-
214
-
215
-
216
-
217
-
218
-
219
-
220
-
221
-
222
-
223
-
224
-
225
-
226
-
227
-
228
-
229
-
230
-
231
-
232
-
233
-
234
-
235
-
236
-
237
-
238
-
239
-
240
-
241
-
242
-
243
-
244
-
245
-
246
-
247
-
248
-
249
-
250
-
251
-
252
-
253
-
254
-
255
-
256
-
257
-
258
-
259
-
260
-
261
-
262
-
263
-
264
-
265
-
266
-
267
-
268
-
269
-
270
-
271
-
272
-
273
-
274
-
275
-
276
-
277
-
278
-
279
-
280
-
281
-
282
-
283
-
284
-
285
-
286
-
287
-
288
-
289
-
290
-
291
-
292
-
293
-
294
-
295
-
296
-
297
-
298
-
299
-
300
 |
 |
