Brother International 4200CN Users Manual - English - Page 100
Unsatisfactory Printing, Brother Customer Service. Do not attempt
 |
UPC - 012502607458
View all Brother International 4200CN manuals
Add to My Manuals
Save this manual to your list of manuals |
Page 100 highlights
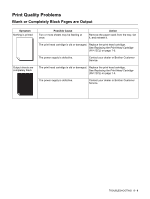
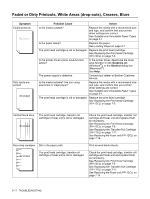
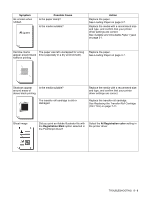
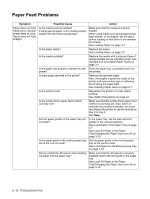
Symptom Possible Cause Action Creased paper Is the paper damp? Replace the paper. See Loading Paper on page 3-7. Is the media suitable? Are you using creased paper? Replace the media with a recommend size and type, and confirm that your printer driver settings are correct. See Suitable and Unsuitable Paper Types on page 3-1. Is the paper tray properly inserted into the Push the paper tray completely back into printer? the printer. Is there any paper or a foreign object jammed in the printer? Turn the power off and remove the jammed paper or foreign object. If you cannot remove the obstruction, turn the printer off and contact your dealer or Brother Customer Service. Do not attempt to disassemble the printer. Is the transfer roll cartridge or fuser unit properly installed in the printer? Make sure that the transfer roll cartridge and fuser unit are properly installed. See Replacing the Transfer Roll Cartridge (TR-11CL) on page 7-11. See Replacing the Fuser unit (FP-12CL) on page 7-14. Slanted printing, Are the paper guides in the paper tray set Incorrectly positioned correctly? printing In the paper tray, set the side and end guides to their correct positions. See Load Paper in the Paper Tray on page 3-7. See Load A5 Paper in the Paper Tray/Changing the Paper Size from A5 on page 3-10. Is the paper guide in the multi-purpose tray set at the correct mark? Set the paper guide in the multi-purpose tray at the correct mark. See Load Paper into the Multi-purpose Tray on page 3-16. Did you install the A5 spacer when loading A5 paper into the paper tray? Make sure that the A5 spacer is properly installed next to the end guide in the paper tray. See Load A5 Paper in the Paper Tray/Changing the Paper Size from A5 on page 3-10. Unsatisfactory Printing 5 - 11 TROUBLESHOOTING
-
 1
1 -
2
-
3
-
4
-
5
-
6
-
7
-
8
-
9
-
10
-
11
-
12
-
13
-
14
-
15
-
16
-
17
-
18
-
19
-
20
-
21
-
22
-
23
-
24
-
25
-
26
-
27
-
28
-
29
-
30
-
31
-
32
-
33
-
34
-
35
-
36
-
37
-
38
-
39
-
40
-
41
-
42
-
43
-
44
-
45
-
46
-
47
-
48
-
49
-
50
-
51
-
52
-
53
-
54
-
55
-
56
-
57
-
58
-
59
-
60
-
61
-
62
-
63
-
64
-
65
-
66
-
67
-
68
-
69
-
70
-
71
-
72
-
73
-
74
-
75
-
76
-
77
-
78
-
79
-
80
-
81
-
82
-
83
-
84
-
85
-
86
-
87
-
88
-
89
-
90
-
91
-
92
-
93
-
94
-
 95
95 -
 96
96 -
 97
97 -
 98
98 -
 99
99 -
 100
100 -
 101
101 -
 102
102 -
 103
103 -
 104
104 -
 105
105 -
106
-
107
-
108
-
109
-
110
-
111
-
112
-
113
-
114
-
115
-
116
-
117
-
118
-
119
-
120
-
121
-
122
-
123
-
124
-
125
-
126
-
127
-
128
-
129
-
130
-
131
-
132
-
133
-
134
-
135
-
136
-
137
-
138
-
139
-
140
-
141
-
142
-
143
-
144
-
145
-
146
-
147
-
148
-
149
-
150
-
151
-
152
-
153
-
154
-
155
-
156
-
157
-
158
-
159
-
160
-
161
-
162
-
163
-
164
-
165
-
166
 |
 |
