Brother International 4200CN Users Manual - English - Page 33
Basic Printer Operation, Printer Part Names and Functions
 |
UPC - 012502607458
View all Brother International 4200CN manuals
Add to My Manuals
Save this manual to your list of manuals |
Page 33 highlights
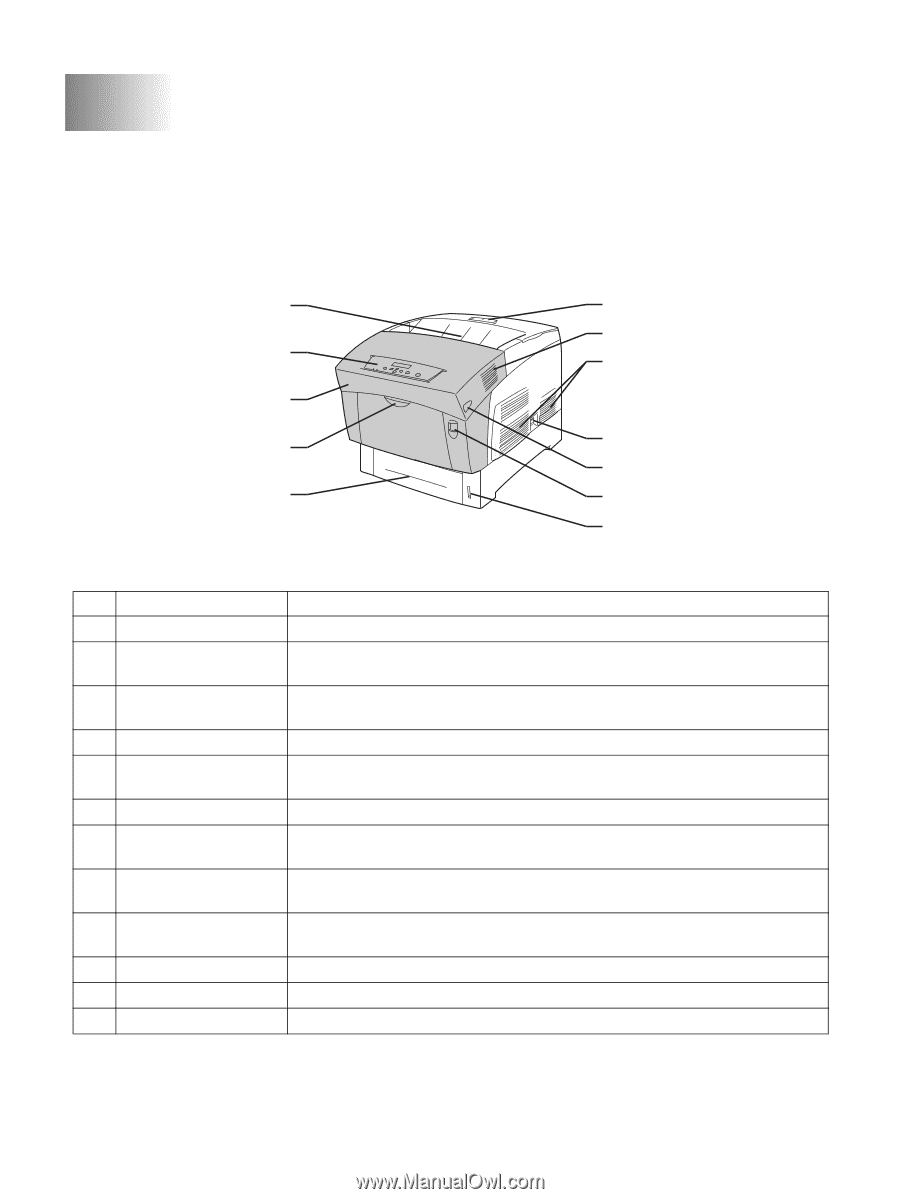
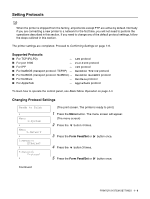
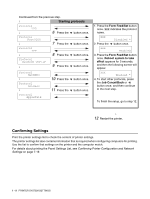
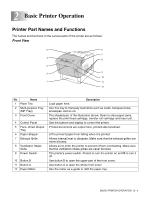
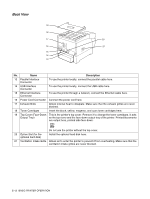
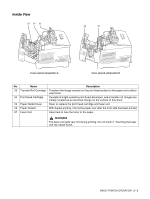
2 Basic Printer Operation Printer Part Names and Functions The names and functions of the various parts of the printer are as follows: Front View 5 6 7 4 8 3 9 2 10 1 11 12 No. Name 1 Paper Tray 2 Multi-purpose Tray (MP Tray) 3 Front Cover 4 Control Panel 5 Face- Down Output Tray 6 Paper Stopper 7 Exhaust Grille 8 Ventilation Intake Grille 9 Power Switch 10 Button B 11 Button A 12 Paper Meter Description Load paper here. Use this tray to manually load items such as cards, transparencies, envelopes, and so on. The shaded part of the illustration above. Open to clear paper jams, replace the print head cartridge, transfer roll cartridge and fuser unit. Use the buttons and display to control the printer. Printed documents are output here, printed side facedown. Lift to prevent paper from falling when it is printed. Allows internal heat to dissipate. Make sure that the exhaust grilles are never blocked. Allows air to enter the printer to prevent it from overheating. Make sure that the ventilation intake grilles are never blocked. The printer's power switch. Press I to turn the printer on and O to turn it off. Use button B to open the upper part of the front cover. Use button A to open the whole front cover. Use the meter as a guide to refill the paper tray. BASIC PRINTER OPERATION 2 - 1
-
 1
1 -
2
-
3
-
4
-
5
-
6
-
7
-
8
-
9
-
10
-
11
-
12
-
13
-
14
-
15
-
16
-
17
-
18
-
19
-
20
-
21
-
22
-
23
-
24
-
25
-
26
-
27
-
 28
28 -
 29
29 -
 30
30 -
 31
31 -
 32
32 -
 33
33 -
 34
34 -
 35
35 -
 36
36 -
 37
37 -
 38
38 -
39
-
40
-
41
-
42
-
43
-
44
-
45
-
46
-
47
-
48
-
49
-
50
-
51
-
52
-
53
-
54
-
55
-
56
-
57
-
58
-
59
-
60
-
61
-
62
-
63
-
64
-
65
-
66
-
67
-
68
-
69
-
70
-
71
-
72
-
73
-
74
-
75
-
76
-
77
-
78
-
79
-
80
-
81
-
82
-
83
-
84
-
85
-
86
-
87
-
88
-
89
-
90
-
91
-
92
-
93
-
94
-
95
-
96
-
97
-
98
-
99
-
100
-
101
-
102
-
103
-
104
-
105
-
106
-
107
-
108
-
109
-
110
-
111
-
112
-
113
-
114
-
115
-
116
-
117
-
118
-
119
-
120
-
121
-
122
-
123
-
124
-
125
-
126
-
127
-
128
-
129
-
130
-
131
-
132
-
133
-
134
-
135
-
136
-
137
-
138
-
139
-
140
-
141
-
142
-
143
-
144
-
145
-
146
-
147
-
148
-
149
-
150
-
151
-
152
-
153
-
154
-
155
-
156
-
157
-
158
-
159
-
160
-
161
-
162
-
163
-
164
-
165
-
166
 |
 |