Brother International 4200CN Users Manual - English - Page 62
all the way to its outermost position again, and then, detection. If this occurs
 |
UPC - 012502607458
View all Brother International 4200CN manuals
Add to My Manuals
Save this manual to your list of manuals |
Page 62 highlights
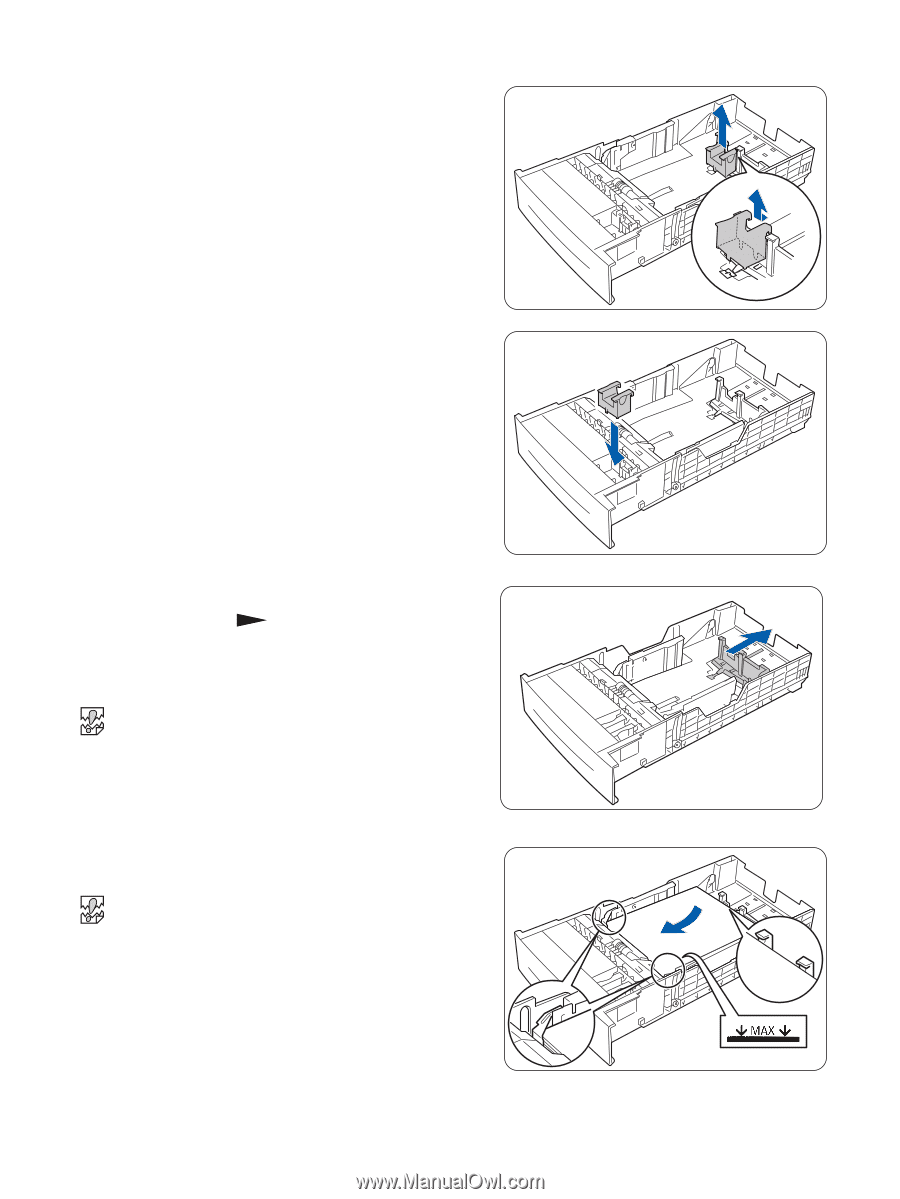
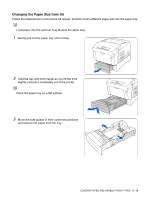
4 Grip the A5 spacer as you gently lift it up while pulling it forward and removing it from its position next to the paper guide. 5 Insert the A5 spacer into its storage slot in the paper tray. 6 Gently lift the end paper guide to move it, and insert the pins at the bottom of the guide in the holes (indicated by the mark) corresponding to the paper size that you want to load. Make sure that the end guide is properly inserted into the holes for the paper size. If the end paper guide is not inserted properly into the hole it could prevent automatic paper size detection. If this occurs, move the end paper guide all the way to its outermost position again, and then realign it with the appropriate paper size mark. 7 Align the four corners of the paper stack and insert the paper (print side up) under the tab. ■ Do not use paper that is folded, creased, or warped. ■ Make sure that all the paper is under the tab. ■ Do not overload the paper tray. 3 - 14 LOADING PAPER AND USABLE PAPER TYPES
-
 1
1 -
2
-
3
-
4
-
5
-
6
-
7
-
8
-
9
-
10
-
11
-
12
-
13
-
14
-
15
-
16
-
17
-
18
-
19
-
20
-
21
-
22
-
23
-
24
-
25
-
26
-
27
-
28
-
29
-
30
-
31
-
32
-
33
-
34
-
35
-
36
-
37
-
38
-
39
-
40
-
41
-
42
-
43
-
44
-
45
-
46
-
47
-
48
-
49
-
50
-
51
-
52
-
53
-
54
-
55
-
56
-
 57
57 -
 58
58 -
 59
59 -
 60
60 -
 61
61 -
 62
62 -
 63
63 -
 64
64 -
 65
65 -
 66
66 -
 67
67 -
68
-
69
-
70
-
71
-
72
-
73
-
74
-
75
-
76
-
77
-
78
-
79
-
80
-
81
-
82
-
83
-
84
-
85
-
86
-
87
-
88
-
89
-
90
-
91
-
92
-
93
-
94
-
95
-
96
-
97
-
98
-
99
-
100
-
101
-
102
-
103
-
104
-
105
-
106
-
107
-
108
-
109
-
110
-
111
-
112
-
113
-
114
-
115
-
116
-
117
-
118
-
119
-
120
-
121
-
122
-
123
-
124
-
125
-
126
-
127
-
128
-
129
-
130
-
131
-
132
-
133
-
134
-
135
-
136
-
137
-
138
-
139
-
140
-
141
-
142
-
143
-
144
-
145
-
146
-
147
-
148
-
149
-
150
-
151
-
152
-
153
-
154
-
155
-
156
-
157
-
158
-
159
-
160
-
161
-
162
-
163
-
164
-
165
-
166
 |
 |