Brother International 4200CN Users Manual - English - Page 28
Setting the IP Address, Setup IP Address
 |
UPC - 012502607458
View all Brother International 4200CN manuals
Add to My Manuals
Save this manual to your list of manuals |
Page 28 highlights
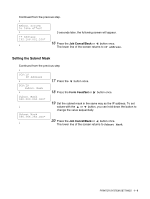
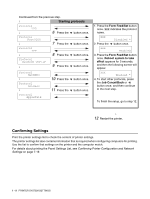
Continued from the previous page. ↓ Setup IP Address Panel * ↓ When the new value is set, an * appears next to it. 9 Press the Job Cancel/Back or button once. The lower line of the screen returns to Setup IP Address. Wait to restart the printer until after you set the gateway address at the last step. Continue to the next step without restarting the printer. Setting the IP Address The IP address consists of four separate values (base 10) separated by decimal points. Each of the four values can be set to a number between 0 and 255. Continued from the previous step Example: ■ IP Address 192.168.1.100 ↓ TCP/IP Setup IP Address ↓ TCP/IP IP Address ↓ IP Address 000.000.000.000* ↓ IP Address 192.000.000.000 ↓ IP Address 192.000.000.000 ↓ IP Address 192.168.001.100 ↓ Continued 10 Press the button once. 11 Press the Form Feed/Set or button once. 12 Press the or button until the value you want appears (for example, 192). You can hold down the buttons to change the value in increments of 10. 13 Press the button once to move the cursor to the next value. 14 Repeat steps 12 and 13 to finish setting the IP address. 15 Press the Form Feed/Set button once. 1 - 5 PRINTER SYSTEM SETTINGS
-
 1
1 -
2
-
3
-
4
-
5
-
6
-
7
-
8
-
9
-
10
-
11
-
12
-
13
-
14
-
15
-
16
-
17
-
18
-
19
-
20
-
21
-
22
-
 23
23 -
 24
24 -
 25
25 -
 26
26 -
 27
27 -
 28
28 -
 29
29 -
 30
30 -
 31
31 -
 32
32 -
 33
33 -
34
-
35
-
36
-
37
-
38
-
39
-
40
-
41
-
42
-
43
-
44
-
45
-
46
-
47
-
48
-
49
-
50
-
51
-
52
-
53
-
54
-
55
-
56
-
57
-
58
-
59
-
60
-
61
-
62
-
63
-
64
-
65
-
66
-
67
-
68
-
69
-
70
-
71
-
72
-
73
-
74
-
75
-
76
-
77
-
78
-
79
-
80
-
81
-
82
-
83
-
84
-
85
-
86
-
87
-
88
-
89
-
90
-
91
-
92
-
93
-
94
-
95
-
96
-
97
-
98
-
99
-
100
-
101
-
102
-
103
-
104
-
105
-
106
-
107
-
108
-
109
-
110
-
111
-
112
-
113
-
114
-
115
-
116
-
117
-
118
-
119
-
120
-
121
-
122
-
123
-
124
-
125
-
126
-
127
-
128
-
129
-
130
-
131
-
132
-
133
-
134
-
135
-
136
-
137
-
138
-
139
-
140
-
141
-
142
-
143
-
144
-
145
-
146
-
147
-
148
-
149
-
150
-
151
-
152
-
153
-
154
-
155
-
156
-
157
-
158
-
159
-
160
-
161
-
162
-
163
-
164
-
165
-
166
 |
 |
