Brother International 4200CN Users Manual - English - Page 105
What to Do When an Error Message Appears
 |
UPC - 012502607458
View all Brother International 4200CN manuals
Add to My Manuals
Save this manual to your list of manuals |
Page 105 highlights
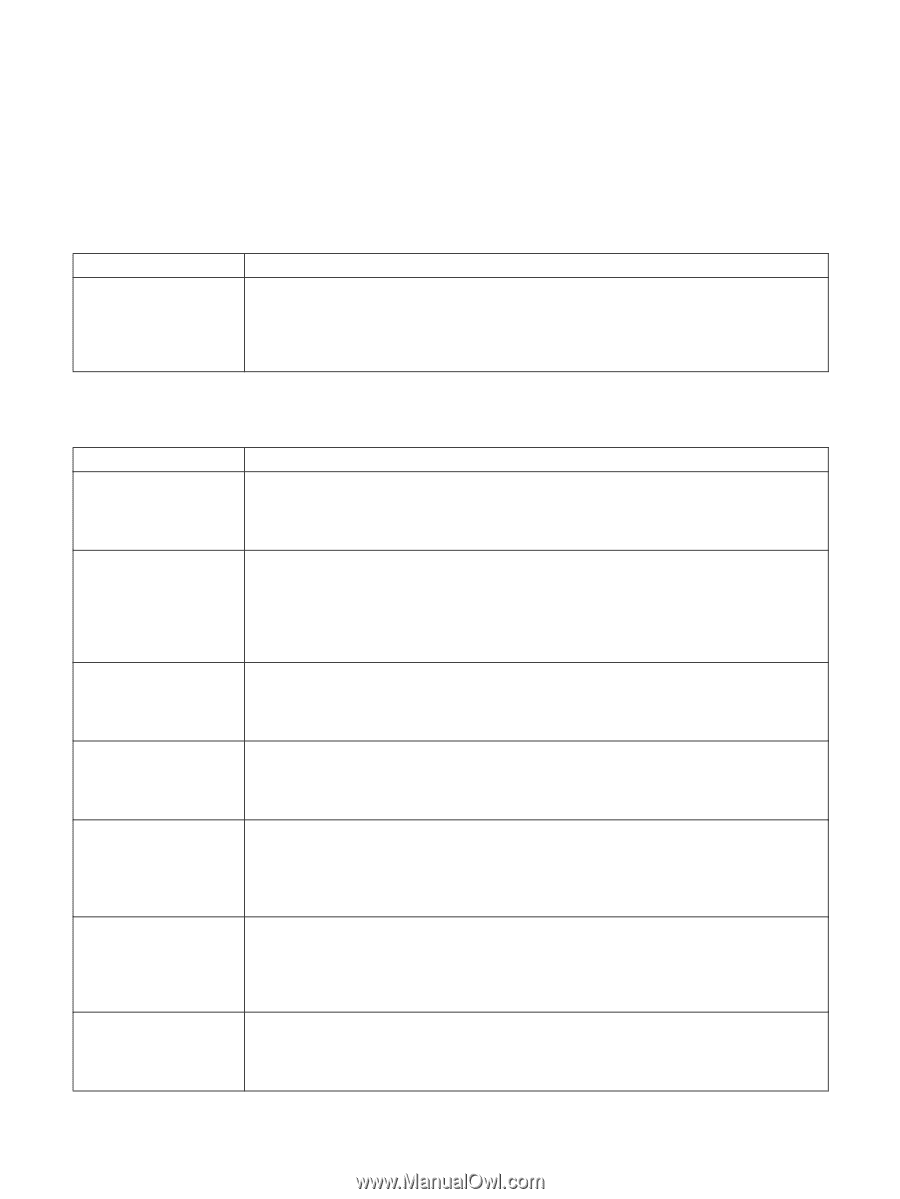
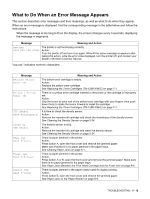
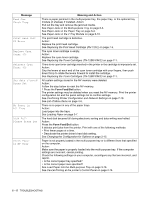
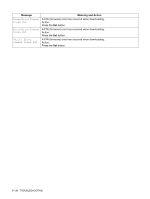
What to Do When an Error Message Appears This section describes error messages and their meanings, as well as what to do when they appear. When an error message is displayed, find the corresponding message in the table below and follow the instructions. When the message is too long to fit on the display, the screen changes every 3 seconds, displaying the message in segments. Message Meaning and Action xxx-xxx Turn OFF the Power The printer is not functioning correctly. Action: Turn the printer off and turn it on again. When/if the same message re-appears after taking this action, write the error code displayed, turn the printer off, and contact your dealer or Brother Customer Service. "xxx-xxx" indicates numeric characters. Message Replace Yellow Toner (Y) Reinsert Yellow Toner (Y) CTD Sensor Need Maintenance Clean Up CTD Sensor Regi Jam Open A-Cover Fuser Jam Open A/B-Cover Duplex Jam Open B-Cover Meaning and Action The yellow toner cartridge is empty. Action: Replace the yellow toner cartridge. See Replacing the Toner Cartridges (TN-12BK/Y/M/C) on page 7-1. There is no yellow toner cartridge inserted in the printer or the cartridge is improperly set. Action: Grip the levers at each end of the yellow toner cartridge with your fingers, then push down firmly to rotate the levers forward to install the cartridge. See Replacing the Toner Cartridges (TN-12BK/Y/M/C) on page 7-1. It is time to check the density sensor. Action: Remove the transfer roll cartridge and check the cleanliness of the density sensor. See Cleaning the Density Sensor on page 5-24. The density sensor is dirty. Action: Remove the transfer roll cartridge and clean the density sensor. See Cleaning the Density Sensor on page 5-24. There is paper jammed in the printer. Action: Press button A, open the front cover and remove the jammed paper. Make sure that there is no paper jammed in the paper trays. See Clearing Paper Jams on page 6-1. There is paper jammed in the printer. Action: Press button A or B, open the front cover and remove the jammed paper. Make sure there is no paper jammed in the paper trays. See Paper Jams Between the Print Head Cartridge and the Fuser Unit on page 6-6. There is paper jammed in the paper rotator used for duplex printing. Action: Press button B, open the front cover and remove the jammed paper. See Paper Jams in the Paper Rotator on page 6-9. TROUBLESHOOTING 5 - 16
-
 1
1 -
2
-
3
-
4
-
5
-
6
-
7
-
8
-
9
-
10
-
11
-
12
-
13
-
14
-
15
-
16
-
17
-
18
-
19
-
20
-
21
-
22
-
23
-
24
-
25
-
26
-
27
-
28
-
29
-
30
-
31
-
32
-
33
-
34
-
35
-
36
-
37
-
38
-
39
-
40
-
41
-
42
-
43
-
44
-
45
-
46
-
47
-
48
-
49
-
50
-
51
-
52
-
53
-
54
-
55
-
56
-
57
-
58
-
59
-
60
-
61
-
62
-
63
-
64
-
65
-
66
-
67
-
68
-
69
-
70
-
71
-
72
-
73
-
74
-
75
-
76
-
77
-
78
-
79
-
80
-
81
-
82
-
83
-
84
-
85
-
86
-
87
-
88
-
89
-
90
-
91
-
92
-
93
-
94
-
95
-
96
-
97
-
98
-
99
-
 100
100 -
 101
101 -
 102
102 -
 103
103 -
 104
104 -
 105
105 -
 106
106 -
 107
107 -
 108
108 -
 109
109 -
 110
110 -
111
-
112
-
113
-
114
-
115
-
116
-
117
-
118
-
119
-
120
-
121
-
122
-
123
-
124
-
125
-
126
-
127
-
128
-
129
-
130
-
131
-
132
-
133
-
134
-
135
-
136
-
137
-
138
-
139
-
140
-
141
-
142
-
143
-
144
-
145
-
146
-
147
-
148
-
149
-
150
-
151
-
152
-
153
-
154
-
155
-
156
-
157
-
158
-
159
-
160
-
161
-
162
-
163
-
164
-
165
-
166
 |
 |