Brother International PE-DESIGN 10 Startup : Reference Guide - Page 31
Importing Patterns
 |
View all Brother International PE-DESIGN 10 manuals
Add to My Manuals
Save this manual to your list of manuals |
Page 31 highlights
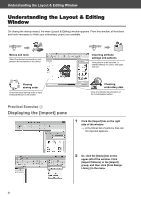
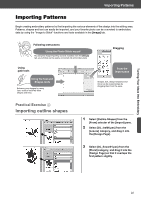
Turning Your Ideas Into Embroidery Importing Patterns Importing Patterns Begin creating embroidery patterns by first importing the various elements of the design into the editing area. Patterns, shapes and text can easily be imported, and your favorite photo can be converted to embroidery data by using the "Image to Stitch" functions and tools available in the [Image] tab. Following instructions Using the Photo Stitch wizard By using the image-importing wizards available from the [Image] tab, your photos can be easily converted into embroidery data. Dragging Using path tools Using the Text and Shapes tools Enhance your designs by using input tools to intuitively draw shapes and lines. From the Import pane Shapes, text, design templates and more can be reused simply by dragging them from the pane. Practical Exercise d Importing outline shapes 1 Select [Outline Shapes] from the [From] selector of the [Import] pane. 2 Select [OL_leaf06.pes] from the [Leaves] category, and drag it into the [Design Page]. 3 Select [OL_flower01.pes] from the [Floral] category, and drag it into the [Design Page] so that it overlaps the first pattern slightly. 22
-
 1
1 -
2
-
3
-
4
-
5
-
6
-
7
-
8
-
9
-
10
-
11
-
12
-
13
-
14
-
15
-
16
-
17
-
18
-
19
-
20
-
21
-
22
-
23
-
24
-
25
-
 26
26 -
 27
27 -
 28
28 -
 29
29 -
 30
30 -
 31
31 -
 32
32 -
 33
33 -
 34
34 -
 35
35 -
 36
36 -
37
-
38
-
39
-
40
-
41
-
42
-
43
-
44
-
45
-
46
-
47
-
48
-
49
-
50
-
51
-
52
-
53
-
54
-
55
-
56
-
57
-
58
-
59
-
60
-
61
-
62
-
63
-
64
-
65
-
66
-
67
-
68
-
69
-
70
-
71
-
72
-
73
-
74
-
75
-
76
-
77
-
78
-
79
-
80
 |
 |
