Brother International PE-DESIGN 10 Startup : Reference Guide - Page 71
polygon that encloses the area
 |
View all Brother International PE-DESIGN 10 manuals
Add to My Manuals
Save this manual to your list of manuals |
Page 71 highlights
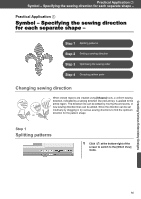
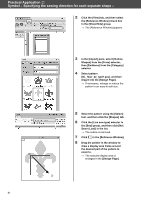
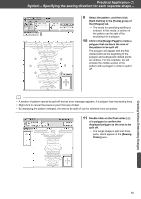
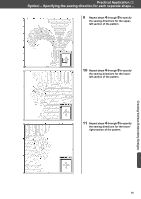
Practical Application g Symbol - Specifying the sewing direction for each separate shape - f a b e d c 9 Select the pattern, and then click [Split Outline] in the [Tools] group of the [Shapes] tab. → The mode for specifying splitting is entered. In this mode, a section of the pattern can be split off by enclosing it in a polygon. 10 Click in the [Design Page] to create a polygon that encloses the area of the pattern to be split off. The polygon will appear with the first clicked point as the beginning of the polygon and subsequent clicked points as vertices. For this example, we will enclose the middle section of the pattern with a polygon in order to split it off. b • A section of pattern cannot be split off and an error message appears, if a polygon has intersecting lines. • Right-click to cancel the previous point that was clicked. • By displaying the pattern enlarged, the area to be split off can be selected more accurately. 11 Double-click on the final vertex (f) of a polygon to confirm the displayed polygon as the area to be split off. → The single shape is split into three parts, which appear in the [Sewing Order] pane. Creating Various Embroidery Designs 62
-
 1
1 -
2
-
3
-
4
-
5
-
6
-
7
-
8
-
9
-
10
-
11
-
12
-
13
-
14
-
15
-
16
-
17
-
18
-
19
-
20
-
21
-
22
-
23
-
24
-
25
-
26
-
27
-
28
-
29
-
30
-
31
-
32
-
33
-
34
-
35
-
36
-
37
-
38
-
39
-
40
-
41
-
42
-
43
-
44
-
45
-
46
-
47
-
48
-
49
-
50
-
51
-
52
-
53
-
54
-
55
-
56
-
57
-
58
-
59
-
60
-
61
-
62
-
63
-
64
-
65
-
 66
66 -
 67
67 -
 68
68 -
 69
69 -
 70
70 -
 71
71 -
 72
72 -
 73
73 -
 74
74 -
 75
75 -
 76
76 -
77
-
78
-
79
-
80
 |
 |
