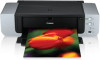
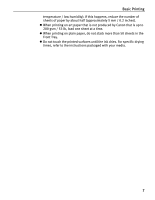
Canon PIXMA Pro9000 Quick Start Guide - Page 12
Loading Envelopes in the Auto Sheet Feeder, Printing with, Windows, Printing with Macintosh - drivers
 |
View all Canon PIXMA Pro9000 manuals
Add to My Manuals
Save this manual to your list of manuals |
Page 12 highlights
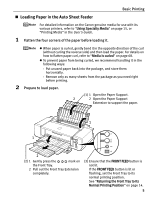
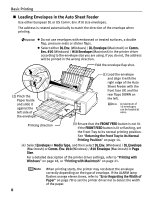
Basic Printing „ Loading Envelopes in the Auto Sheet Feeder Use either European DL or US Comm. Env. #10 size envelopes. The address is rotated automatically to match the direction of the envelope when printing. z Do not use envelopes with embossed or treated surfaces, a double flap, pressure seals or sticker flaps. z Select either DL Env. (Windows) / DL Envelope (Macintosh) or Comm. Env. #10 (Windows) / #10 Envelope (Macintosh) in the printer driver according to the envelope size you are using. If you do not, the address will be printed in the wrong direction. Fold the envelope flap shut. (2) Pinch the Paper Guide and slide it against the left side of the envelope. (1) Load the envelope and align it with the right edge of the Auto Sheet Feeder with the front face UP, and the rear flaps DOWN on the left. A maximum of 10 envelopes can be loaded at once. Printing direction (3) Ensure that the FRONT FEED button is not lit. If the FRONT FEED button is lit or flashing, set the Front Tray to its normal printing position. See "Returning the Front Tray to Its Normal Printing Position" on page 14. (4) Select Envelope in Media Type, and then select DL Env. (Windows) / DL Envelope (Macintosh) or Comm. Env. #10 (Windows) / #10 Envelope (Macintosh) in Page Size. For a detailed description of the printer driver settings, refer to "Printing with Windows" on page 18, or "Printing with Macintosh" on page 21. When printing starts, the printer may not detect the envelope correctly depending on the type of envelope. If the ALARM lamp flashes orange eleven times, refer to "Error Regarding the Width of Paper" on page 78 to set the printer driver not to detect the width of the paper. 8
-
 1
1 -
2
-
3
-
4
-
5
-
6
-
 7
7 -
 8
8 -
 9
9 -
 10
10 -
 11
11 -
 12
12 -
 13
13 -
 14
14 -
 15
15 -
 16
16 -
 17
17 -
18
-
19
-
20
-
21
-
22
-
23
-
24
-
25
-
26
-
27
-
28
-
29
-
30
-
31
-
32
-
33
-
34
-
35
-
36
-
37
-
38
-
39
-
40
-
41
-
42
-
43
-
44
-
45
-
46
-
47
-
48
-
49
-
50
-
51
-
52
-
53
-
54
-
55
-
56
-
57
-
58
-
59
-
60
-
61
-
62
-
63
-
64
-
65
-
66
-
67
-
68
-
69
-
70
-
71
-
72
-
73
-
74
-
75
-
76
-
77
-
78
-
79
-
80
-
81
-
82
-
83
-
84
-
85
-
86
-
87
-
88
-
89
-
90
-
91
-
92
-
93
-
94
-
95
-
96
-
97
-
98
-
99
-
100
 |
 |
