Canon PIXMA Pro9000 Quick Start Guide - Page 85
Camera Error Message, Possible Cause, Try This, Easy Setup Instructions - printhead
 |
View all Canon PIXMA Pro9000 manuals
Add to My Manuals
Save this manual to your list of manuals |
Page 85 highlights
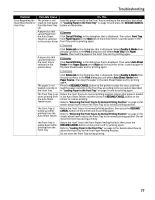
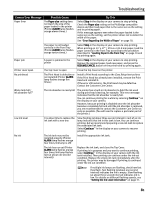
Troubleshooting Camera Error Message Possible Cause Paper Error The Paper size setting does not match the size of the paper loaded in the printer (Printer ALARM lamp flashes orange eleven times.) Try This Select Stop in the display on your camera to stop printing. Check the Paper size setting on the PictBridge compatible device and then load paper that is the same size as the setting and try printing again. If this message appears even when the paper loaded is the same size as the setting, set the printer driver not to detect the width of the paper. See "Error Regarding the Width of Paper" on page 78. The paper is not loaded correctly in the Front Tray (Printer ALARM lamp flashes orange twelve times.) Select Stop in the display on your camera to stop printing. When printing on 14" x 17" / 355.6 x 431.8 mm paper, load the paper correctly in the Front Tray according to the procedure described in "Loading Paper in the Front Tray" on page 10 and try printing again. Paper jam A paper is jammed in the printer Select Stop in the display on your camera to stop printing. Remove the jammed paper, load new paper, and press the RESUME/CANCEL button on the printer and try printing again. Printer cover open The Top Cover is open Close the Top Cover on the printer. No printhead The Print Head is defective or not installed (Printer ALARM lamp flashes orange five times.) Install a Print Head according to the Easy Setup Instructions. If the Print Head has already been installed, remove the Print Head and reinstall it. If the error still remains, the Print Head may be defective. Contact the Customer Care Center. Waste tank full / Ink absorber full*2 The ink absorber is nearly full The printer has a built-in ink absorber to hold the ink used during print head cleaning, for example. This error message indicates that the ink absorber is nearly full. You can continue printing for a while by selecting Continue*1 on the display on your camera. However, because printing is disabled once the ink absorber becomes completely full and until the ink absorber is replaced, you are recommended to contact the Customer Care Center as early as possible. (You will need to replace a particular part of the printer.) Low ink level It is about time to replace the ink tank with a new one Slow flashing (at about three second interval in red) of an ink lamp indicates that ink in this tank is low. You can continue printing, but we recommend preparing a new ink tank to replace the associated ink tank. Select Continue*1 in the display on your camera to resume printing. No ink The ink tank may not be installed properly (Printer ALARM lamp flashes orange four times/ink lamp is off) Install the appropriate ink tank. The ink has run out (Printer ALARM lamp flashes orange four times/ink lamp flashes fast (at about one second interval)) Replace the ink tank, and close the Top Cover. If printing is in progress and you want to continue printing, select Continue*1 in the display on your camera with the ink tank installed. Then printing can continue under the ink out condition. Replace the empty ink tank immediately after the printing. The printer may be damaged if printing is continued under the ink out condition. If multiple ink lamps are flashing, check how fast they flash. Fast flashing (at about one second interval) indicates the ink is empty. Slow flashing (at about three second interval) indicates ink is low. For details on different flashing speeds, see "Getting the Ink Level Information" on page 37. 81
-
 1
1 -
2
-
3
-
4
-
5
-
6
-
7
-
8
-
9
-
10
-
11
-
12
-
13
-
14
-
15
-
16
-
17
-
18
-
19
-
20
-
21
-
22
-
23
-
24
-
25
-
26
-
27
-
28
-
29
-
30
-
31
-
32
-
33
-
34
-
35
-
36
-
37
-
38
-
39
-
40
-
41
-
42
-
43
-
44
-
45
-
46
-
47
-
48
-
49
-
50
-
51
-
52
-
53
-
54
-
55
-
56
-
57
-
58
-
59
-
60
-
61
-
62
-
63
-
64
-
65
-
66
-
67
-
68
-
69
-
70
-
71
-
72
-
73
-
74
-
75
-
76
-
77
-
78
-
79
-
 80
80 -
 81
81 -
 82
82 -
 83
83 -
 84
84 -
 85
85 -
 86
86 -
 87
87 -
 88
88 -
 89
89 -
 90
90 -
91
-
92
-
93
-
94
-
95
-
96
-
97
-
98
-
99
-
100
 |
 |