Canon PIXMA Pro9000 Quick Start Guide - Page 83
When using Mac OS X v.10.3.x or Mac OS X v.10.2.8, select, Printer, Pro9000, Print and Fax Preferences
 |
View all Canon PIXMA Pro9000 manuals
Add to My Manuals
Save this manual to your list of manuals |
Page 83 highlights
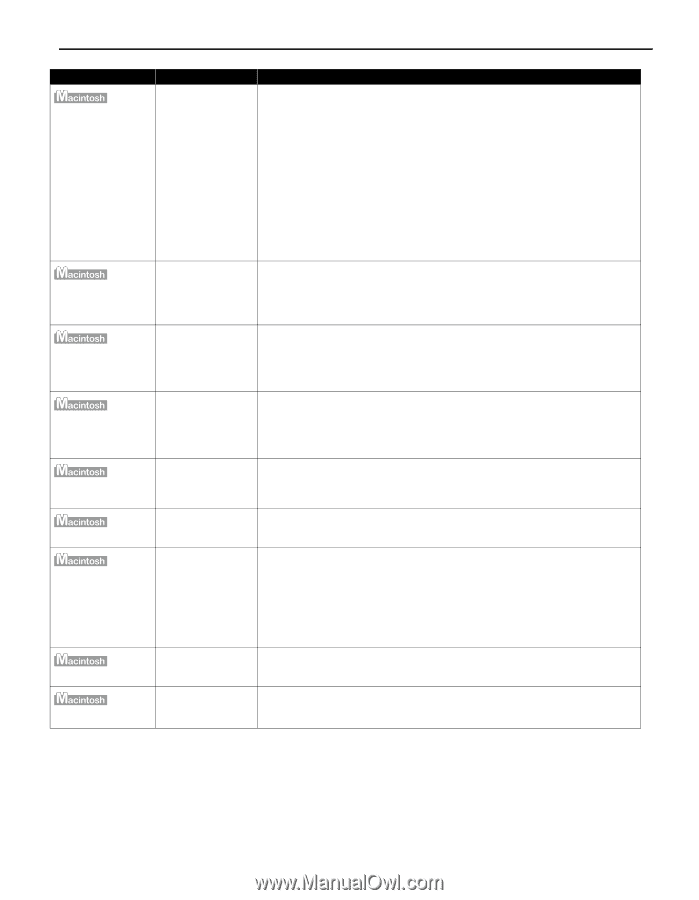
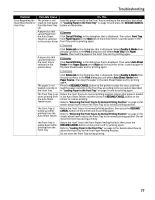
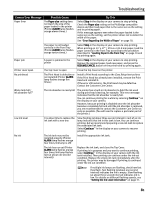
Troubleshooting Problem "Error No.: 300" "Error No.: 1281" "Error No.: 1283" "Error No.: 1284" "Error No.: 1320" "Error No.: 1321" "Error No.: 1700" "Error No.: 1851" "Error No.: 1856" Possible Cause Printer you want to use is not selected on the Printer popup menu on the Print dialog box Try This Select Pro9000 on the Printer pop-up menu on the Print dialog box. If Pro9000 does not appear on the Printer pop-up menu, do the following to confirm the printer settings: 1. Select Print and Fax Preferences from the Printer pop-up menu. When using Mac OS X v.10.3.x or Mac OS X v.10.2.8, select Edit Printer List from the Printer pop-up menu. 2. Ensure that Pro9000 is displayed and the check box is selected in the screen that is displayed. When using Mac OS X v.10.2.8, ensure that Pro9000 is displayed in the Printer List. 3. If Pro9000 is not displayed in the screen displayed in step 2, click Add(+) to add the printer. If you cannot add the printer, follow the procedures described in the Easy Setup Instructions and reinstall the driver. The Front Tray is up when printing from the Auto Sheet Feeder starts Return the Front Tray to its normal printing position. Ensure that paper is loaded in the Auto Sheet Feeder and then press the RESUME/CANCEL button on the printer to resume printing. Refer to "Returning the Front Tray to Its Normal Printing Position" on page 14 for details about how to return the Front Tray to its normal printing position. The Front Tray is pulled up while printing from the Auto Sheet Feeder Return the Front Tray to its normal printing position, then press RESUME/ CANCEL button on the printer and try printing again. Refer to "Returning the Front Tray to Its Normal Printing Position" on page 14 for details about how to return the Front Tray to its normal printing position. Do not move the Front Tray during printing. The Front Tray is pulled down while printing from the Front Tray Return the Front Tray to the Front Paper Feeding Position, then press the RESUME/CANCEL button on the printer and try printing again. Refer to "Loading Paper in the Front Tray" on page 10 for details about how to return the Front Tray to the Front Paper Feeding Position. Do not move the Front Tray during printing. The printer is not Load the paper correctly in the Front Tray according to the procedure described ready to feed paper in "Loading Paper in the Front Tray" on page 10 and press the RESUME/CANCEL from the Front Tray button on the printer. yet The paper is not Press the RESUME/CANCEL button on the printer to clear the error, and then loaded correctly in load the paper correctly in the Front Tray according to the procedure described the Front Tray in "Loading Paper in the Front Tray" on page 10 and try printing again. The ink absorber is nearly full The printer has a built-in ink absorber to hold the ink used during print head cleaning, for example. This error message indicates that this ink absorber is nearly full. Press the RESUME/CANCEL button to clear the error so you can continue printing. Before the ink absorber becomes completely full, contact the Customer Care Center. When you experience this error, you will need to call for servicing to replace the ink absorber and to check the printer for proper operation. Inner Cover is open Close the Inner Cover, then press the RESUME/CANCEL button to resume when printing printing. starts Inner Cover is opened while printing Close the Inner Cover, then press the RESUME/CANCEL button. One page of the print data being sent at the time of the error will be erased, so print that page again. 79
-
 1
1 -
2
-
3
-
4
-
5
-
6
-
7
-
8
-
9
-
10
-
11
-
12
-
13
-
14
-
15
-
16
-
17
-
18
-
19
-
20
-
21
-
22
-
23
-
24
-
25
-
26
-
27
-
28
-
29
-
30
-
31
-
32
-
33
-
34
-
35
-
36
-
37
-
38
-
39
-
40
-
41
-
42
-
43
-
44
-
45
-
46
-
47
-
48
-
49
-
50
-
51
-
52
-
53
-
54
-
55
-
56
-
57
-
58
-
59
-
60
-
61
-
62
-
63
-
64
-
65
-
66
-
67
-
68
-
69
-
70
-
71
-
72
-
73
-
74
-
75
-
76
-
77
-
 78
78 -
 79
79 -
 80
80 -
 81
81 -
 82
82 -
 83
83 -
 84
84 -
 85
85 -
 86
86 -
 87
87 -
 88
88 -
89
-
90
-
91
-
92
-
93
-
94
-
95
-
96
-
97
-
98
-
99
-
100
 |
 |