Canon PIXMA Pro9000 Quick Start Guide - Page 72
Troubleshooting Printer Hardware
 |
View all Canon PIXMA Pro9000 manuals
Add to My Manuals
Save this manual to your list of manuals |
Page 72 highlights
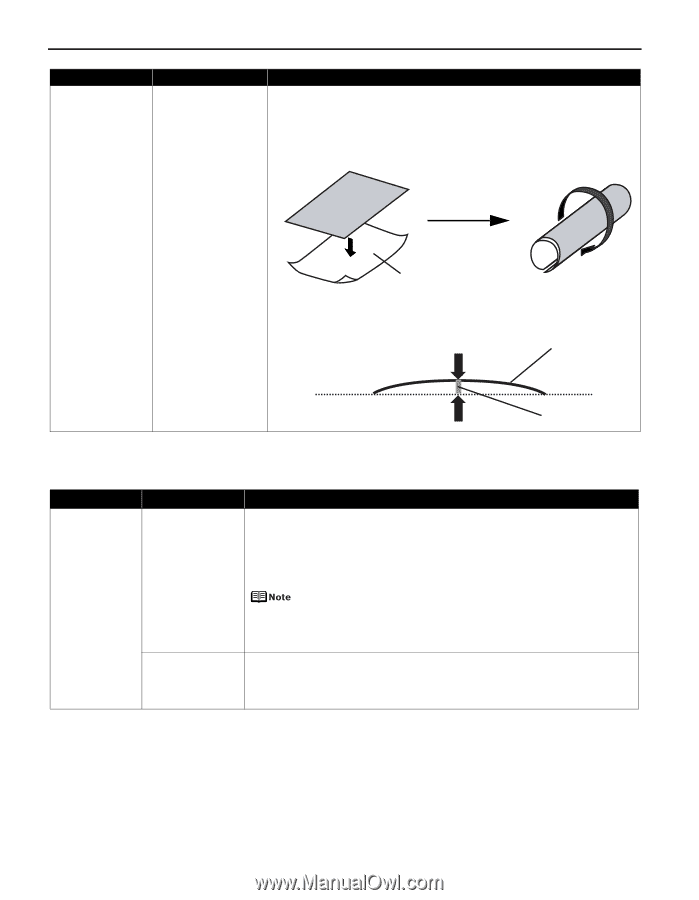
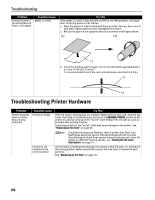
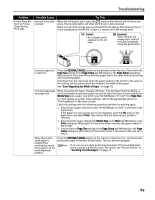
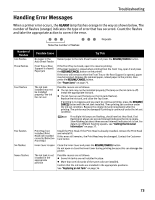
Troubleshooting Problem Printed Surface is Scratched/Back of Paper is Smudged Possible Cause Media is curled Try This If the paper is curled, it may become marked or not feed properly. Use paper after correcting paper curl as follows. 1. Place the paper on a flat surface with the print side*1 face up, then cover it with plain regular paper to avoid damaging the surface. 2. Roll up the paper in the opposite direction as shown in the figure below. (1) (2) *1 3. Check the printing paper if paper curl is corrected within approximately 2 to 5 mm / 0.08 to 0.2 inches*2. It is recommended to print the curl-corrected paper one sheet at a time. *1 *2 Troubleshooting Printer Hardware Problem Printer Does Not Start or Printer Stops During Print Jobs Possible Cause Ink tank is empty Ink tank is not installed in the correct position Try This If the ink lamp is flashing fast, ink is empty. Replace the ink tank and close the Top Cover. If printing is not finished yet, just press the RESUME/CANCEL button on the printer to continue printing in the "no ink" state. Replace the ink tank as soon as possible after printing finishes. Continuing to print in the "no ink" state may cause damage to the printer. See "Replacing an Ink Tank" on page 36. If multiple ink lamps are flashing, check how fast they flash. Fast flashing (at about one second interval) indicates the ink is empty. Slow flashing (at about three second interval) indicates ink is low. For details on different flashing speeds, see "Getting the Ink Level Information" on page 37. If an ink lamp is flashing even though ink remains in that ink tank, it is inserted in the wrong position. Make sure that the correct ink tank color is inserted in each position. See "Replacing an Ink Tank" on page 36. 68
-
 1
1 -
2
-
3
-
4
-
5
-
6
-
7
-
8
-
9
-
10
-
11
-
12
-
13
-
14
-
15
-
16
-
17
-
18
-
19
-
20
-
21
-
22
-
23
-
24
-
25
-
26
-
27
-
28
-
29
-
30
-
31
-
32
-
33
-
34
-
35
-
36
-
37
-
38
-
39
-
40
-
41
-
42
-
43
-
44
-
45
-
46
-
47
-
48
-
49
-
50
-
51
-
52
-
53
-
54
-
55
-
56
-
57
-
58
-
59
-
60
-
61
-
62
-
63
-
64
-
65
-
66
-
 67
67 -
 68
68 -
 69
69 -
 70
70 -
 71
71 -
 72
72 -
 73
73 -
 74
74 -
 75
75 -
 76
76 -
 77
77 -
78
-
79
-
80
-
81
-
82
-
83
-
84
-
85
-
86
-
87
-
88
-
89
-
90
-
91
-
92
-
93
-
94
-
95
-
96
-
97
-
98
-
99
-
100
 |
 |