Canon PIXMA Pro9000 Quick Start Guide - Page 84
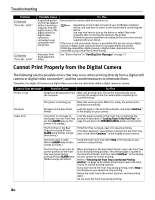
Cannot Print Properly from the Digital Camera
 |
View all Canon PIXMA Pro9000 manuals
Add to My Manuals
Save this manual to your list of manuals |
Page 84 highlights
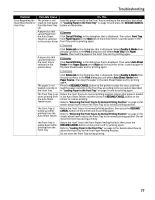
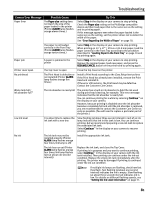
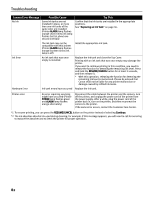
Troubleshooting Problem "Error No.: 2001" "Error No.: 2500" Possible Cause A specified period of time has elapsed without receiving a response from the digital camera/The digital camera or digital video camcorder connected is not compatible with this printer Automatic Print Head alignment failed Try This Disconnect the camera cable and reconnect it. Depending on the model or brand of your PictBridge compliant device, you may have to select a print mode before connecting the device. You may also have to turn on the device or select Play mode manually after connecting the device to the printer. Perform necessary operations according to the instruction manual supplied with your device. If the error is still unresolved, there is a possibility that you are using a digital camera or digital video camcorder that is not supported by this printer. PictBridge-compatible digital camera or digital video camcorder can be connected to your printer for Direct Printing. See "Eleven flashes" in "Handling Error Messages" on page 73. Cannot Print Properly from the Digital Camera The following are the possible errors that may occur when printing directly from a digital still camera or digital video camcorder*, and the countermeasures to eliminate them. *Hereafter, the digital still camera and digital video camcorder are collectively called a digital camera or camera. Camera Error Message Possible Cause Try This Printer in use Images are being printed from Wait until printing ends. The printer automatically starts the computer printing the images from the camera after completing the current printing. No paper The printer is warming up No paper in the Auto Sheet Feeder Wait until warm-up ends. When it is ready, the printer starts printing automatically. Load the paper in the Auto Sheet Feeder, and select Continue*1 in the display on your camera. Paper Error The printer is not ready to Load the paper correctly in the Front Tray according to the feed paper from the Front Tray procedure described in "Loading Paper in the Front Tray" on yet (the ALARM lamp on the page 10 and press the RESUME/CANCEL button on the printer. printer is lit orange.) The Front Tray or the Rear Support is closed (Printer ALARM lamp flashes orange three times.) If the Front Tray is closed, open it to resume printing. If the Rear Support is closed when printing from the Front Tray, open it and select Continue*1 in the display on your camera. The Inner Cover is open Close the Inner Cover and select Stop in the display on your (Printer ALARM lamp flashes camera to stop printing. orange six times.) The Front Tray is not set to its correct position or the Front Tray was moved during printing (Printer ALARM lamp flashes orange ten times.) When printing from the Auto Sheet Feeder, return the Front Tray to its normal printing position. Ensure that paper is loaded in the Auto Sheet Feeder and then select Continue*1 in the display on your camera to resume printing. Refer to "Returning the Front Tray to Its Normal Printing Position" on page 14 for details about how to return the Front Tray to its normal printing position. If you have moved the Front Tray during printing, select Stop in the display on your camera to stop printing. Return the Front Tray to the correct position, and try printing again. Do not move the Front Tray during printing. 80
-
 1
1 -
2
-
3
-
4
-
5
-
6
-
7
-
8
-
9
-
10
-
11
-
12
-
13
-
14
-
15
-
16
-
17
-
18
-
19
-
20
-
21
-
22
-
23
-
24
-
25
-
26
-
27
-
28
-
29
-
30
-
31
-
32
-
33
-
34
-
35
-
36
-
37
-
38
-
39
-
40
-
41
-
42
-
43
-
44
-
45
-
46
-
47
-
48
-
49
-
50
-
51
-
52
-
53
-
54
-
55
-
56
-
57
-
58
-
59
-
60
-
61
-
62
-
63
-
64
-
65
-
66
-
67
-
68
-
69
-
70
-
71
-
72
-
73
-
74
-
75
-
76
-
77
-
78
-
 79
79 -
 80
80 -
 81
81 -
 82
82 -
 83
83 -
 84
84 -
 85
85 -
 86
86 -
 87
87 -
 88
88 -
 89
89 -
90
-
91
-
92
-
93
-
94
-
95
-
96
-
97
-
98
-
99
-
100
 |
 |