Canon PowerShot 350 Service Manual - Page 18
Timer, Negative, Multi, Image
 |
View all Canon PowerShot 350 manuals
Add to My Manuals
Save this manual to your list of manuals |
Page 18 highlights
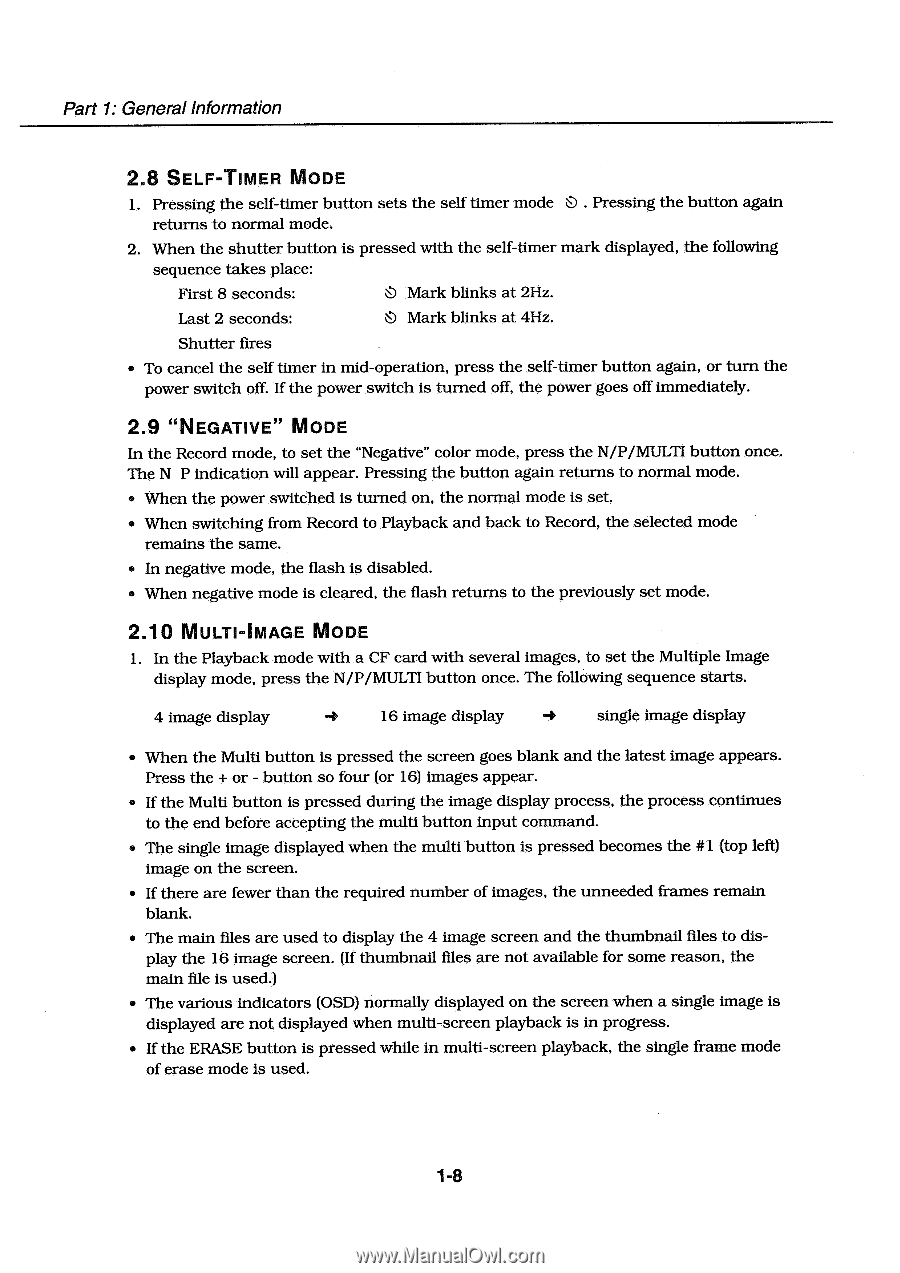
Part 1: General Information 2.8 SELF-TIMER MODE 1. Pressing the self-timer button sets the self timer mode J . Pressing the button again returns to normal mode. 2. When the shutter button is pressed with the self-timer mark displayed, the following sequence takes place: First 8 seconds: k)\l Mark blinks at 2Hz. Last 2 seconds: Mark blinks at 4Hz. Shutter fires • To cancel the self timer in mid-operation, press the self-timer button again, or turn the power switch off. If the power switch is turned off, the power goes off immediately. 2.9 "NEGATIVE" MODE In the Record mode, to set the "Negative" color mode, press the N/P/MULTI button once. The N P indication will appear. Pressing the button again returns to normal mode. • When the power switched is turned on, the normal mode is set. • When switching from Record to Playback and back to Record, the selected mode remains the same. • In negative mode, the flash is disabled. • When negative mode is cleared, the flash returns to the previously set mode. 2.10 MULTI-IMAGE MODE 1. In the Playback mode with a CF card with several images, to set the Multiple Image display mode, press the N/P/MULTI button once. The following sequence starts. 4 image display ▪ 16 image display single image display • When the Multi button is pressed the screen goes blank and the latest image appears. Press the + or - button so four (or 16) images appear. • If the Multi button is pressed during the image display process, the process continues to the end before accepting the multi button input command. • The single image displayed when the multi button is pressed becomes the #1 (top left) image on the screen. • If there are fewer than the required number of images, the unneeded frames remain blank. • The main files are used to display the 4 image screen and the thumbnail files to display the 16 image screen. (If thumbnail files are not available for some reason, the main file is used.) • The various indicators (OSD) normally displayed on the screen when a single image is displayed are not displayed when multi-screen playback is in progress. • If the ERASE button is pressed while in multi-screen playback, the single frame mode of erase mode is used. 1-8
-
 1
1 -
2
-
3
-
4
-
5
-
6
-
7
-
8
-
9
-
10
-
11
-
12
-
 13
13 -
 14
14 -
 15
15 -
 16
16 -
 17
17 -
 18
18 -
 19
19 -
 20
20 -
 21
21 -
 22
22 -
 23
23 -
24
-
25
-
26
-
27
-
28
-
29
-
30
-
31
-
32
-
33
-
34
-
35
-
36
-
37
-
38
-
39
-
40
-
41
-
42
-
43
-
44
-
45
-
46
-
47
-
48
-
49
-
50
-
51
-
52
-
53
-
54
-
55
-
56
-
57
-
58
-
59
-
60
-
61
-
62
-
63
-
64
-
65
-
66
-
67
-
68
-
69
-
70
-
71
-
72
-
73
-
74
-
75
-
76
-
77
-
78
-
79
-
80
-
81
-
82
-
83
-
84
-
85
-
86
-
87
-
88
-
89
-
90
-
91
-
92
-
93
-
94
-
95
-
96
-
97
-
98
-
99
-
100
-
101
-
102
-
103
-
104
-
105
-
106
-
107
-
108
-
109
-
110
-
111
-
112
-
113
-
114
-
115
-
116
-
117
-
118
-
119
-
120
-
121
-
122
-
123
-
124
-
125
-
126
-
127
-
128
-
129
-
130
-
131
-
132
-
133
-
134
-
135
-
136
-
137
-
138
-
139
 |
 |