Canon PowerShot 350 Service Manual - Page 61
Adjustments
 |
View all Canon PowerShot 350 manuals
Add to My Manuals
Save this manual to your list of manuals |
Page 61 highlights
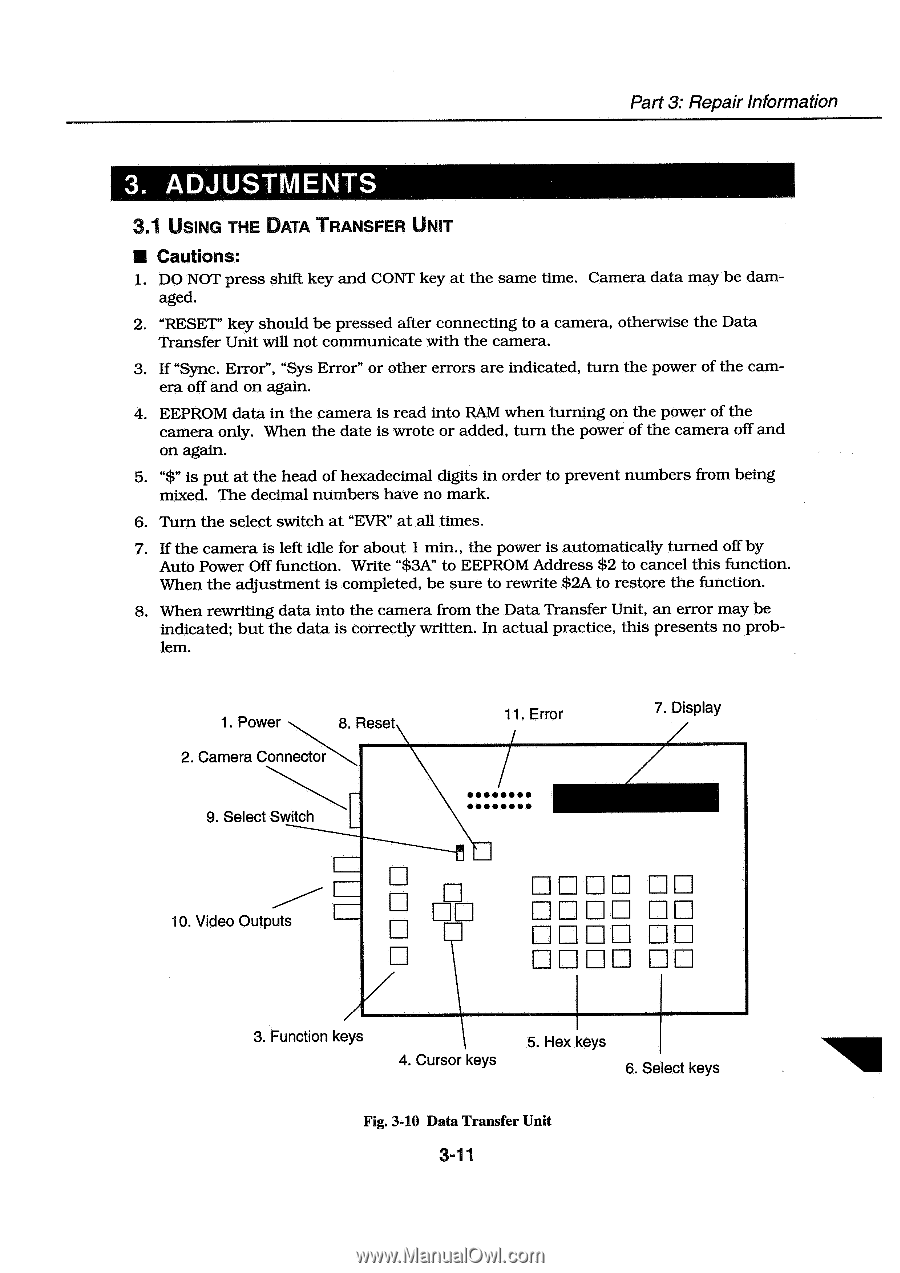
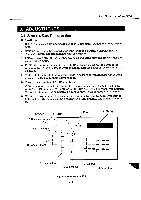
Part 3: Repair information 3. ADJUSTMENTS 3.1 USING THE DATA TRANSFER UNIT ■ Cautions: 1. DO NOT press shift key and CONT key at the same time. Camera data may be dam- aged. 2. "RESET" key should be pressed after connecting to a camera, otherwise the Data Transfer Unit will not communicate with the camera. 3. If "Sync. Error", "Sys Error" or other errors are indicated, turn the power of the camera off and on again. 4. EEPROM data in the camera is read into RAM when turning on the power of the camera only. When the date is wrote or added, turn the power of the camera off and on again. 5. "$" is put at the head of hexadecimal digits in order to prevent numbers from being mixed. The decimal numbers have no mark. 6. Turn the select switch at "EVR" at all times. 7. If the camera is left idle for about 1 min. , the power is automatically turned off by Auto Power Off function. Write "$3A" to EEPROM Address $2 to cancel this function. When the adjustment is completed, be sure to rewrite $2A to restore the function. 8. When rewriting data into the camera from the Data Transfer Unit, an error may be indicated; but the data is correctly written. In actual practice, this presents no problem. 1. Power 8. Resets 2. Camera Connector 9. Select Switch 11. Error 01110 OO • OO 7. Display 10. Video Outputs F1EFF1 Fri PERI-1 nn FITIFE nr n 3. Function keys 4. Cursor keys 5. Hex keys 6. Select keys Fig. 3-10 Data Transfer Unit 3-11
-
 1
1 -
2
-
3
-
4
-
5
-
6
-
7
-
8
-
9
-
10
-
11
-
12
-
13
-
14
-
15
-
16
-
17
-
18
-
19
-
20
-
21
-
22
-
23
-
24
-
25
-
26
-
27
-
28
-
29
-
30
-
31
-
32
-
33
-
34
-
35
-
36
-
37
-
38
-
39
-
40
-
41
-
42
-
43
-
44
-
45
-
46
-
47
-
48
-
49
-
50
-
51
-
52
-
53
-
54
-
55
-
 56
56 -
 57
57 -
 58
58 -
 59
59 -
 60
60 -
 61
61 -
 62
62 -
 63
63 -
 64
64 -
 65
65 -
 66
66 -
67
-
68
-
69
-
70
-
71
-
72
-
73
-
74
-
75
-
76
-
77
-
78
-
79
-
80
-
81
-
82
-
83
-
84
-
85
-
86
-
87
-
88
-
89
-
90
-
91
-
92
-
93
-
94
-
95
-
96
-
97
-
98
-
99
-
100
-
101
-
102
-
103
-
104
-
105
-
106
-
107
-
108
-
109
-
110
-
111
-
112
-
113
-
114
-
115
-
116
-
117
-
118
-
119
-
120
-
121
-
122
-
123
-
124
-
125
-
126
-
127
-
128
-
129
-
130
-
131
-
132
-
133
-
134
-
135
-
136
-
137
-
138
-
139
 |
 |