Canon PowerShot 350 Service Manual - Page 19
Erasing, Images
 |
View all Canon PowerShot 350 manuals
Add to My Manuals
Save this manual to your list of manuals |
Page 19 highlights
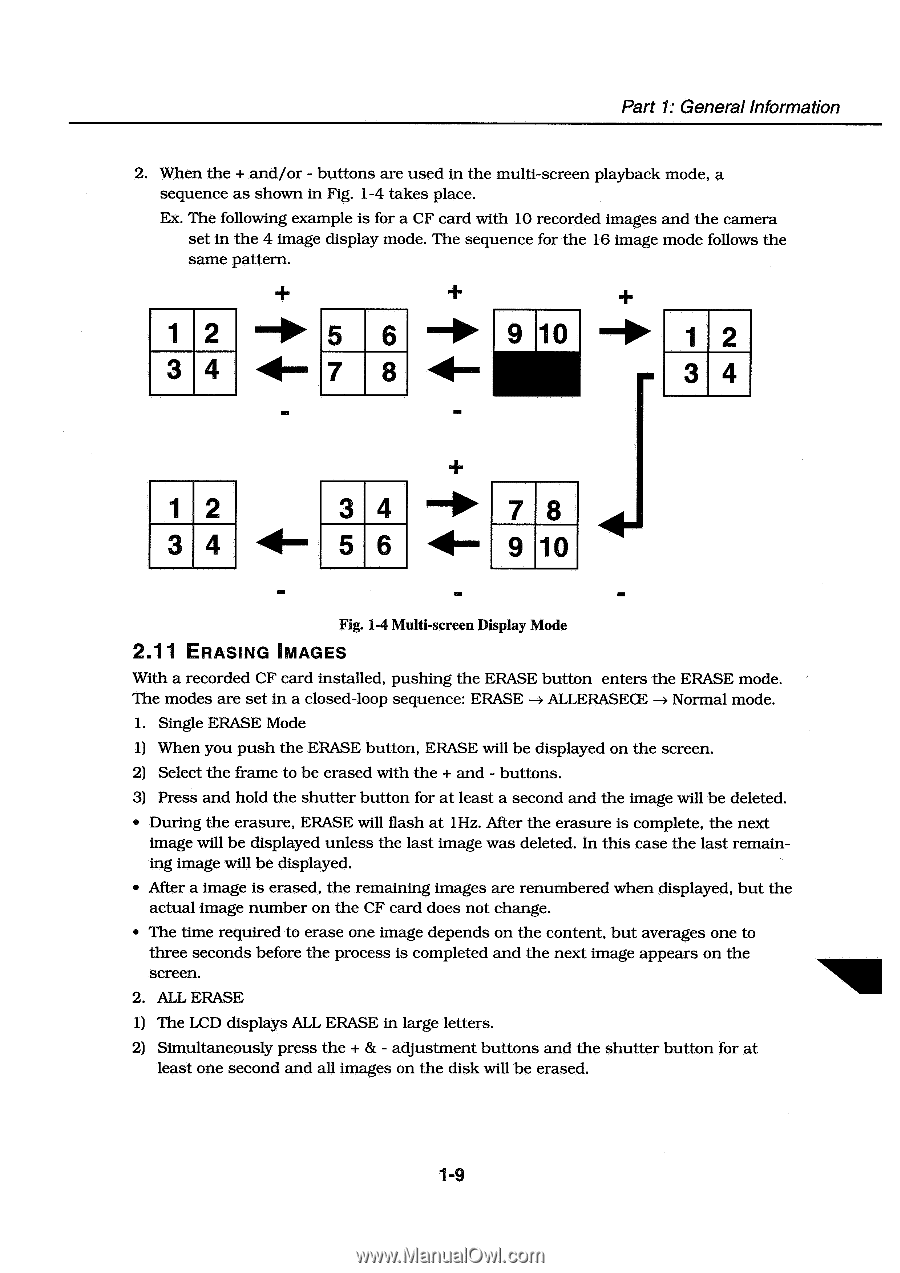
Part 1: General Information 2. When the + and/or - buttons are used in the multi-screen playback mode, a sequence as shown in Fig. 1-4 takes place. Ex. The following example is for a CF card with 10 recorded images and the camera set in the 4 image display mode. The sequence for the 16 image mode follows the same pattern. 1 2 5 6 3 4 7 8 10 1 2 3 4 1 2 4 7 8 3 4 5 6 9 10 Fig. 1-4 Multi-screen Display Mode 2.11 ERASING IMAGES With a recorded CF card installed, pushing the ERASE button enters the ERASE mode. The modes are set in a closed-loop sequence: ERASE ALLERASECE ----> Normal mode. 1. Single ERASE Mode 1) When you push the ERASE button, ERASE will be displayed on the screen. 2) Select the frame to be erased with the + and - buttons. 3) Press and hold the shutter button for at least a second and the image will be deleted. • During the erasure, ERASE will flash at 1Hz. After the erasure is complete, the next image will be displayed unless the last image was deleted. In this case the last remaining image will be displayed. • After a image is erased, the remaining images are renumbered when displayed, but the actual image number on the CF card does not change. • The time required to erase one image depends on the content, but averages one to three seconds before the process is completed and the next image appears on the screen. 2. ALL ERASE 1) The LCD displays ALL ERASE in large letters. 2) Simultaneously press the + & - adjustment buttons and the shutter button for at least one second and all images on the disk will be erased. 1-9
-
 1
1 -
2
-
3
-
4
-
5
-
6
-
7
-
8
-
9
-
10
-
11
-
12
-
13
-
 14
14 -
 15
15 -
 16
16 -
 17
17 -
 18
18 -
 19
19 -
 20
20 -
 21
21 -
 22
22 -
 23
23 -
 24
24 -
25
-
26
-
27
-
28
-
29
-
30
-
31
-
32
-
33
-
34
-
35
-
36
-
37
-
38
-
39
-
40
-
41
-
42
-
43
-
44
-
45
-
46
-
47
-
48
-
49
-
50
-
51
-
52
-
53
-
54
-
55
-
56
-
57
-
58
-
59
-
60
-
61
-
62
-
63
-
64
-
65
-
66
-
67
-
68
-
69
-
70
-
71
-
72
-
73
-
74
-
75
-
76
-
77
-
78
-
79
-
80
-
81
-
82
-
83
-
84
-
85
-
86
-
87
-
88
-
89
-
90
-
91
-
92
-
93
-
94
-
95
-
96
-
97
-
98
-
99
-
100
-
101
-
102
-
103
-
104
-
105
-
106
-
107
-
108
-
109
-
110
-
111
-
112
-
113
-
114
-
115
-
116
-
117
-
118
-
119
-
120
-
121
-
122
-
123
-
124
-
125
-
126
-
127
-
128
-
129
-
130
-
131
-
132
-
133
-
134
-
135
-
136
-
137
-
138
-
139
 |
 |