Canon PowerShot SX420 IS User Manual - Page 102
Using a Smartphone to View Camera, Images and Control the Camera
 |
View all Canon PowerShot SX420 IS manuals
Add to My Manuals
Save this manual to your list of manuals |
Page 102 highlights
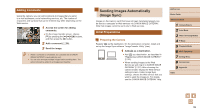
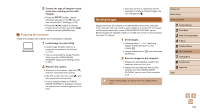
Using a Smartphone to View Camera Images and Control the Camera You can do the following with the dedicated smartphone app Camera Connect. ●● Browse images on the camera and save them to the smartphone ●● Geotag images on the camera (=102) ●● Shoot remotely (=102) ●● Privacy settings must be configured in advance to allow image viewing on the smartphone (=82, =103). Geotagging Images on the Camera GPS data recorded on a smartphone using the dedicated Camera Connect application can be added to images on the camera. Images are tagged with information including the latitude, longitude, and elevation. ●● Before shooting, make sure the date and time and your home time zone are set correctly, as described in "Setting the Date and Time" (= 17). Also follow the steps in "World Clock" (= 107) to specify any shooting destinations in other time zones. ●● Others may be able to locate or identify you by using location data in your geotagged still images or movies. Be careful when sharing these images with others, as when posting images online where many others can view them. Shooting Remotely As you check a shooting screen on your smartphone, you can use it to shoot remotely. 1 Secure the camera. ●●Once remote shooting begins, the camera lens will come out. Lens motion from zooming may also move the camera out of position. Keep the camera still by mounting it on a tripod or taking other measures. 2 Connect the camera and smartphone (=82). ●●In the privacy settings, choose [Yes]. 3 Choose remote shooting. ●●In Camera Connect on the smartphone, choose remote shooting. ●●The camera lens will come out. Do not press near the lens, and make sure no objects will obstruct it. ●●Once the camera is ready for remote shooting, a live image from the camera will be displayed on the smartphone. ●●At this time, a message is displayed on the camera, and all operations except pressing the power button are disabled. 4 Shoot. ●●Use the smartphone to shoot. Before Use Basic Guide Advanced Guide 1 Camera Basics 2 Auto Mode 3 Other Shooting Modes 4 P Mode 5 Playback Mode 6 Wi-Fi Functions 7 Setting Menu 8 Accessories 9 Appendix Index 102
-
 1
1 -
2
-
3
-
4
-
5
-
6
-
7
-
8
-
9
-
10
-
11
-
12
-
13
-
14
-
15
-
16
-
17
-
18
-
19
-
20
-
21
-
22
-
23
-
24
-
25
-
26
-
27
-
28
-
29
-
30
-
31
-
32
-
33
-
34
-
35
-
36
-
37
-
38
-
39
-
40
-
41
-
42
-
43
-
44
-
45
-
46
-
47
-
48
-
49
-
50
-
51
-
52
-
53
-
54
-
55
-
56
-
57
-
58
-
59
-
60
-
61
-
62
-
63
-
64
-
65
-
66
-
67
-
68
-
69
-
70
-
71
-
72
-
73
-
74
-
75
-
76
-
77
-
78
-
79
-
80
-
81
-
82
-
83
-
84
-
85
-
86
-
87
-
88
-
89
-
90
-
91
-
92
-
93
-
94
-
95
-
96
-
 97
97 -
 98
98 -
 99
99 -
 100
100 -
 101
101 -
 102
102 -
 103
103 -
 104
104 -
 105
105 -
 106
106 -
 107
107 -
108
-
109
-
110
-
111
-
112
-
113
-
114
-
115
-
116
-
117
-
118
-
119
-
120
-
121
-
122
-
123
-
124
-
125
-
126
-
127
-
128
-
129
-
130
-
131
-
132
-
133
-
134
-
135
-
136
-
137
-
138
-
139
-
140
-
141
-
142
-
143
-
144
-
145
-
146
-
147
-
148
-
149
 |
 |