Canon imageRUNNER ADVANCE 8295 imageRUNNER ADVANCE 8200 Srs Basic Operation Gu - Page 147
Remove any jammed paper from the fixing unit., Open the lower guide, holding by, the green tab.
 |
View all Canon imageRUNNER ADVANCE 8295 manuals
Add to My Manuals
Save this manual to your list of manuals |
Page 147 highlights
Troubleshooting 5 Remove any jammed paper from the fixing unit. If you cannot pull out the jammed paper, proceed to the next step. Do not pull out jammed paper by force, as this may leave torn pieces inside the machine and cause the machine to malfunction. 6 Remove any jammed paper from the lower guide. 1 Open the lower guide, holding by the green tab. 2 Remove any jammed paper. 3 Close the lower guide. When closing the guide, be careful not to get your fingers caught, as this may result in personal injury. 147
-
 1
1 -
2
-
3
-
4
-
5
-
6
-
7
-
8
-
9
-
10
-
11
-
12
-
13
-
14
-
15
-
16
-
17
-
18
-
19
-
20
-
21
-
22
-
23
-
24
-
25
-
26
-
27
-
28
-
29
-
30
-
31
-
32
-
33
-
34
-
35
-
36
-
37
-
38
-
39
-
40
-
41
-
42
-
43
-
44
-
45
-
46
-
47
-
48
-
49
-
50
-
51
-
52
-
53
-
54
-
55
-
56
-
57
-
58
-
59
-
60
-
61
-
62
-
63
-
64
-
65
-
66
-
67
-
68
-
69
-
70
-
71
-
72
-
73
-
74
-
75
-
76
-
77
-
78
-
79
-
80
-
81
-
82
-
83
-
84
-
85
-
86
-
87
-
88
-
89
-
90
-
91
-
92
-
93
-
94
-
95
-
96
-
97
-
98
-
99
-
100
-
101
-
102
-
103
-
104
-
105
-
106
-
107
-
108
-
109
-
110
-
111
-
112
-
113
-
114
-
115
-
116
-
117
-
118
-
119
-
120
-
121
-
122
-
123
-
124
-
125
-
126
-
127
-
128
-
129
-
130
-
131
-
132
-
133
-
134
-
135
-
136
-
137
-
138
-
139
-
140
-
141
-
 142
142 -
 143
143 -
 144
144 -
 145
145 -
 146
146 -
 147
147 -
 148
148 -
 149
149 -
 150
150 -
 151
151 -
 152
152 -
153
-
154
-
155
-
156
-
157
-
158
-
159
-
160
-
161
-
162
-
163
-
164
-
165
-
166
-
167
-
168
-
169
-
170
-
171
-
172
-
173
-
174
-
175
-
176
-
177
-
178
-
179
-
180
-
181
-
182
-
183
-
184
-
185
-
186
-
187
-
188
-
189
-
190
-
191
-
192
-
193
-
194
-
195
-
196
-
197
-
198
-
199
-
200
-
201
-
202
-
203
-
204
-
205
-
206
-
207
-
208
-
209
-
210
-
211
-
212
-
213
-
214
-
215
-
216
-
217
-
218
-
219
-
220
-
221
-
222
-
223
-
224
-
225
-
226
-
227
-
228
-
229
-
230
-
231
-
232
-
233
-
234
-
235
-
236
-
237
-
238
-
239
-
240
-
241
-
242
-
243
-
244
-
245
-
246
-
247
-
248
-
249
-
250
-
251
-
252
-
253
-
254
-
255
-
256
-
257
-
258
-
259
-
260
-
261
-
262
-
263
-
264
 |
 |

147
Troubleshooting
5
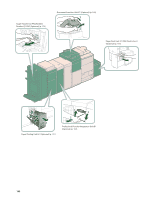
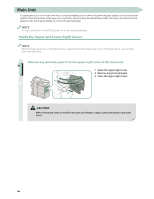
Remove any jammed paper from the fixing unit.
If you cannot pull out the jammed paper, proceed to the next step. Do not pull out jammed paper by force,
as this may leave torn pieces inside the machine and cause the machine to malfunction.
6
Remove any jammed paper from the lower guide.
1
Open the lower guide, holding by
the green tab.
2 Remove any jammed paper.
3 Close the lower guide.
When closing the guide, be careful not to get your fingers caught, as this may result in personal
injury.