Canon imageRUNNER ADVANCE 8295 imageRUNNER ADVANCE 8200 Srs Basic Operation Gu - Page 18
ID Log In/Out key, Status Monitor/Cancel key
 |
View all Canon imageRUNNER ADVANCE 8295 manuals
Add to My Manuals
Save this manual to your list of manuals |
Page 18 highlights
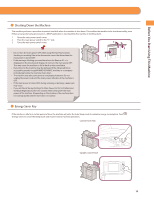
Control Panel and Touch Panel Display 11 Processing/Data Indicator Flashes or blinks green when the machine is performing operations, and maintains a steady green light when fax data is stored in memory. 12 Reset key Press to restore the standard settings of the machine. 13 ID (Log In/Out) key Press to log in/out when a login service such as Department ID Management or SSO-H has been set. 14 Numeric keys Press to enter numerical values. 15 Touch Panel Display The settings screen for each function is shown on this display. Eight function keys are displayed by default. 16 Brightness Adjustment Dial Use to adjust the brightness of the touch panel display. 17 Volume Settings key Press to display the screen for adjusting settings, such as the transmission volume and fax sending/receiving alarm volume. 18 Status Monitor/Cancel key Press to check the status of jobs or to cancel print jobs. Also, press to check status of the machine, such as checking the amount of paper remaining. 19 Quick Menu key Press to retrieve favorite functions stored in Quick Menu. Also, if you are using authentication, Quick Menu set for each individual user can be displayed. 20 Main Menu key Press to return to the Main Menu screen, such as when you want to switch functions. 18
-
 1
1 -
2
-
3
-
4
-
5
-
6
-
7
-
8
-
9
-
10
-
11
-
12
-
 13
13 -
 14
14 -
 15
15 -
 16
16 -
 17
17 -
 18
18 -
 19
19 -
 20
20 -
 21
21 -
 22
22 -
 23
23 -
24
-
25
-
26
-
27
-
28
-
29
-
30
-
31
-
32
-
33
-
34
-
35
-
36
-
37
-
38
-
39
-
40
-
41
-
42
-
43
-
44
-
45
-
46
-
47
-
48
-
49
-
50
-
51
-
52
-
53
-
54
-
55
-
56
-
57
-
58
-
59
-
60
-
61
-
62
-
63
-
64
-
65
-
66
-
67
-
68
-
69
-
70
-
71
-
72
-
73
-
74
-
75
-
76
-
77
-
78
-
79
-
80
-
81
-
82
-
83
-
84
-
85
-
86
-
87
-
88
-
89
-
90
-
91
-
92
-
93
-
94
-
95
-
96
-
97
-
98
-
99
-
100
-
101
-
102
-
103
-
104
-
105
-
106
-
107
-
108
-
109
-
110
-
111
-
112
-
113
-
114
-
115
-
116
-
117
-
118
-
119
-
120
-
121
-
122
-
123
-
124
-
125
-
126
-
127
-
128
-
129
-
130
-
131
-
132
-
133
-
134
-
135
-
136
-
137
-
138
-
139
-
140
-
141
-
142
-
143
-
144
-
145
-
146
-
147
-
148
-
149
-
150
-
151
-
152
-
153
-
154
-
155
-
156
-
157
-
158
-
159
-
160
-
161
-
162
-
163
-
164
-
165
-
166
-
167
-
168
-
169
-
170
-
171
-
172
-
173
-
174
-
175
-
176
-
177
-
178
-
179
-
180
-
181
-
182
-
183
-
184
-
185
-
186
-
187
-
188
-
189
-
190
-
191
-
192
-
193
-
194
-
195
-
196
-
197
-
198
-
199
-
200
-
201
-
202
-
203
-
204
-
205
-
206
-
207
-
208
-
209
-
210
-
211
-
212
-
213
-
214
-
215
-
216
-
217
-
218
-
219
-
220
-
221
-
222
-
223
-
224
-
225
-
226
-
227
-
228
-
229
-
230
-
231
-
232
-
233
-
234
-
235
-
236
-
237
-
238
-
239
-
240
-
241
-
242
-
243
-
244
-
245
-
246
-
247
-
248
-
249
-
250
-
251
-
252
-
253
-
254
-
255
-
256
-
257
-
258
-
259
-
260
-
261
-
262
-
263
-
264
 |
 |
