Canon imageRUNNER ADVANCE 8295 imageRUNNER ADVANCE 8200 Srs Basic Operation Gu - Page 70
Loading Pre-Punched Paper, Loading Transparencies, If you are making one-sided prints
 |
View all Canon imageRUNNER ADVANCE 8295 manuals
Add to My Manuals
Save this manual to your list of manuals |
Page 70 highlights
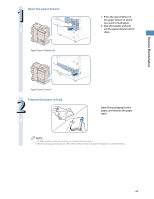
Loading Pre-Punched Paper You can load pre-punched paper to the following paper source: • Paper Drawers of the main unit • Multi-purpose Tray • Paper Deck Unit-C1 • POD Deck Lite-A1 When loading pre-punched paper, take note of the orientation of the binding holes and the image. When pre-punched paper is loaded in the paper drawer of the main unit, the side facing down is the one printed on. When pre-punched paper is loaded in the Multi-purpose Tray, Paper Deck Unit-C1, or POD Deck Lite-A1, the side facing up is the one printed on. • If you are making one-sided prints, select [Face Up (Reverse Order)] in [Face Up/Face Down]. (See e-Manual > Copy.) • If you want to output prints with the printed face down, select plain paper with horizontal (landscape) orientation in [Select Paper]. (See e-Manual > Copy.) Loading Transparencies You can load the transparencies to the following paper source. • Multi-purpose Tray • POD Deck Lite-A1 Transparencies have a front and back side. To achieve sharp printing results, the side facing up is the one printed on. • You can load only LTR or LTRR size transparencies • You cannot load the transparencies into the Paper Drawer 3 and 4, Paper Drawer (Right/Left), Paper Deck Unit-C1, or Document Insertion Unit-K1. • When loading transparencies, make sure to hold only the edges of the sheets and avoid touching the print surface. • Do not load transparencies while the machine is printing. Doing so may cause a paper jam. • Use only transparencies intended for use with this machine. If you use other transparencies, you may cause damage to the machine. • It is recommended that output transparencies are immediately removed from the output tray to avoid folding of the transparencies and paper jams. • Return the remaining transparencies to their original package for storage, avoiding locations subject to high temperatures and humidity. Leaving transparencies loaded for an extended period of time may cause the sheets to stick together and result in a paper jam. • Leaving transparencies loaded for an extended period of time may cause the sheets to stick together and result in difficulties feeding the transparencies. In this case, fan the loaded transparency sheets, or if you have loaded 100 or more sheets, reduce the number of sheets to less than 100 or use new transparencies. • When printing on transparencies, depending on the type of image, the image may become dense. When this happens, adjust the density for the output image. • You can load up to 250 sheets of transparencies in the POD Deck Lite-A1. • If a paper jam occurs, fan the loaded transparency sheets well. 70
-
 1
1 -
2
-
3
-
4
-
5
-
6
-
7
-
8
-
9
-
10
-
11
-
12
-
13
-
14
-
15
-
16
-
17
-
18
-
19
-
20
-
21
-
22
-
23
-
24
-
25
-
26
-
27
-
28
-
29
-
30
-
31
-
32
-
33
-
34
-
35
-
36
-
37
-
38
-
39
-
40
-
41
-
42
-
43
-
44
-
45
-
46
-
47
-
48
-
49
-
50
-
51
-
52
-
53
-
54
-
55
-
56
-
57
-
58
-
59
-
60
-
61
-
62
-
63
-
64
-
 65
65 -
 66
66 -
 67
67 -
 68
68 -
 69
69 -
 70
70 -
 71
71 -
 72
72 -
 73
73 -
 74
74 -
 75
75 -
76
-
77
-
78
-
79
-
80
-
81
-
82
-
83
-
84
-
85
-
86
-
87
-
88
-
89
-
90
-
91
-
92
-
93
-
94
-
95
-
96
-
97
-
98
-
99
-
100
-
101
-
102
-
103
-
104
-
105
-
106
-
107
-
108
-
109
-
110
-
111
-
112
-
113
-
114
-
115
-
116
-
117
-
118
-
119
-
120
-
121
-
122
-
123
-
124
-
125
-
126
-
127
-
128
-
129
-
130
-
131
-
132
-
133
-
134
-
135
-
136
-
137
-
138
-
139
-
140
-
141
-
142
-
143
-
144
-
145
-
146
-
147
-
148
-
149
-
150
-
151
-
152
-
153
-
154
-
155
-
156
-
157
-
158
-
159
-
160
-
161
-
162
-
163
-
164
-
165
-
166
-
167
-
168
-
169
-
170
-
171
-
172
-
173
-
174
-
175
-
176
-
177
-
178
-
179
-
180
-
181
-
182
-
183
-
184
-
185
-
186
-
187
-
188
-
189
-
190
-
191
-
192
-
193
-
194
-
195
-
196
-
197
-
198
-
199
-
200
-
201
-
202
-
203
-
204
-
205
-
206
-
207
-
208
-
209
-
210
-
211
-
212
-
213
-
214
-
215
-
216
-
217
-
218
-
219
-
220
-
221
-
222
-
223
-
224
-
225
-
226
-
227
-
228
-
229
-
230
-
231
-
232
-
233
-
234
-
235
-
236
-
237
-
238
-
239
-
240
-
241
-
242
-
243
-
244
-
245
-
246
-
247
-
248
-
249
-
250
-
251
-
252
-
253
-
254
-
255
-
256
-
257
-
258
-
259
-
260
-
261
-
262
-
263
-
264
 |
 |
