Canon imageRUNNER ADVANCE 8295 imageRUNNER ADVANCE 8200 Srs Basic Operation Gu - Page 63

Routine Maintenance, Removing Staple Waste For Optional Products ..107

Page 63 highlights

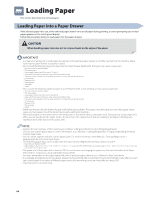
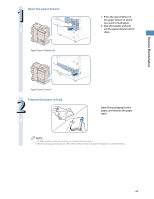
Routine Maintenance Routine Maintenance 3 Loading Paper 64 Loading Paper into a Paper Drawer 64 Adjusting a Paper Drawer to Hold a Different Paper Size 68 Loading Pre-Punched Paper 70 Loading Transparencies 70 Loading Tab Paper Using the Tab Feeding Attachment Kit-B1 (Optional 71 Loading Paper into the Paper Deck Unit-C1/POD Deck Lite-A1 (Optional 74 Loading Paper into the Document Insertion Unit-K1 (Optional 86 Replacing the Stamp Cartridge Duplex Color Image Reader Unit-G1 90 Replacing the Staple Cartridge (For Optional Products 93 Replacing the Staple Cartridge in the Stapler Unit (Staple Finisher-Q1 PRO/Booklet Finisher-Q1 PRO 93 Replacing the Staple Cartridge in the Saddle Stitcher Unit (Booklet Finisher-Q1 PRO 96 Replacing the Staple Cartridge in the Stapler Unit (Staple Finisher-N1/Booklet Finisher-N1 100 Replacing the Staple Cartridge in the Saddle Stitcher Unit (Booklet Finisher-N1 103 Removing Staple Waste (For Optional Products 107 Removing Punch Waste (For Optional Products 111 Removing Trim Waste (Inner Booklet Trimmer-A1 116 Operating the Limited Functions Mode 118 Replacing the Toner Cartridge 121 Routine Cleaning 126 Platen Glass and Underside of the Feeder 127 Manual Feeder Cleaning 128 Automatic Feeder Cleaning 132 Wire Cleaning 133 Drum Cleaning 134 Cleaning the Touch Panel Display 135 Consumables 136 63

  • 1
  • 2
  • 3
  • 4
  • 5
  • 6
  • 7
  • 8
  • 9
  • 10
  • 11
  • 12
  • 13
  • 14
  • 15
  • 16
  • 17
  • 18
  • 19
  • 20
  • 21
  • 22
  • 23
  • 24
  • 25
  • 26
  • 27
  • 28
  • 29
  • 30
  • 31
  • 32
  • 33
  • 34
  • 35
  • 36
  • 37
  • 38
  • 39
  • 40
  • 41
  • 42
  • 43
  • 44
  • 45
  • 46
  • 47
  • 48
  • 49
  • 50
  • 51
  • 52
  • 53
  • 54
  • 55
  • 56
  • 57
  • 58
  • 59
  • 60
  • 61
  • 62
  • 63
  • 64
  • 65
  • 66
  • 67
  • 68
  • 69
  • 70
  • 71
  • 72
  • 73
  • 74
  • 75
  • 76
  • 77
  • 78
  • 79
  • 80
  • 81
  • 82
  • 83
  • 84
  • 85
  • 86
  • 87
  • 88
  • 89
  • 90
  • 91
  • 92
  • 93
  • 94
  • 95
  • 96
  • 97
  • 98
  • 99
  • 100
  • 101
  • 102
  • 103
  • 104
  • 105
  • 106
  • 107
  • 108
  • 109
  • 110
  • 111
  • 112
  • 113
  • 114
  • 115
  • 116
  • 117
  • 118
  • 119
  • 120
  • 121
  • 122
  • 123
  • 124
  • 125
  • 126
  • 127
  • 128
  • 129
  • 130
  • 131
  • 132
  • 133
  • 134
  • 135
  • 136
  • 137
  • 138
  • 139
  • 140
  • 141
  • 142
  • 143
  • 144
  • 145
  • 146
  • 147
  • 148
  • 149
  • 150
  • 151
  • 152
  • 153
  • 154
  • 155
  • 156
  • 157
  • 158
  • 159
  • 160
  • 161
  • 162
  • 163
  • 164
  • 165
  • 166
  • 167
  • 168
  • 169
  • 170
  • 171
  • 172
  • 173
  • 174
  • 175
  • 176
  • 177
  • 178
  • 179
  • 180
  • 181
  • 182
  • 183
  • 184
  • 185
  • 186
  • 187
  • 188
  • 189
  • 190
  • 191
  • 192
  • 193
  • 194
  • 195
  • 196
  • 197
  • 198
  • 199
  • 200
  • 201
  • 202
  • 203
  • 204
  • 205
  • 206
  • 207
  • 208
  • 209
  • 210
  • 211
  • 212
  • 213
  • 214
  • 215
  • 216
  • 217
  • 218
  • 219
  • 220
  • 221
  • 222
  • 223
  • 224
  • 225
  • 226
  • 227
  • 228
  • 229
  • 230
  • 231
  • 232
  • 233
  • 234
  • 235
  • 236
  • 237
  • 238
  • 239
  • 240
  • 241
  • 242
  • 243
  • 244
  • 245
  • 246
  • 247
  • 248
  • 249
  • 250
  • 251
  • 252
  • 253
  • 254
  • 255
  • 256
  • 257
  • 258
  • 259
  • 260
  • 261
  • 262
  • 263
  • 264

3
Routine Maintenance
Routine Maintenance
Loading Paper . . . . . . . . . . . . . . . . . . . . . . . . . . . . . . . . . . . . . . . . . . . . . . . . . . . 64
Loading Paper into a Paper Drawer• • • • • • • • • • • • • • • • • • • • • • • • • • • • • • • • • • • • • • • • • • • • • • • • • • • • • • • • • • • • • • • • • • • • • • • • • • • • • • • • • • 64
Adjusting a Paper Drawer to Hold a Different Paper Size• • • • • • • • • • • • • • • • • • • • • • • • • • • • • • • • • • • • • • • • • • • • • • • • • • • • • • • • • • • • • • • • •68
Loading Pre-Punched Paper
• • • • • • • • • • • • • • • • • • • • • • • • • • • • • • • • • • • • • • • • • • • • • • • • • • • • • • • • • • • • • • • • • • • • • • • • • • • • • • • • • • • • • • • 70
Loading Transparencies • • • • • • • • • • • • • • • • • • • • • • • • • • • • • • • • • • • • • • • • • • • • • • • • • • • • • • • • • • • • • • • • • • • • • • • • • • • • • • • • • • • • • • • • • • • 70
Loading Tab Paper Using the Tab Feeding Attachment Kit-B1 (Optional)
• • • • • • • • • • • • • • • • • • • • • • • • • • • • • • • • • • • • • • • • • • • • • • • • • • • 71
Loading Paper into the Paper Deck Unit-C1/POD Deck Lite-A1 (Optional)
• • • • • • • • • • • • • • • • • • • • • • • • • • • • • • • • • • • • • • • • • • • • • • • • • • 74
Loading Paper into the Document Insertion Unit-K1 (Optional)• • • • • • • • • • • • • • • • • • • • • • • • • • • • • • • • • • • • • • • • • • • • • • • • • • • • • • • • • • • 86
Replacing the Stamp Cartridge
Duplex Color Image Reader Unit-G1) . . . . . . . . . . . . . . . . . . . . . . . . . . . . . . 90
Replacing the Staple Cartridge (For Optional Products) . . . . . . . . . . . . . 93
Replacing the Staple Cartridge in the Stapler Unit (Staple Finisher-Q1 PRO/Booklet Finisher-Q1 PRO)
• • • • • • • • • • • • • • • • • • • • • • • • • • • 93
Replacing the Staple Cartridge in the Saddle Stitcher Unit (Booklet Finisher-Q1 PRO)• • • • • • • • • • • • • • • • • • • • • • • • • • • • • • • • • • • • • • • • •96
Replacing the Staple Cartridge in the Stapler Unit (Staple Finisher-N1/Booklet Finisher-N1)
• • • • • • • • • • • • • • • • • • • • • • • • • • • • • • • • • • 100
Replacing the Staple Cartridge in the Saddle Stitcher Unit (Booklet Finisher-N1) • • • • • • • • • • • • • • • • • • • • • • • • • • • • • • • • • • • • • • • • • • • • 103
Removing Staple Waste (For Optional Products) . . . . . . . . . . . . . . . . . . .107
Removing Punch Waste (For Optional Products) . . . . . . . . . . . . . . . . . . . 111
Removing Trim Waste (Inner Booklet Trimmer-A1) . . . . . . . . . . . . . . . . .116
Operating the Limited Functions Mode . . . . . . . . . . . . . . . . . . . . . . . . . . .118
Replacing the Toner Cartridge . . . . . . . . . . . . . . . . . . . . . . . . . . . . . . . . . . . .121
Routine Cleaning . . . . . . . . . . . . . . . . . . . . . . . . . . . . . . . . . . . . . . . . . . . . . . . . 126
Platen Glass and Underside of the Feeder
• • • • • • • • • • • • • • • • • • • • • • • • • • • • • • • • • • • • • • • • • • • • • • • • • • • • • • • • • • • • • • • • • • • • • • • • • • • 127
Manual Feeder Cleaning
• • • • • • • • • • • • • • • • • • • • • • • • • • • • • • • • • • • • • • • • • • • • • • • • • • • • • • • • • • • • • • • • • • • • • • • • • • • • • • • • • • • • • • • • • 128
Automatic Feeder Cleaning • • • • • • • • • • • • • • • • • • • • • • • • • • • • • • • • • • • • • • • • • • • • • • • • • • • • • • • • • • • • • • • • • • • • • • • • • • • • • • • • • • • • • • •132
Wire Cleaning • • • • • • • • • • • • • • • • • • • • • • • • • • • • • • • • • • • • • • • • • • • • • • • • • • • • • • • • • • • • • • • • • • • • • • • • • • • • • • • • • • • • • • • • • • • • • • • • • •133
Drum Cleaning • • • • • • • • • • • • • • • • • • • • • • • • • • • • • • • • • • • • • • • • • • • • • • • • • • • • • • • • • • • • • • • • • • • • • • • • • • • • • • • • • • • • • • • • • • • • • • • • •134
Cleaning the Touch Panel Display • • • • • • • • • • • • • • • • • • • • • • • • • • • • • • • • • • • • • • • • • • • • • • • • • • • • • • • • • • • • • • • • • • • • • • • • • • • • • • • • • •135
Consumables . . . . . . . . . . . . . . . . . . . . . . . . . . . . . . . . . . . . . . . . . . . . . . . . . . .136