Casio EX-Z70 Owners Manual - Page 193
View and copy the images you want, Double-click the folder that contains
 |
UPC - 079767622251
View all Casio EX-Z70 manuals
Add to My Manuals
Save this manual to your list of manuals |
Page 193 highlights
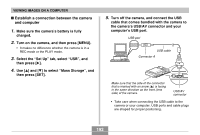
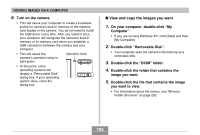
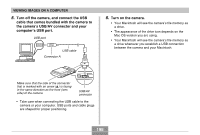
VIEWING IMAGES ON A COMPUTER 6. Turn on the camera. • This will cause your computer to create a hardware profile for camera's built-in memory or the memory card loaded in the camera. You do not need to install the USB driver every time. After you install it once, your computer will recognize the camera's built-in memory or its memory card when you establish a USB connection between the camera and your computer. • This will cause the camera's operation lamp to light green. Operation lamp • At this point, some operating systems will display a "Removable Disk" dialog box. If your operating system does, close the dialog box. I View and copy the images you want 1. On your computer, double-click "My Computer". • If you are running Windows XP, click [Start] and then [My Computer]. 2. Double-click "Removable Disk". • Your computer sees the camera's file memory as a removable disk. 3. Double-click the "DCIM" folder. 4. Double-click the folder that contains the image you want. 5. Double-click the file that contains the image you want to view. • For information about file names, see "Memory Folder Structure" on page 202. 193
-
 1
1 -
2
-
3
-
4
-
5
-
6
-
7
-
8
-
9
-
10
-
11
-
12
-
13
-
14
-
15
-
16
-
17
-
18
-
19
-
20
-
21
-
22
-
23
-
24
-
25
-
26
-
27
-
28
-
29
-
30
-
31
-
32
-
33
-
34
-
35
-
36
-
37
-
38
-
39
-
40
-
41
-
42
-
43
-
44
-
45
-
46
-
47
-
48
-
49
-
50
-
51
-
52
-
53
-
54
-
55
-
56
-
57
-
58
-
59
-
60
-
61
-
62
-
63
-
64
-
65
-
66
-
67
-
68
-
69
-
70
-
71
-
72
-
73
-
74
-
75
-
76
-
77
-
78
-
79
-
80
-
81
-
82
-
83
-
84
-
85
-
86
-
87
-
88
-
89
-
90
-
91
-
92
-
93
-
94
-
95
-
96
-
97
-
98
-
99
-
100
-
101
-
102
-
103
-
104
-
105
-
106
-
107
-
108
-
109
-
110
-
111
-
112
-
113
-
114
-
115
-
116
-
117
-
118
-
119
-
120
-
121
-
122
-
123
-
124
-
125
-
126
-
127
-
128
-
129
-
130
-
131
-
132
-
133
-
134
-
135
-
136
-
137
-
138
-
139
-
140
-
141
-
142
-
143
-
144
-
145
-
146
-
147
-
148
-
149
-
150
-
151
-
152
-
153
-
154
-
155
-
156
-
157
-
158
-
159
-
160
-
161
-
162
-
163
-
164
-
165
-
166
-
167
-
168
-
169
-
170
-
171
-
172
-
173
-
174
-
175
-
176
-
177
-
178
-
179
-
180
-
181
-
182
-
183
-
184
-
185
-
186
-
187
-
 188
188 -
 189
189 -
 190
190 -
 191
191 -
 192
192 -
 193
193 -
 194
194 -
 195
195 -
 196
196 -
 197
197 -
 198
198 -
199
-
200
-
201
-
202
-
203
-
204
-
205
-
206
-
207
-
208
-
209
-
210
-
211
-
212
-
213
-
214
-
215
-
216
-
217
-
218
-
219
-
220
-
221
-
222
-
223
-
224
-
225
-
226
-
227
-
228
-
229
-
230
-
231
-
232
-
233
-
234
-
235
-
236
-
237
-
238
-
239
 |
 |