Cisco 5505 Administration Guide - Page 21
AnyConnect Client and New Windows Installations, Adding a Security Appliance to the List of Trusted - used
 |
UPC - 882658082252
View all Cisco 5505 manuals
Add to My Manuals
Save this manual to your list of manuals |
Page 21 highlights
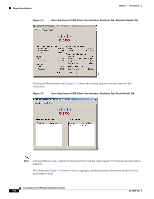
Chapter 2 Common AnyConnect VPN Client Installation and Configuration Procedures Before You Install the AnyConnect Client The procedure varies by browser. See the procedures that follow this section. - Make sure the Common Name (CN) in security appliance certificates matches the name clients use to connect to it. By default, the security appliance certificate CN field is its IP address. If clients use a DNS name, change the CN field on the security appliance certificate to that name. • The Cisco Security Agent (CSA) might display warnings during the AnyConnect client installation. Current shipping versions of CSA do not have a built-in rule that is compatible with the AnyConnect client. You can create the following rule using CSA version 5.0 or later by following these steps: Step 1 Step 2 In the Rule Module: "Cisco Secure Tunneling Client Module", add a FACL: Priority Allow, no Log, Description: "Cisco Secure Tunneling Browsers, read/write vpnweb.ocx" Applications in the following class: "Cisco Secure Tunneling Client - Controlled Web Browsers" Attempt: Read file, Write File On any of these files: @SYSTEM\vpnweb.ocx Application Class: "Cisco Secure Tunneling Client - Installation Applications" add the following process names: **\vpndownloader.exe @program_files\**\Cisco\Cisco AnyConnect VPN Client\vpndownloader.exe This rule will be built in to a future release of CSA. • We recommend that Microsoft Internet Explorer (MSIE) users add the security appliance to the list of trusted sites, or install Java. Doing so enables the ActiveX control to install with minimal interaction from the user. This is particularly important for users of Windows XP SP2 with enhanced security. Windows Vista users must add the security appliance to the list of trusted sites in order to use the dynamic deployment feature. Refer to the following sections for instructions. AnyConnect Client and New Windows Installations In rare circumstances, if you install the AnyConnect client on a computer that has a new or clean Windows installation, the AnyConnect client might fail to connect, and your computer might display the following message: The required system DLL (filename) is not present on the system. This could occur if the computer does not have the file MSVCP60.dll or MSVCRT.dll located in the winnt\system32 directory. For more information about this problem, see the Microsoft Knowledge Base, article 259403, at http://support.microsoft.com/kb/259403. Adding a Security Appliance to the List of Trusted Sites (Internet Explorer) To add a security appliance to the list of trusted sites, use Microsoft Internet Explorer and do the following steps. OL-12950-012 Cisco AnyConnect VPN Client Administrator Guide 2-3
-
 1
1 -
2
-
3
-
4
-
5
-
6
-
7
-
8
-
9
-
10
-
11
-
12
-
13
-
14
-
15
-
 16
16 -
 17
17 -
 18
18 -
 19
19 -
 20
20 -
 21
21 -
 22
22 -
 23
23 -
 24
24 -
 25
25 -
 26
26 -
27
-
28
-
29
-
30
-
31
-
32
-
33
-
34
-
35
-
36
-
37
-
38
-
39
-
40
-
41
-
42
-
43
-
44
-
45
-
46
-
47
-
48
-
49
-
50
-
51
-
52
-
53
-
54
-
55
-
56
-
57
-
58
-
59
-
60
-
61
-
62
-
63
-
64
-
65
-
66
-
67
-
68
-
69
-
70
-
71
-
72
-
73
-
74
-
75
-
76
-
77
-
78
-
79
-
80
-
81
-
82
-
83
-
84
-
85
-
86
-
87
-
88
-
89
-
90
-
91
-
92
-
93
-
94
-
95
-
96
-
97
-
98
-
99
-
100
-
101
-
102
-
103
-
104
-
105
-
106
-
107
-
108
-
109
-
110
-
111
-
112
-
113
-
114
-
115
-
116
-
117
-
118
 |
 |
