Cisco 5505 Administration Guide - Page 31
Move Up, Move Down, Network, Client Access > SSL VPN Connection Profiles - enable asdm
 |
UPC - 882658082252
View all Cisco 5505 manuals
Add to My Manuals
Save this manual to your list of manuals |
Page 31 highlights
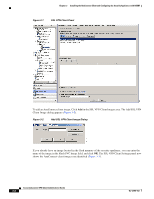
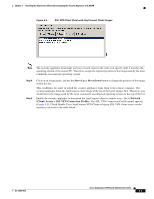
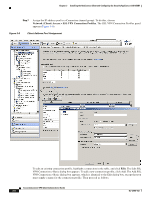
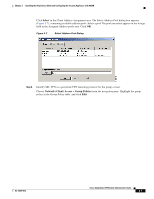
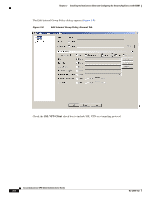
Chapter 3 Installing the AnyConnect Client and Configuring the Security Appliance with ASDM Figure 3-3 SSL VPN Client Panel with AnyConnect Client Images Note The security appliance downloads portions of each client in the order you specify until it matches the operating system of the remote PC. Therefore, assign the topmost position to the image used by the most commonly-encountered operating system. Step 4 Step 5 Click on an image name, and use the Move Up or Move Down button to change the position of the image within the list. This establishes the order in which the security appliance loads them to the remote computer. The security appliance loads the AnyConnect client image at the top of the list of images first. Therefore, you should move the image used by the most commonly-encountered operating system to the top of the list. Enable the security appliance to download the AnyConnect client to remote users. Go to Network (Client) Access > SSL VPN Connection Profiles. The SSL VPN Connection Profiles panel appears (Figure 3-4). Check Enable Cisco AnyConnect VPN Client or legacy SSL VPN client access on the interfaces selected in the table below. OL-12950-012 Cisco AnyConnect VPN Client Administrator Guide 3-3
-
 1
1 -
2
-
3
-
4
-
5
-
6
-
7
-
8
-
9
-
10
-
11
-
12
-
13
-
14
-
15
-
16
-
17
-
18
-
19
-
20
-
21
-
22
-
23
-
24
-
25
-
 26
26 -
 27
27 -
 28
28 -
 29
29 -
 30
30 -
 31
31 -
 32
32 -
 33
33 -
 34
34 -
 35
35 -
 36
36 -
37
-
38
-
39
-
40
-
41
-
42
-
43
-
44
-
45
-
46
-
47
-
48
-
49
-
50
-
51
-
52
-
53
-
54
-
55
-
56
-
57
-
58
-
59
-
60
-
61
-
62
-
63
-
64
-
65
-
66
-
67
-
68
-
69
-
70
-
71
-
72
-
73
-
74
-
75
-
76
-
77
-
78
-
79
-
80
-
81
-
82
-
83
-
84
-
85
-
86
-
87
-
88
-
89
-
90
-
91
-
92
-
93
-
94
-
95
-
96
-
97
-
98
-
99
-
100
-
101
-
102
-
103
-
104
-
105
-
106
-
107
-
108
-
109
-
110
-
111
-
112
-
113
-
114
-
115
-
116
-
117
-
118
 |
 |
