Cisco 5505 Administration Guide - Page 26
Installing the AnyConnect Client on a User’s PC - vpn setup
 |
UPC - 882658082252
View all Cisco 5505 manuals
Add to My Manuals
Save this manual to your list of manuals |
Page 26 highlights
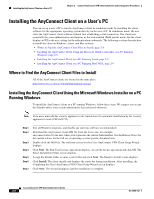
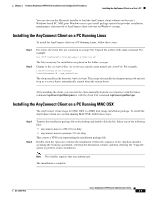
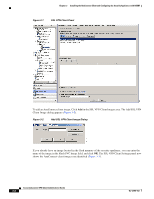
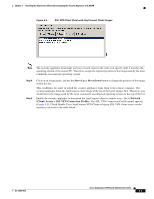
Installing the AnyConnect Client on a User's PC Chapter 2 Common AnyConnect VPN Client Installation and Configuration Procedures Installing the AnyConnect Client on a User's PC You can set up a user's PC to run the AnyConnect client in standalone mode by installing the client software for the appropriate operating system directly on the user's PC. In standalone mode, the user starts the AnyConnect client software without first establishing a web connection. The client uses essentially the same authentication mechanisms as the web-enabled (WebLaunch) mode, but the client displays a GUI to the user, asking for the authentication credentials. The following sections describe how to install the client on Windows, Linux, and Mac systems. • Where to Find the AnyConnect Client Files to Install, page 2-8 • Installing the AnyConnect Client Using the Microsoft Windows Installer on a PC Running Windows, page 2-8 • Installing the AnyConnect Client on a PC Running Linux, page 2-9 • Installing the AnyConnect Client on a PC Running MAC OSX, page 2-9 Where to Find the AnyConnect Client Files to Install All of the AnyConnect clients are located in the same place. http://www.cisco.com/cgi-bin/tablebuild.pl/anyconnect Installing the AnyConnect Client Using the Microsoft Windows Installer on a PC Running Windows To install the AnyConnect client on a PC running Windows, follow these steps. We suggest you accept the defaults unless your system administrator has instructed otherwise. Note Vista users must add the security appliance to the trusted zone for automatic installation by the security appliance to work (CSCsh23752). Step 1 Step 2 Step 3 Step 4 Step 5 Step 6 Step 7 Exit all Windows programs, and disable any antivirus software (recommended). Download the AnyConnect client MSI file from the Cisco site; for example, anyconnect-win-2.0.xxx.msi, where xxx represents the current build number. See the Release Notes for the current release for the full set of operating-system-specific download sites. Double-click the MSI file. The welcome screen for the Cisco AnyConnect VPN Client Setup Wizard displays. Click Next. The End-User License Agreement displays. Accept the license agreement and click OK. The Select Installation Folder screen displays. Accept the default folder or enter a new folder and click Next. The Ready to Install screen displays. Click Install. The client installs and displays the status bar during installation. After installing, the Completing the Cisco AnyConnect VPN Client Setup Wizard screen displays. Click Next. The wizard disappears and the installation is complete. Cisco AnyConnect VPN Client Administrator Guide 2-8 OL-12950-012
-
 1
1 -
2
-
3
-
4
-
5
-
6
-
7
-
8
-
9
-
10
-
11
-
12
-
13
-
14
-
15
-
16
-
17
-
18
-
19
-
20
-
 21
21 -
 22
22 -
 23
23 -
 24
24 -
 25
25 -
 26
26 -
 27
27 -
 28
28 -
 29
29 -
 30
30 -
 31
31 -
32
-
33
-
34
-
35
-
36
-
37
-
38
-
39
-
40
-
41
-
42
-
43
-
44
-
45
-
46
-
47
-
48
-
49
-
50
-
51
-
52
-
53
-
54
-
55
-
56
-
57
-
58
-
59
-
60
-
61
-
62
-
63
-
64
-
65
-
66
-
67
-
68
-
69
-
70
-
71
-
72
-
73
-
74
-
75
-
76
-
77
-
78
-
79
-
80
-
81
-
82
-
83
-
84
-
85
-
86
-
87
-
88
-
89
-
90
-
91
-
92
-
93
-
94
-
95
-
96
-
97
-
98
-
99
-
100
-
101
-
102
-
103
-
104
-
105
-
106
-
107
-
108
-
109
-
110
-
111
-
112
-
113
-
114
-
115
-
116
-
117
-
118
 |
 |