Cisco 5505 Administration Guide - Page 89
Import/Export Language Localization, Import Language Localization Pane
 |
UPC - 882658082252
View all Cisco 5505 manuals
Add to My Manuals
Save this manual to your list of manuals |
Page 89 highlights
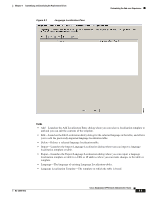
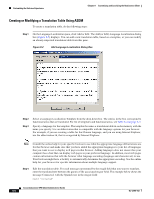
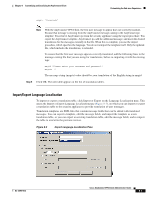
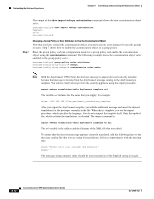
Chapter 8 Customizing and Localizing the AnyConnect Client Customizing the End-user Experience msgstr "Conectado" Note With the AnyConnect VPN Client, the first user message to appear does not correctly translate, because that message is missing from the AnyConnect message catalog in the AnyConnect.po template. You retrieve AnyConnect.po from the security appliance using the export procedure. You export the AnyConnect template, AnyConnect.po, add the additional message, and insert the desired translations for the messages currently in the file. When this is complete, you use the import procedure, which specifies the language. You do not reimport the template itself. Only the updated file, which includes the translations, is reloaded. To ensure that the first user message appears correctly translated, add the following lines to the message catalog file that you are using for translations, before re-importing it with the missing tags: msgid "Please enter your username and password." msgstr "" The message string (msgstr) value should be your translation of the English string in msgid. Step 5 Click OK. The new table appears in the list of translation tables. Import/Export Language Localization To import or export a translation table, click Import or Export on the Language Localization pane. This opens the Import or Export Language Localization pane (Figure 8-3), on which you can import or export a translation table to the security appliance to provide translation of user messages. Translation templates are XML files that contain message fields that can be edited with translated messages. You can export a template, edit the message fields, and import the template as a new translation table, or you can export an existing translation table, edit the message fields, and re-import the table to overwrite the previous version. Figure 8-3 Import Language Localization Pane OL-12950-012 Cisco AnyConnect VPN Client Administrator Guide 8-7
-
 1
1 -
2
-
3
-
4
-
5
-
6
-
7
-
8
-
9
-
10
-
11
-
12
-
13
-
14
-
15
-
16
-
17
-
18
-
19
-
20
-
21
-
22
-
23
-
24
-
25
-
26
-
27
-
28
-
29
-
30
-
31
-
32
-
33
-
34
-
35
-
36
-
37
-
38
-
39
-
40
-
41
-
42
-
43
-
44
-
45
-
46
-
47
-
48
-
49
-
50
-
51
-
52
-
53
-
54
-
55
-
56
-
57
-
58
-
59
-
60
-
61
-
62
-
63
-
64
-
65
-
66
-
67
-
68
-
69
-
70
-
71
-
72
-
73
-
74
-
75
-
76
-
77
-
78
-
79
-
80
-
81
-
82
-
83
-
 84
84 -
 85
85 -
 86
86 -
 87
87 -
 88
88 -
 89
89 -
 90
90 -
 91
91 -
 92
92 -
 93
93 -
 94
94 -
95
-
96
-
97
-
98
-
99
-
100
-
101
-
102
-
103
-
104
-
105
-
106
-
107
-
108
-
109
-
110
-
111
-
112
-
113
-
114
-
115
-
116
-
117
-
118
 |
 |
