Compaq ProLiant 8000 ProLiant 8000 Servers Maintenance and Service Guide - Page 38
Drive Cage with Backplane Board, Hot-Plug Drive Replacement Guidelines
 |
View all Compaq ProLiant 8000 manuals
Add to My Manuals
Save this manual to your list of manuals |
Page 38 highlights
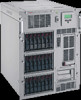
Removal and Replacement Procedures 2-21 Drive Cage with Backplane Board To remove a drive cage with backplane board: 1. Perform the preparation procedures. See "Preparation Procedures" earlier in this chapter. 2. Remove the left side access panel. See "Left Side Access Panel" earlier in this chapter. 3. Disconnect the power and SCSI cables from the backplane board. 4. Remove all drives from the drive cage. See "Hot-Plug Drive Replacement Guidelines" earlier in this chapter. CAUTION: Hard drives removed from the drive bays must be replaced into the same slots from which they were removed to preserve data integrity. 5. Remove the two slotted T-15 screws from the front of the drive cage. 6. Pull out the drive cage assembly. Figure 2-15. Removing the drive cage with backplane board Reverse steps 1 through 6 to replace the drive cage with backplane board. CAUTION: If an internal drive cage bay does not contain a drive cage, you must install a hot-plug drive cage blanking panel to ensure proper system cooling.
-
 1
1 -
2
-
3
-
4
-
5
-
6
-
7
-
8
-
9
-
10
-
11
-
12
-
13
-
14
-
15
-
16
-
17
-
18
-
19
-
20
-
21
-
22
-
23
-
24
-
25
-
26
-
27
-
28
-
29
-
30
-
31
-
32
-
 33
33 -
 34
34 -
 35
35 -
 36
36 -
 37
37 -
 38
38 -
 39
39 -
 40
40 -
 41
41 -
 42
42 -
 43
43 -
44
-
45
-
46
-
47
-
48
-
49
-
50
-
51
-
52
-
53
-
54
-
55
-
56
-
57
-
58
-
59
-
60
-
61
-
62
-
63
-
64
-
65
-
66
-
67
-
68
-
69
-
70
-
71
-
72
-
73
-
74
-
75
-
76
-
77
-
78
-
79
-
80
-
81
-
82
-
83
-
84
-
85
-
86
-
87
-
88
-
89
-
90
-
91
-
92
-
93
-
94
-
95
-
96
-
97
-
98
-
99
-
100
-
101
-
102
-
103
-
104
-
105
-
106
-
107
-
108
-
109
-
110
-
111
-
112
-
113
-
114
-
115
-
116
-
117
-
118
-
119
-
120
-
121
-
122
-
123
-
124
-
125
-
126
-
127
-
128
-
129
-
130
-
131
-
132
-
133
-
134
-
135
-
136
-
137
-
138
-
139
-
140
-
141
-
142
-
143
-
144
-
145
-
146
-
147
-
148
-
149
-
150
-
151
-
152
-
153
-
154
-
155
-
156
-
157
-
158
-
159
-
160
-
161
-
162
-
163
-
164
-
165
-
166
-
167
-
168
-
169
-
170
-
171
-
172
-
173
-
174
-
175
-
176
-
177
-
178
-
179
-
180
-
181
-
182
-
183
-
184
-
185
-
186
-
187
-
188
-
189
-
190
-
191
-
192
-
193
-
194
-
195
-
196
-
197
-
198
-
199
-
200
-
201
-
202
-
203
-
204
-
205
-
206
-
207
-
208
-
209
-
210
-
211
-
212
-
213
-
214
-
215
 |
 |
