Dell DR4000 Administrator Guide - Page 22
Default IP Address and Subnet Mask Address for Set Up, Local Console Connection
 |
View all Dell DR4000 manuals
Add to My Manuals
Save this manual to your list of manuals |
Page 22 highlights
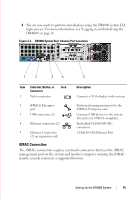
FILE LOCATION: C:\Users\bruce_wylie\Desktop\Dell Docs\~Sidewinder_Docs_DR4000\FRAME_Conversion_DR4000_AdminGuide\~DR4000_AG_F Default IP Address and Subnet Mask Address for Set Up The following lists the default value for the DR4000 system: • IP address-10.77.88.99 • Subnet mask address-255.0.0.0 When using the Initial System Configuration Wizard with a local console connection, if you cannot set the MAC addresses of the network cards so that DHCP resolves to a known IP address, you can use the default IP address (10.77.88.99). NOTE: After successfully initializing and configuring your system, you can modify the IP address to use either a static IP address or use dynamic IP addressing, and modify the subnet mask address to one that is supported by your network. If your network does not accept the default subnet mask address (255.0.0.0), establish a connection between the system and a laptop workstation. Make sure to connect using SSH, and use the default IP address to run the Initial System Configuration Wizard. If you are using a known IP address, skip running the Initial System Configuration Wizard, and directly configure the system using its user interface. To configure the DR4000 system, select System Configuration Networking and configure the network settings as desired. For more information, see "Configuring Networking Settings" on page 33. Local Console Connection The local console connection requires two system rear chassis cable connections: • VGA port and your video monitor • USB port and your keyboard To make these local console cable connections: 1 Locate the VGA monitor port and the USB ports on the back of your system. See Figure 3-1 for the VGA and USB port locations. 2 Connect the video monitor to the VGA port on the back of your system. 3 Connect the USB keyboard to one of the two USB ports on the back of your system. DELL CONFIDENTIAL - PRELIMINARY 1/10/12 - FOR PROOF ONLY 14 Setting Up the DR4000 System
-
 1
1 -
2
-
3
-
4
-
5
-
6
-
7
-
8
-
9
-
10
-
11
-
12
-
13
-
14
-
15
-
16
-
 17
17 -
 18
18 -
 19
19 -
 20
20 -
 21
21 -
 22
22 -
 23
23 -
 24
24 -
 25
25 -
 26
26 -
 27
27 -
28
-
29
-
30
-
31
-
32
-
33
-
34
-
35
-
36
-
37
-
38
-
39
-
40
-
41
-
42
-
43
-
44
-
45
-
46
-
47
-
48
-
49
-
50
-
51
-
52
-
53
-
54
-
55
-
56
-
57
-
58
-
59
-
60
-
61
-
62
-
63
-
64
-
65
-
66
-
67
-
68
-
69
-
70
-
71
-
72
-
73
-
74
-
75
-
76
-
77
-
78
-
79
-
80
-
81
-
82
-
83
-
84
-
85
-
86
-
87
-
88
-
89
-
90
-
91
-
92
-
93
-
94
-
95
-
96
-
97
-
98
-
99
-
100
-
101
-
102
-
103
-
104
-
105
-
106
-
107
-
108
-
109
-
110
-
111
-
112
-
113
-
114
-
115
-
116
-
117
-
118
-
119
-
120
-
121
-
122
-
123
-
124
-
125
-
126
-
127
-
128
-
129
-
130
-
131
-
132
 |
 |
