Dell DR4000 Administrator Guide - Page 49
Configuring Email Alert Settings, Adding a Recipient Email Address
 |
View all Dell DR4000 manuals
Add to My Manuals
Save this manual to your list of manuals |
Page 49 highlights
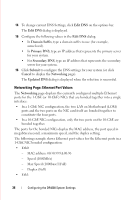
FILE LOCATION: C:\Users\bruce_wylie\Desktop\Dell Docs\~Sidewinder_Docs_DR4000\FRAME_Conversion_DR4000_AdminGuide\~DR4000_AG_F NOTE: If you have not configured Active Directory settings, an informational dialog is displayed in the Active Directory page. 2 Click Join on the options bar. The Active Directory Configuration dialog is displayed. 3 Type the following values in the Active Directory Configuration dialog: • In Domain Name, type a fully qualified domain name (FQDN) for the Active Directory Service (for example, AD12.acme.com). • In Username, type a valid user name that meets user name guidelines for the Active Directory Service. • In Password, type a valid password that meets password guidelines for the Active Directory Service. 4 Click Join Domain to configure your system with these ADS settings (or click Cancel to display the Active Directory page). The Successfully Configured dialog is displayed when successful. NOTE: If you have configured a CIFS container share path, this will be displayed in a CIFS Container Share Path pane in the Active Directory page. Configuring Email Alert Settings You can create and manage email addresses for recipients in which you want to send DR4000 system email alerts. The Email Alerts page lets you add new, or edit or delete existing recipient email addresses using the corresponding options, and send a test message to the recipient email addresses displayed in the Recipient Email Address pane. NOTE: The Email Alerts page also contains panes that display the Administrator Contact Information and Relay Host information. The Email Alerts options bar contains the options you need to manage the Administrator Contact Information and Relay Host settings. Adding a Recipient Email Address To configure a new recipient email address: 1 Select System Configuration Email Alerts. The Email Alerts page is displayed. 2 Click Add on the options bar. DELL CONFIDENTIAL - PRELIMINARY 1/10/12 - FOR PROOF ONLY Configuring the DR4000 System Settings 41
-
 1
1 -
2
-
3
-
4
-
5
-
6
-
7
-
8
-
9
-
10
-
11
-
12
-
13
-
14
-
15
-
16
-
17
-
18
-
19
-
20
-
21
-
22
-
23
-
24
-
25
-
26
-
27
-
28
-
29
-
30
-
31
-
32
-
33
-
34
-
35
-
36
-
37
-
38
-
39
-
40
-
41
-
42
-
43
-
 44
44 -
 45
45 -
 46
46 -
 47
47 -
 48
48 -
 49
49 -
 50
50 -
 51
51 -
 52
52 -
 53
53 -
 54
54 -
55
-
56
-
57
-
58
-
59
-
60
-
61
-
62
-
63
-
64
-
65
-
66
-
67
-
68
-
69
-
70
-
71
-
72
-
73
-
74
-
75
-
76
-
77
-
78
-
79
-
80
-
81
-
82
-
83
-
84
-
85
-
86
-
87
-
88
-
89
-
90
-
91
-
92
-
93
-
94
-
95
-
96
-
97
-
98
-
99
-
100
-
101
-
102
-
103
-
104
-
105
-
106
-
107
-
108
-
109
-
110
-
111
-
112
-
113
-
114
-
115
-
116
-
117
-
118
-
119
-
120
-
121
-
122
-
123
-
124
-
125
-
126
-
127
-
128
-
129
-
130
-
131
-
132
 |
 |
