Dell DR4000 Administrator Guide - Page 25
for no, for yes, If you responded - appliance
 |
View all Dell DR4000 manuals
Add to My Manuals
Save this manual to your list of manuals |
Page 25 highlights
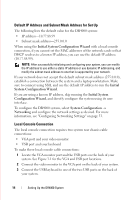
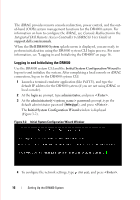
FILE LOCATION: C:\Users\bruce_wylie\Desktop\Dell Docs\~Sidewinder_Docs_DR4000\FRAME_Conversion_DR4000_AdminGuide\~DR4000_AG_F 5 To configure the system to use the default IP address that ships with the system, choose to use static IP addressing. To do this, at the DHCP prompt, type no (this selects static IP addressing), and press . NOTE: When you select static IP addressing, you are prompted to type the static IP address (for example, you could use the default IP, 10.77.88.99) for the system, and press . If your network supports the use of DHCP, type yes at the DHCP prompt, press , and respond to any prompts. 6 To configure a subnet mask address, type the subnet mask address you want to use (for example, you could use the default subnet mask address, 255.0.0.0), and press . 7 To configure a default gateway address, type the default gateway address you want to use (for example, 10.10.20.10), and press . 8 To configure a DNS Suffix, type the DNS suffix you want to use (for example, storage.local), and press . 9 To configure a primary DNS server IP address, type an IP address you want to use for the primary DNS server (for example, 10.10.10.10), and press . 10 (Optional) To configure a secondary DNS server IP address, type y (for yes), and press . If you responded yes, type an IP address you want to use for the secondary DNS server (for example, 10.10.10.11), and press . 11 To change the default host name (for example, the serial number of the DR4000 hardware appliance), type y (for yes) and press . If you responded yes, type the host name you want to use, and press . If you did not want to change the default host name, type n (for no) and press . After you configure your host name response, the current system settings are displayed. 12 To accept these settings, type y (for yes), and press . 13 If you want to change any of these settings, type n (for no), and press . Modify any settings as needed, and press . When completed, a successful initialization message is displayed. DELL CONFIDENTIAL - PRELIMINARY 1/10/12 - FOR PROOF ONLY Setting Up the DR4000 System 17
-
 1
1 -
2
-
3
-
4
-
5
-
6
-
7
-
8
-
9
-
10
-
11
-
12
-
13
-
14
-
15
-
16
-
17
-
18
-
19
-
 20
20 -
 21
21 -
 22
22 -
 23
23 -
 24
24 -
 25
25 -
 26
26 -
 27
27 -
 28
28 -
 29
29 -
 30
30 -
31
-
32
-
33
-
34
-
35
-
36
-
37
-
38
-
39
-
40
-
41
-
42
-
43
-
44
-
45
-
46
-
47
-
48
-
49
-
50
-
51
-
52
-
53
-
54
-
55
-
56
-
57
-
58
-
59
-
60
-
61
-
62
-
63
-
64
-
65
-
66
-
67
-
68
-
69
-
70
-
71
-
72
-
73
-
74
-
75
-
76
-
77
-
78
-
79
-
80
-
81
-
82
-
83
-
84
-
85
-
86
-
87
-
88
-
89
-
90
-
91
-
92
-
93
-
94
-
95
-
96
-
97
-
98
-
99
-
100
-
101
-
102
-
103
-
104
-
105
-
106
-
107
-
108
-
109
-
110
-
111
-
112
-
113
-
114
-
115
-
116
-
117
-
118
-
119
-
120
-
121
-
122
-
123
-
124
-
125
-
126
-
127
-
128
-
129
-
130
-
131
-
132
 |
 |
