Dell DR4000 Administrator Guide - Page 24
Logging in and Initializing the DR4000, Initial System Configuration Wizard - configuration guide
 |
View all Dell DR4000 manuals
Add to My Manuals
Save this manual to your list of manuals |
Page 24 highlights
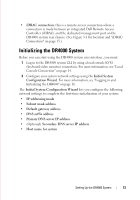
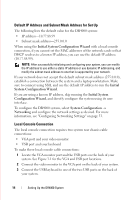
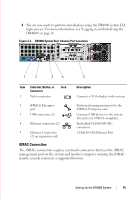
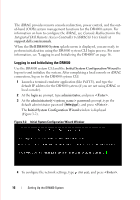
FILE LOCATION: C:\Users\bruce_wylie\Desktop\Dell Docs\~Sidewinder_Docs_DR4000\FRAME_Conversion_DR4000_AdminGuide\~DR4000_AG_F The iDRAC provides remote console redirection, power control, and the outof-band (OOB) system management functions for the DR4000 system. For information on how to configure the iDRAC, see Console Redirection in the Integrated Dell Remote Access Controller 6 (iDRAC6) User Guide at support.dell.com/manuals. When the Dell DR4000 System splash screen is displayed, you are ready to perform initialization using the DR4000 system CLI login process. For more information, see "Logging in and Initializing the DR4000" on page 16. Logging in and Initializing the DR4000 Use the DR4000 system CLI and the Initial System Configuration Wizard to log on to and initialize the system. After completing a local console or iDRAC connection, log on to the DR4000 system CLI: 1 Launch a terminal emulator application (like PuTTY), and type the default IP address for the DR4000 system (if you are not using iDRAC or local console). 2 At the login as: prompt, type administrator, and press . 3 At the administrator@ password: prompt, type the default administrator password (St0r@ge!), and press . The Initial System Configuration Wizard window is displayed (Figure 3-2). Figure 3-2. Initial System Configuration Wizard Window 4 To configure the network settings, type y (for yes), and press . DELL CONFIDENTIAL - PRELIMINARY 1/10/12 - FOR PROOF ONLY 16 Setting Up the DR4000 System
-
 1
1 -
2
-
3
-
4
-
5
-
6
-
7
-
8
-
9
-
10
-
11
-
12
-
13
-
14
-
15
-
16
-
17
-
18
-
 19
19 -
 20
20 -
 21
21 -
 22
22 -
 23
23 -
 24
24 -
 25
25 -
 26
26 -
 27
27 -
 28
28 -
 29
29 -
30
-
31
-
32
-
33
-
34
-
35
-
36
-
37
-
38
-
39
-
40
-
41
-
42
-
43
-
44
-
45
-
46
-
47
-
48
-
49
-
50
-
51
-
52
-
53
-
54
-
55
-
56
-
57
-
58
-
59
-
60
-
61
-
62
-
63
-
64
-
65
-
66
-
67
-
68
-
69
-
70
-
71
-
72
-
73
-
74
-
75
-
76
-
77
-
78
-
79
-
80
-
81
-
82
-
83
-
84
-
85
-
86
-
87
-
88
-
89
-
90
-
91
-
92
-
93
-
94
-
95
-
96
-
97
-
98
-
99
-
100
-
101
-
102
-
103
-
104
-
105
-
106
-
107
-
108
-
109
-
110
-
111
-
112
-
113
-
114
-
115
-
116
-
117
-
118
-
119
-
120
-
121
-
122
-
123
-
124
-
125
-
126
-
127
-
128
-
129
-
130
-
131
-
132
 |
 |
